Posted in Uncategorized

How many secrets does your cross stitch hold?

Hi Everyone

I hope you’re all well.

As I’m writing this post, it’s Mother’s Day in Australia and restrictions are starting to be lifted a bit more and we’re starting to get some more normality back to our lives! If all goes well, hopefully by the end of July/early August, life will be as close to normal pre-pandemic as possible.

As a result of staying home a lot more, I’ve been trying to catch up on a lot of the Flosstube clips people have been posting and it’s been really nice seeing what people are working on and how they’re going. When I was partly watching and listening to a Flosstube clip, the person at the time said something that I thought was quite interesting and quirky. They are not a fan fudging their stitching. If they make a mistake in their stitching, they’ll frog it (undo the stitches) and re-stitch the correct amount. Because to this person, they see fudging a project as a form of lying and being dishonest. To me, this is admirable. They have the patience and integrity to correct their mistakes.

The biggest ‘secret’ of them all

Nearly every project I’ve worked on and finished has at least one mistake in it and I haven’t been bothered to fix it for various reasons. The biggest mistake I’ve made on a project has been quite recently and I’m contemplating whether or not to do anything about it. Below is the project that I’ve made the biggest mistake and when I realised what my mistake was, I couldn’t help but laugh at myself and wonder why I hadn’t picked up on it sooner! Can you see the mistakes I’ve made?

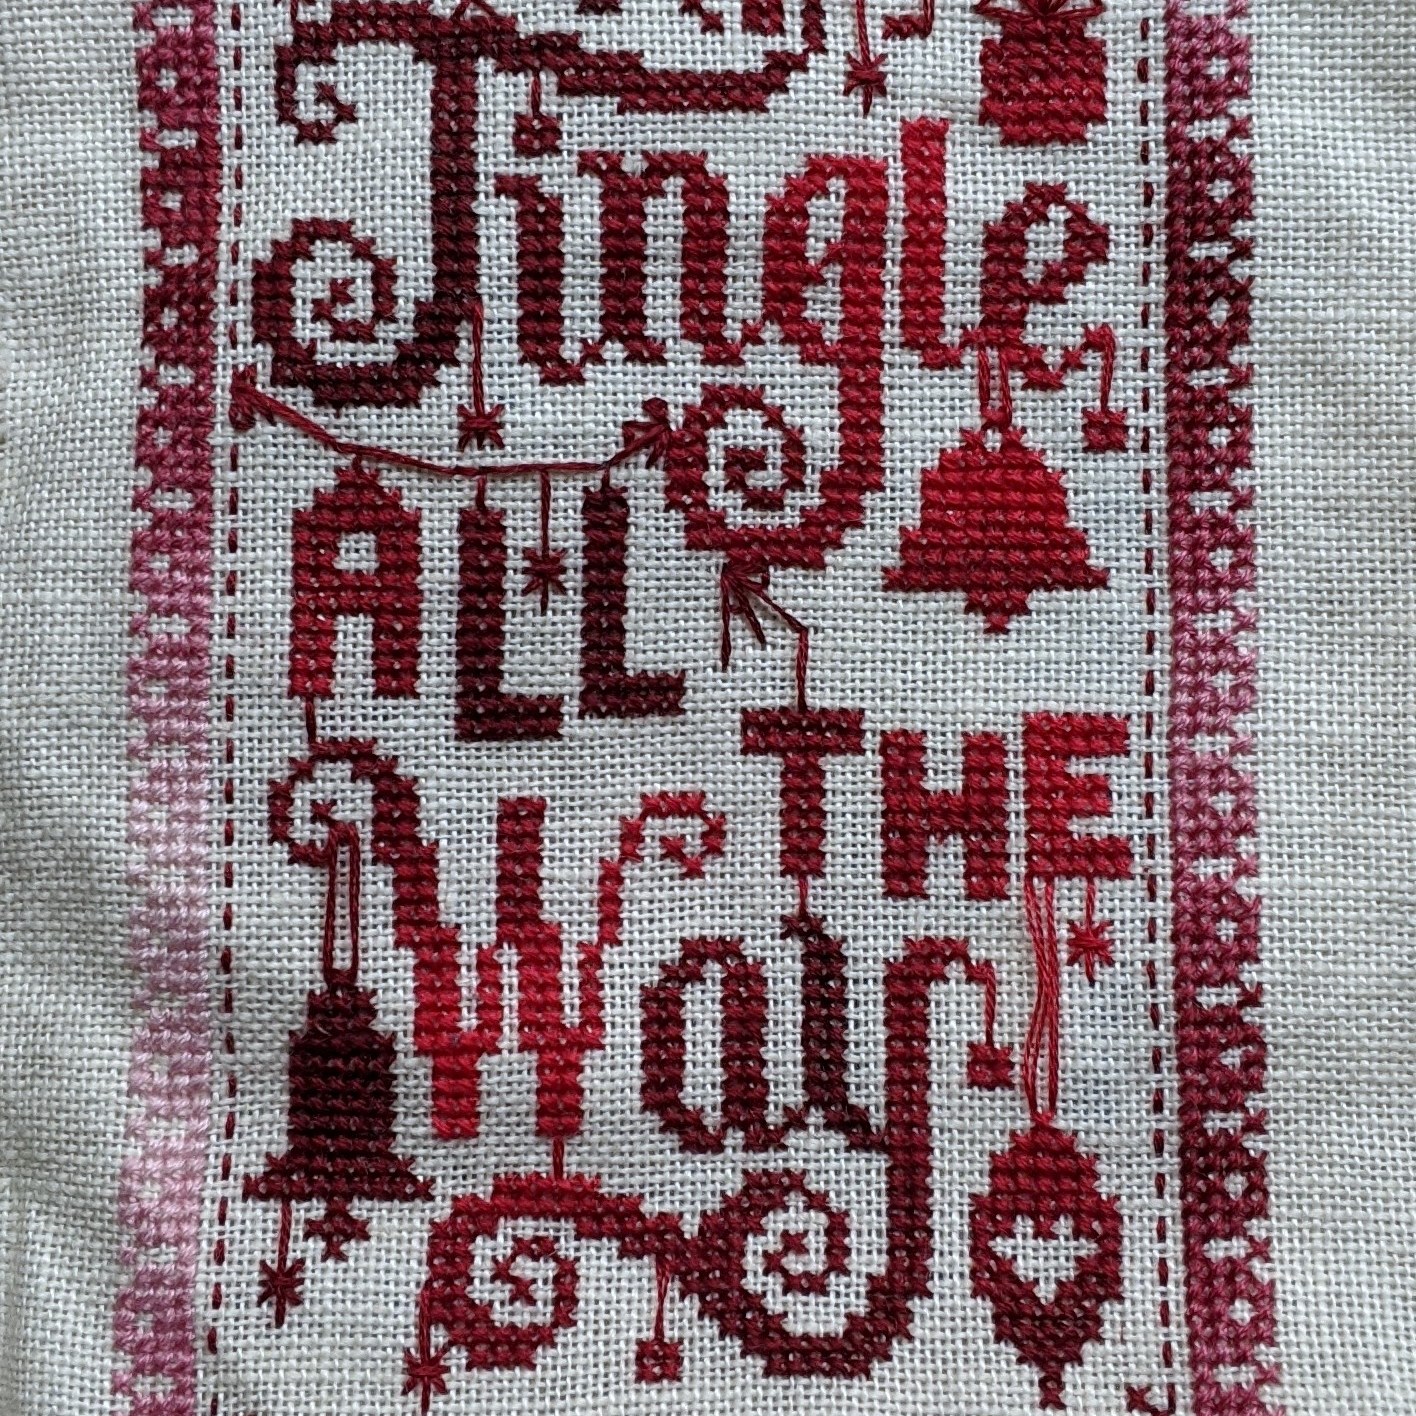
I can’t remember what the fabric count is. I used DMC’s varigated thread to stitch the project and the pattern was from …

The picture on the left is the finished project. The centre picture show mistake 1 and 2. The picture on the right shows mistake 3. When I was stitching this project – specifically the border, I made the novice mistake of rotated or turned the project based upon which side of the border I’m working on. So the picture on the right will show you that the direction of my stitches on the border is a different direction to the stitches in the centre of the project. You may also notice that the direction of my stitches at the top of the project (the centre picture) is different again and the width of the border is one row less than the other 3 sides. That’s because of my first mistake. When I started stitching the centre of the project, I had started it a row lower than I should have, which has thrown out the balance of how many rows I needed to stitch for the top of the border. If the rest of my stitches had been okay and the direction they should I have been, I could have added an extra row and some extra stitches to balance the border out.

How many secrets can a project hold?

If we don’t tell each other what our mistakes are and have a comparison picture of what it should be, does that make it a secret? Alternatively, if we show each other what we’ve done and show each other what it should look like, does it then become a ‘Where’s Wally?’ / find the mistake puzzle?

With my first HAED – ‘Moon Lit Waters’ that I’m working on, it will hold the largest amount of secrets and I’m totally okay with it! For anyone who’s been following my progress with this project, will know that it’s been a very slow work in progress! Over the last couple of years or so, I’ve been able to complete three pages and I’m starting on my fourth. The pictures below show my current progress, what it will look like at the end and the comparison shot of the cover sheet as a comparison of where I’m at:

Just before Stitch Maynia started, I downloaded the Moon Lit Waters pattern onto the Pattern Keeper app. I needed to purchase the PDF pattern to easily and honestly onto the app, as I’ve been working on the paper copy for too long and the edges are too awkward to send through the scanner.

One thing I had not anticipated or expected with this PDF is the updates and changes that the team at HAED and the associated artists have made to the pattern. I love that they have incorporated the new colours that DMC have released and I’m looking forward to incorporating those colours into the project when I get to it. What had me cursing and swearing as I was trying to figure out where I’m at on the pattern and marking off what I’ve completed. The symbols on the paper pattern have changed a little in comparison to the digital pattern and it means that I’m going to be doing a lot more fudging to make it all work!

When I’m done with the project, it will be for my sister and because of the nature of HAED’s, the odd colour being mis-stitched to me is not a big deal. I know that there are a lot of mistakes and fudging happening with the project and I’m okay with that. I’m going to continue using Pattern Keeper with this project because of the confetti in it and there being well over 100 different colours for it!

Now that I’ve rambled a bit about Moon Lit Waters and some of my challenges with it, have you found some of the secrets my stitching holds?

If you’re able to see any of the secrets, I am in awe of your eye sight! I know for certain where some of the secrets are, but my memory has faded a bit with what the exact secrets are. I’d like to think that I’ve blended them in well enough with the rest of the project, that it hasn’t thrown the intended design off at all.

What secrets do your projects hold?

As a stitcher, would you go back and fix it all up or would you leave it? Also, how honest are you with your stitching? At what point do draw the line and allow the mistake to remain in your project and you try to work around it?

Related reads:

Posted in Uncategorized

Stitching to the Plan verses Making Alterations. What do you do?

One of the many things that I love about cross stitch, is that it enables me to be creative in so many ways. This ranges from adjusting the colours in a pattern through to fudging parts of the pattern when I’ve made some minor mistakes. Then there’s the swapping out of French Knots for beads because I’m avoiding doing the French Knots when all I really should do is practice them!

Changing colours

In earlier blog posts when I’ve talked about my WIP (work in progress) I’ve nicknamed Jingle Bells (because I keep forgetting the official name which is Christmas Toys, designed by Irina Zagorodskaya), I’ve swapped out a couple of colours for two reasons – 1. because I thought that the silver thread highlights would add a different dimension or flare to the picture and 2. I didn’t have the shade of blue that the pattern required, so I went through my stash and found another one that seems to work just as well!

Blue Swap and Metallic Highlights

Sometimes when my friend and I talk about swapping colours around in cross stitch patterns, she says that the idea of it freaks her out. She’s worried about getting it wrong and that she would rather stick to what is on the chart and go out and buy any threads that she’s missing. All of that is totally fine and plausible. I worry about getting the colours wrong sometimes as well – especially if I don’t have the colour at all and I have no idea what it should look like. Saying that, I should just look it up on the Net and all would be well!

Things to remember if you’re going to change colours

  • Keep within the same brand of thread you’re using. Over the years I have found that whilst other brands have tried their best to provide us with a conversion chart from their brand to DMC, the colours don’t always match up the way that I at least would like. Which means that if I’m stitching a pattern using DMC threads, I’m going to stick with that brand, regardless of what colours I use. This ensures consistency with the feel of the cotton and vibrancy of the colours. Additionally, if I run out of a DMC colour, I’m going to make sure I purchase the same colour from DMC and not interchange it with a similar shade from a different brand.
  • Sometimes the brands get it wrong. When I was stitching the Fire and Ice horse (pictured below), I was using DMC threads and I ran out of a particular colour. Also, it had been a while since I’d picked up the project to stitch, so when I got around to stitching it again and purchasing the colour I needed, DMC had slightly altered the shade as part of the dying process. Which meant that the colour I had purchased was slightly lighter than what I had previously stitched with, even though it was the same number! This completely threw out the appearance of the picture and by luck, a vendor at the Canberra Quilt and Craft Fair was able to supply me with the colour I needed, because she had a few skeins left over.
Fire and Ice – Designed by Dyan Allaire – produced by Kustom Krafts
  • Limit the amount of changes you’re going to make and use a colour chart. Peacock and Fig wrote a fantastic article on changing colours in a pattern and they strongly recommended limiting the number of colours that are changed. To aid the changes made, they also recommended the use of a colour chart. Especially if you’re not quite sure on how to go about it or what colours would work well in place of the charted colour.
  • Note down what colours you have changed. The point is particularly important so that you don’t get confused and waste a lot of your time, energy and thread.

Fudging a pattern

In a recent blog post titled ‘The Top 5 Cross Stitch Things I’m Yet to Perfect (and 5 I probably won’t!)’, I talked about my need to go back to school and learn how to count. I’ve never really kept count of the amount of times I’ve “stitched myself up” and needed to undo parts of a project because I’ve been completely out with my counting. Regardless of whether I’ve stitched too many or not enough, I try to find a way to fudge it in a way that means it won’t be too obvious what I’ve done and doesn’t throw the rest of the project out of balance.

For example, the most recent fudging I’ve had to do is stitch an “extra” four lines for the Four Season Kittens project because I hadn’t stitched enough. Unfortunately this is a significant muck up and I’ve already stitched a significant amount of the Winter quarter. So in my mind, this is too much for me to go back and figure out where I’ve gone wrong and frog it (another ‘formal’ term meaning to rip it all out, or ribbit like the sound a frog makes!). Now, if I don’t show people what the final picture looks like, it shouldn’t be too obvious. However, if you take a look at the pictures below, you’ll see what I mean…

Swapping types of stitches and embellishments

In a recent blog post titled ‘The Top 5 Cross Stitch Things I’m Yet to Perfect (and 5 I probably won’t!)’, I talked about my ability to do French Knots. In many projects that have called for French Knots, I’ve used the small Mill Hill beads for the eyes of teddy bears, embellishments on flowers and buttons on outfits to name a few.

Meanwhile, I’ve also been known to adjust the way that I do my back-stitch on pictures like the teddy bear one shown above. In some parts of the picture, you’ll see that I’ve stitched around most sides of the cross and when there has been more of a straight line longer than one cross, I’ve gone from point A to D without stitching point B and C. For short distances, I think that this has worked well as it has not diminished the finished piece in any way and it’s saved me a little bit of time.

There’s no right or wrong…be aware of your intentions

The aim of this post has been to let you know that it’s okay to make alterations here and there and that mistakes are okay as well. You will need to remember why you bought the pattern or kit and what you intend to do with the completed project. The point here is that making an alteration to a project – intentional or not – does not then mean you can claim it to be your own design – especially if you’re going to broadcast it to the world and attempt to make money out of it. If you are wanting to broadcast to the world the alterations you have made to any designs you’ve purchased, make sure you do it legally.

What do you do? Do you stick to the pattern or make your own adjustments?

If you have made any adjustments to your projects, what have they been? Did they work out the way you wanted them too?

In the meantime, happy stitching everyone!

Posted in Uncategorized

Cross Stitch – Perfection vs Close Enough is Good Enough. Does it really matter?

In life and death situations, perfectionism all the way. Unless you’re going Bear Grylls style out in the wild and have limited supplies. Also, we expect near perfectionism when we’re paying professionals for their advice or to do a job for us that we can’t do for ourselves.

What about our private lives? When we’re playing video games, being healthy and active, cooking for our loved ones, crafting and interacting with our family and friends are we wanting things to be perfect?

The Need for Perfection

For some stitcher’s, there is the desire to have stitches as flat and neat as possible and no visibly stray threads – to the point where the stitches are re-stitched until they are exactly the way they want them done.

Clip by Isolath Creations – published on YouTube on 14 February 2016

Then there’s the need for the tension to be right whilst stitching and then having the tension right when the project is being framed – if it gets framed! There are so many different options for finishing a project that the pressure to find the right finishing option for the right project and person can be overwhelming.

When near enough is good enough

Quote by Moumita Ray on 8 August 2018. Image obtained from website http://www.yourquote.in on 4 May 2019

With cross stitch, it is important for the crosses to be uniform and being stitched in the same direction. Once we’ve mastered the basics, for many of us – including myself – use the close enough is good enough approach. For example, I’m stitching a Heaven and Earth Design that has a lot of confetti in it. On the first page I had done some serious muck ups where I had lost track of where I’m stitching on the fabric in comparison to the pattern. Mostly because I had crossed off parts that I hadn’t stitched yet and I thought I would get back to that section to update it, but never did. Which left me with the following choices:

  1. I could use an eraser to rub out where I’d accidentally marked off and stitch the section then and there;
  2. Leave it as is and stitch the area I had accidentally marked off on the pattern; or
  3. Leave it as is and stitch the area using similar colours to what would be used in that area.

I chose to use some creative licence and I left the areas on the pattern marked off and used colours that have been used throughout the page. I also used my own judgement for the amount of stitches for each colour that I thought was appropriate for the area I was working on and for the pattern broadly speaking. Thankfully, the area I was stitching wasn’t too close to the edge of the page so it wouldn’t have an adverse affect on the adjoining pages!

Another example is when I’ve accidentally stitched one too many stitches on a line or two for a long line – e.g. 50 crosses. Rather than unpicking all of it to fix the error, I’ve adjusted the other stitches around the mistake to bring the picture back into alignment.

Creative Licence and Cross Stitch

There have also been times when I have used some creative licence to change or update a pattern because of preference for certain colours and fabric types. Spruce Crafts for example, discuss this very topic and provide guidance on changing fabric counts to suit patterns you want to stitch. I’ve also talked about changing a couple of colours in the pattern I call Jingle Bells, because I didn’t have the colour the pattern called for and I’ve used a metallic thread to give the picture some texture and make it unique.

Image obtained from Shimbo Pottery site on 4 May 2019 –
http://shimbopottery.com/art-and-copyright-law/

One thing I need to make very clear, is the importance of respecting copyright where it’s due. I’m not a lawyer. I understand what I need to and aim here is not to provide any legal advice, but to advocate for the continual respect for copyright and how it affects the artists and those around them. At the end of this post, I have included some links to some creative commons sites and copyright sites for anyone who would like to know more.

The awesome thing I have noticed about the cross-stitch/embroidery community is that the majority of us understand this and respect it. I’ve noticed this with the way people talk about the patterns they are working on via Flosstube. They willingly share the details of who the artist/creator/designer is and where they got the pattern/kit from and encourage the rest of the community to shop local where possible – especially the small local shops that aren’t part of the large chains.

Mistakes happen

For many of us, it can be hard to accept that mistakes happen and to bounce back from them. As a stitcher, mistakes tend to range from miscounting, causing lines to be out of balance by one or more stitches through to stitching sections in the wrong colour. All the while we curse and grumble about lost time, wasted floss, that we need to get our eyes checked and learn how to count again while we’re frogging a section we’ve just stitched.

Milsey’s clip on Frogging a cross stitch project – Posted on 30 January 2018

Embracing the middle ground and flaws in our stitching

It’s clear in this post that I’m advocating the acceptance of near enough is good enough whilst taking pride in our projects and how they look when finished. What I want to know now is what you think. Are you a perfectionist when it comes to your stitching? Alternatively, is near enough good enough for you?
What lengths have you gone to, to ensure your project looks the way that you want it?

Related topics and links: