By the time you’re reading this post we will be nearing the end of June and my boyfriend and I have had a weekend at the coast. It’s been a topsy-turvy few weeks for us – especially my boyfriend. In the space of two weeks, he was told that his contract was finishing at the end of June because funding had been cut. He was then told a week after the first phone call, that the project was too important and that funding had been re-instated for the project, as well as his contract! Whilst all of that was happening, his new car arrived and he was having all kinds of fun getting it registered in Canberra (it had been trucked up from Melbourne, Victoria – roughly 6 to 8 hours drive away).
Whilst the drama was happening for my boyfriend, I got to head down to the coast a couple of weekends ago on my own and catch up with my parents which was good. It had been about 10 years since I’d travelled to the coast on my own! I use to do the trip regularly on my own as a way of recharging my batteries and hibernating from the world. As much as I missed my boyfriend, it was good for him to have the thinking space he needed. Because he was able to decide what he wanted to do with the job loss (before we found out he’d been offered the job back) and make some really positive decisions.
Meanwhile, as I’m writing this post, the clouds are starting to come over and the rain we’ve been anticipating should be starting to make it’s self known. Which means that I should be getting some more stitching in. My friend and I have started up our stitch ‘n’ bitch sessions again as restrictions are being lifted even more in Canberra and surrounds. Our aim is to alternate between each other’s places on most Saturdays, with the flexibility of postponing it if we have appointments, are needing to/wanting to travel etc. It was a really good start to the weekend, because the hilarity leading up to our catch-ups, we had been living about half an hour away from each other, but were Skyping because of the social and travel restrictions 🙂
Stitching progress
Since my last post about Jolly June and Stitchmas in July, I’ve been working on:
Gundaroo Mini Mushroom
Fight Like a Girl
Autumn Castle
Candy Express
Santa’s Coming
Zebras
Gundaroo Mini Mushroom designed by Kristen Gawronski
I know this has nothing to do with a Christmas theme. It is something that makes me happy as I continue to make progress with it. One of the things I found after working on it for so long, is that the pattern has the same symbol for two different colours! How on earth did I manage to miss that?! I’ve decided to go with the greener tone and it should blend in well.
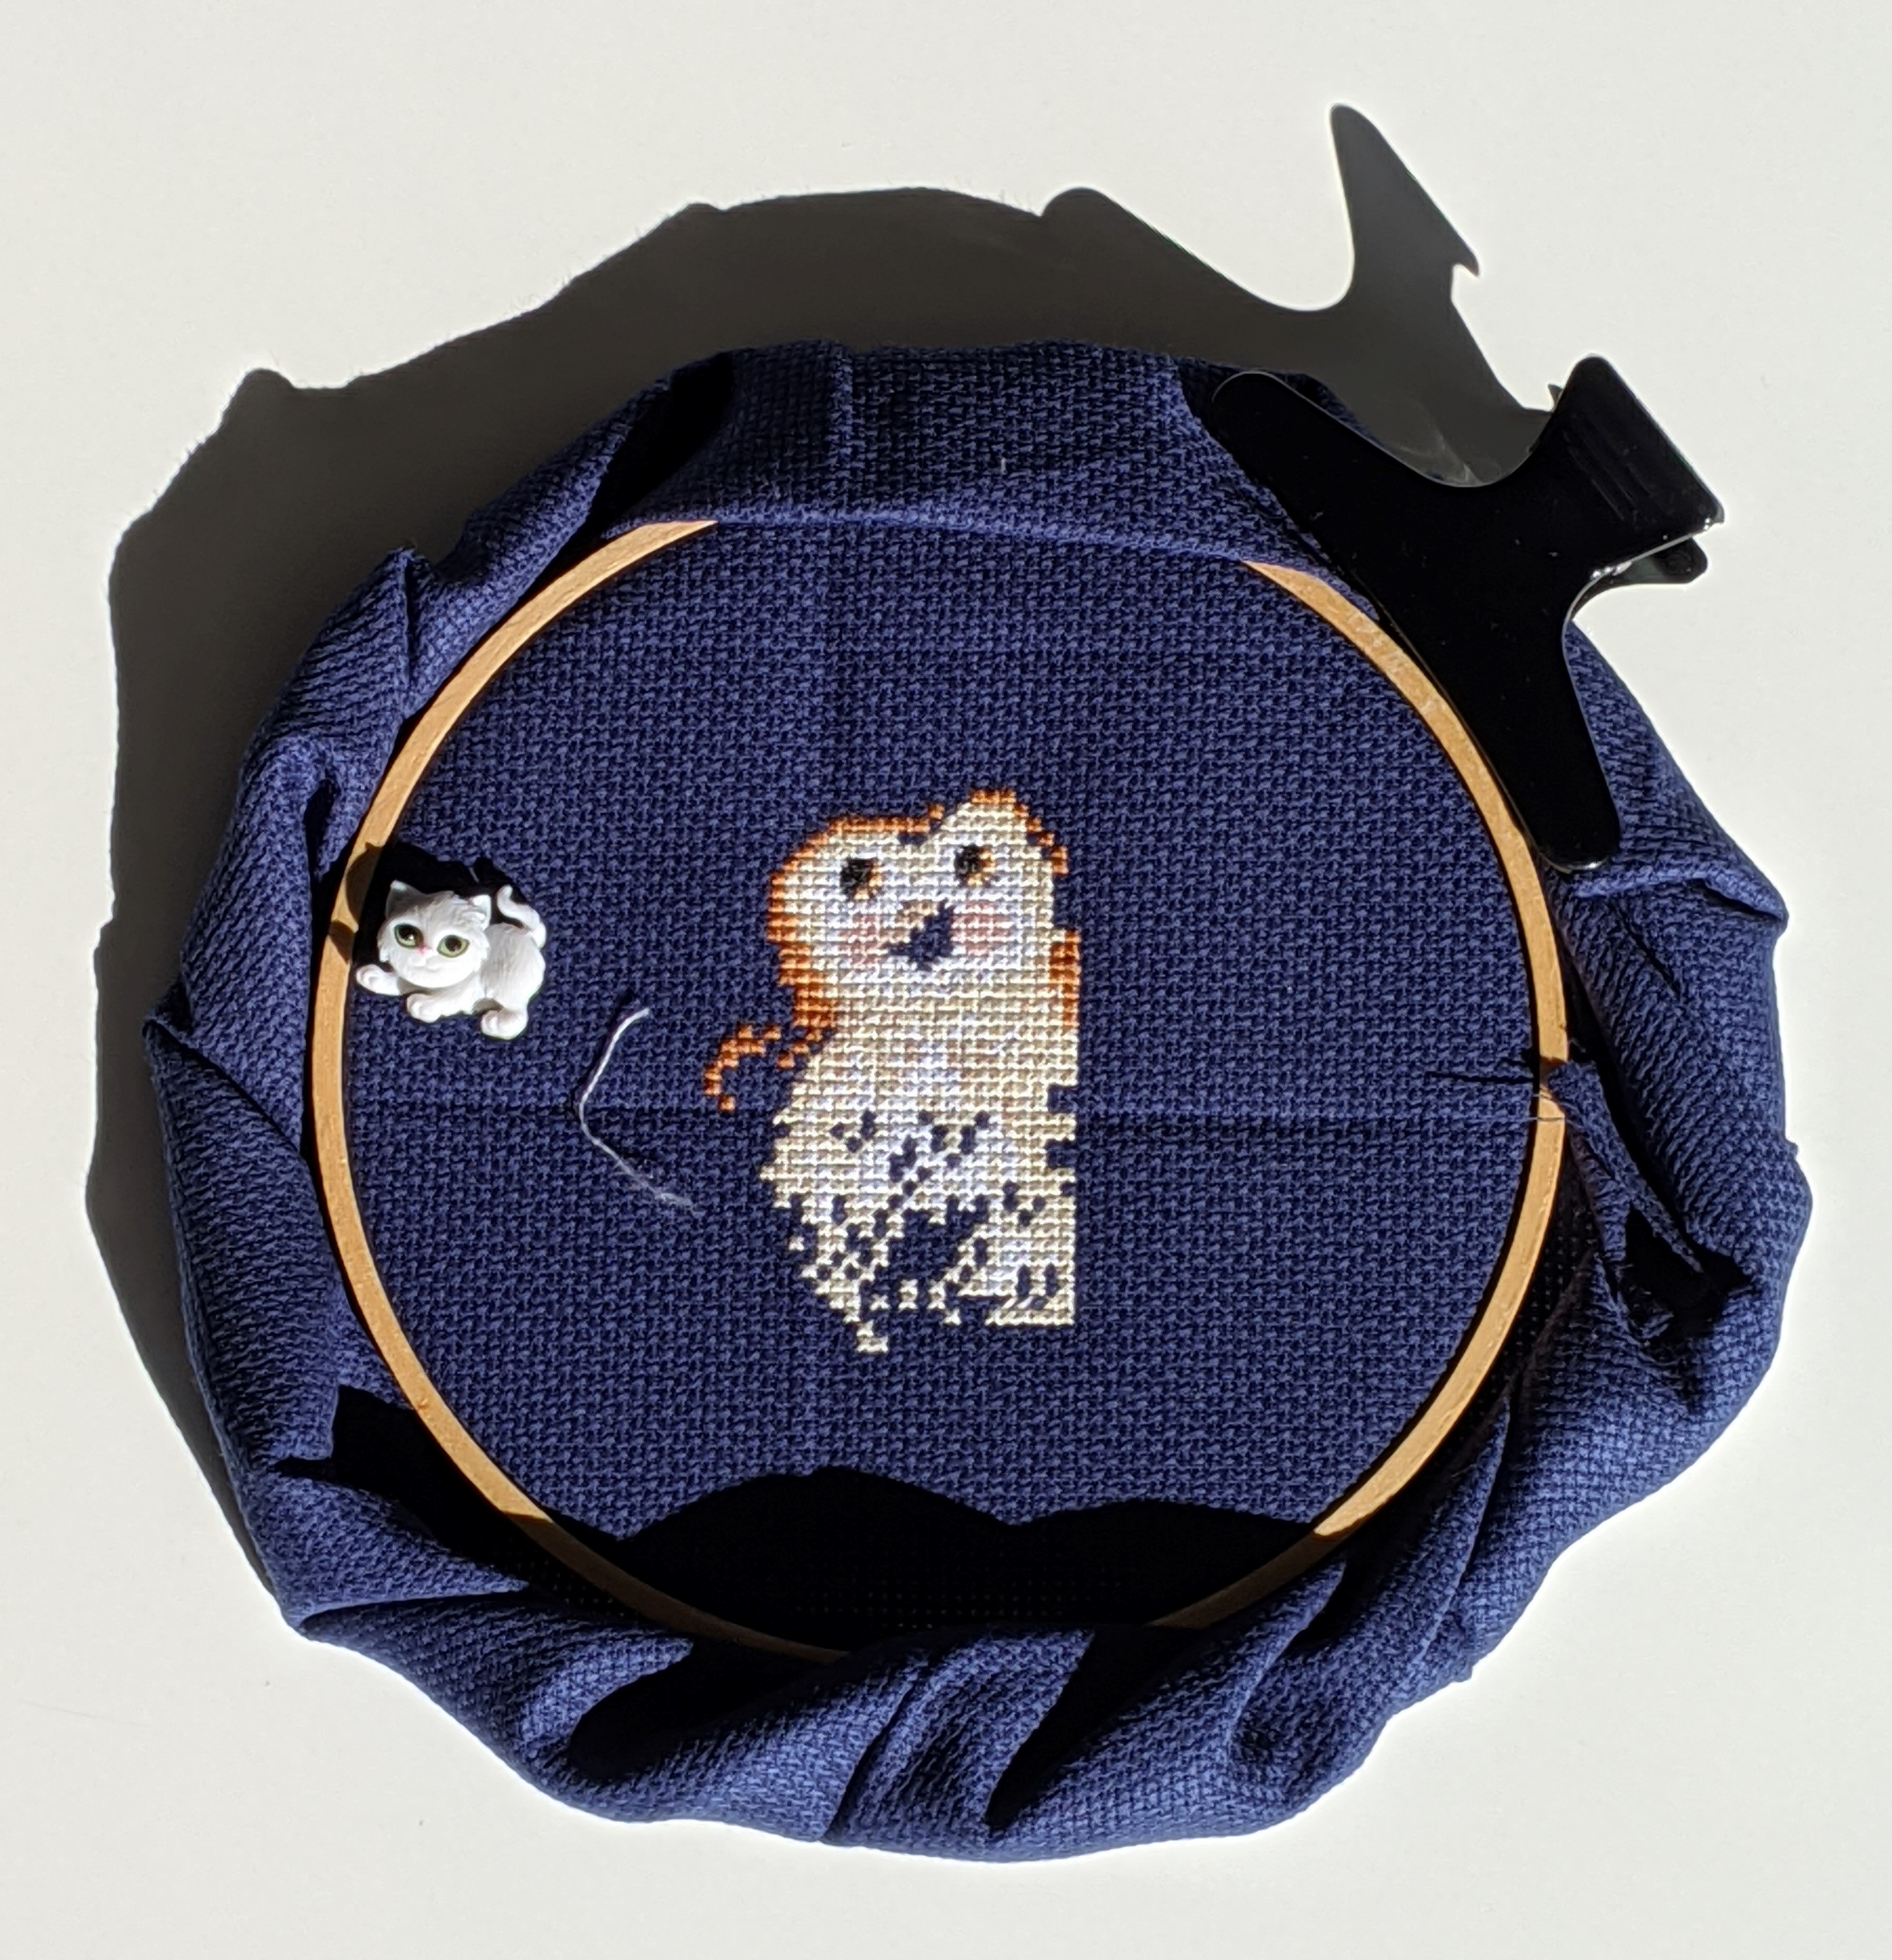
Fight Like a Girl designed by Tanya Amity
Again, not a Christmas theme project and one that’s not bringing me much joy once I start stitching it. Some of the things that will help (I hope) is to put the project in a larger hoop. I’ve got so much fabric to deal with because of the size of the project, that if I have it in a larger hoop, I can roll the excess around it until I need to move the hoop. Similar to what people do with Q-snaps and scroll frames.
My other issue with the project is being tired when I’m stitching it. It’s on 18 count navy blue fabric and I’ve adjusted my light so that it’s shining from underneath rather than overhead. It’s helping a bit. But more sleep is definitely needed for when I work on it so that I don’t make as many mistakes when I’m working on it and mis-counting my stitches.
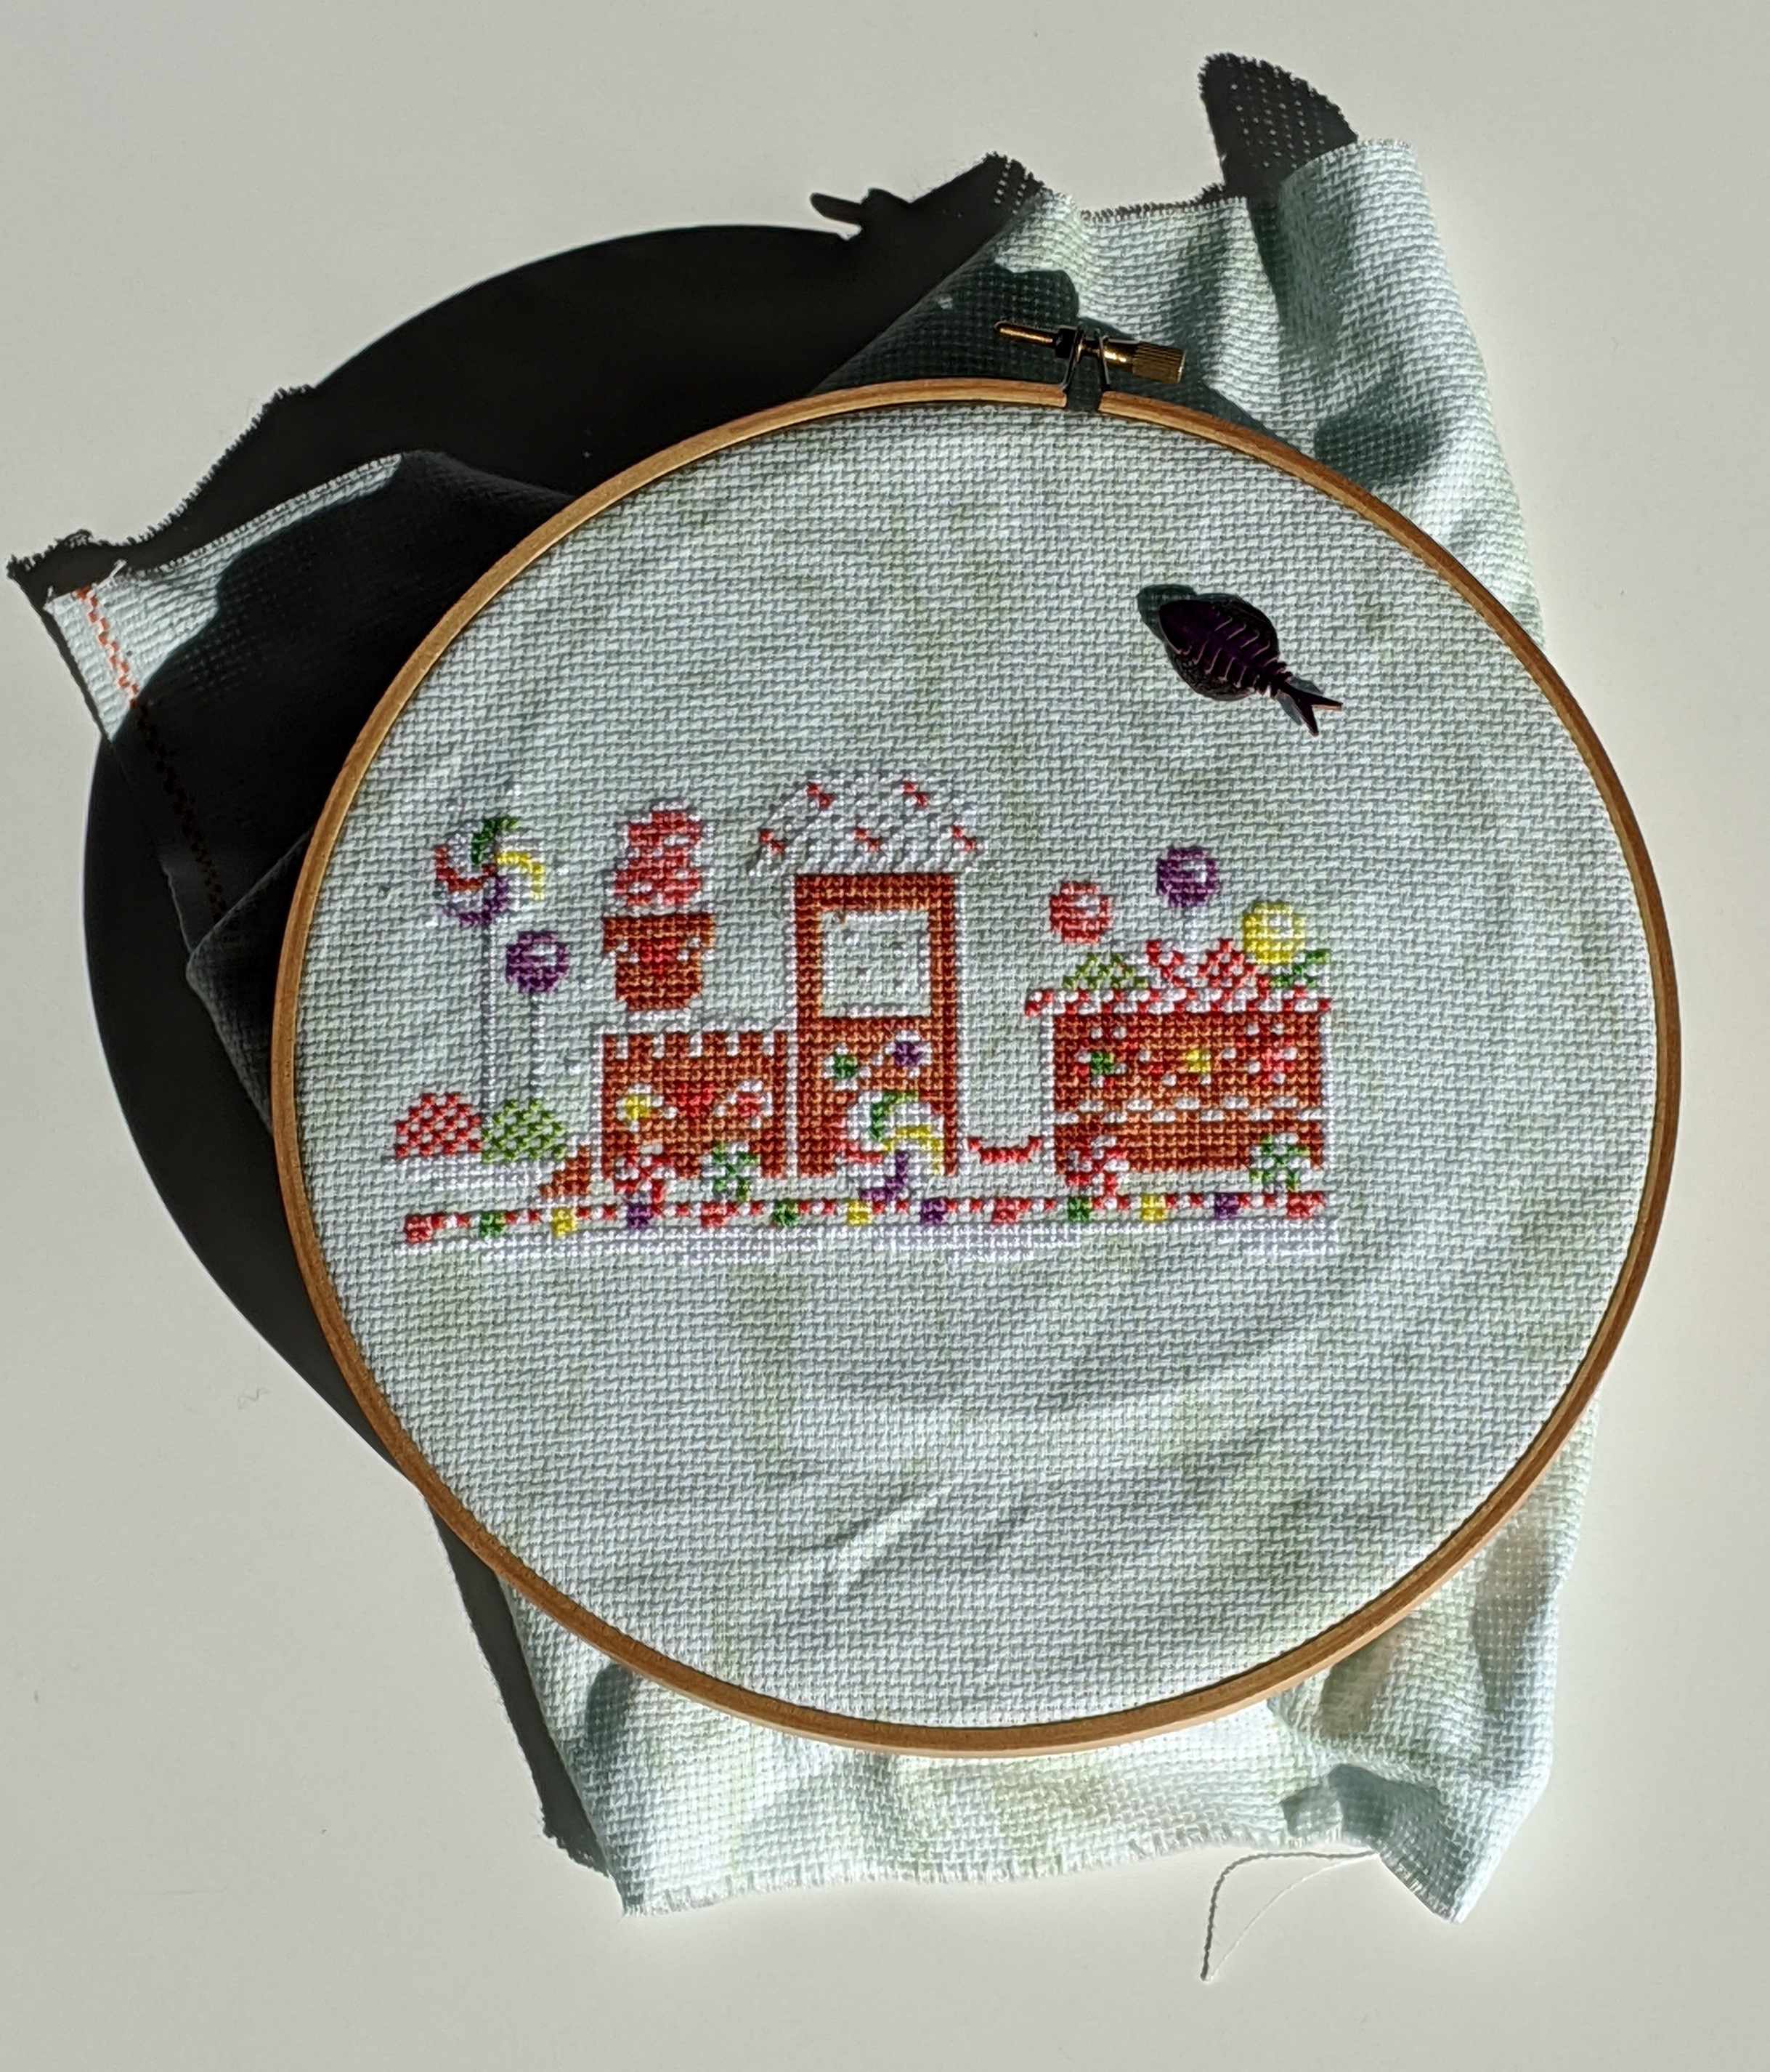
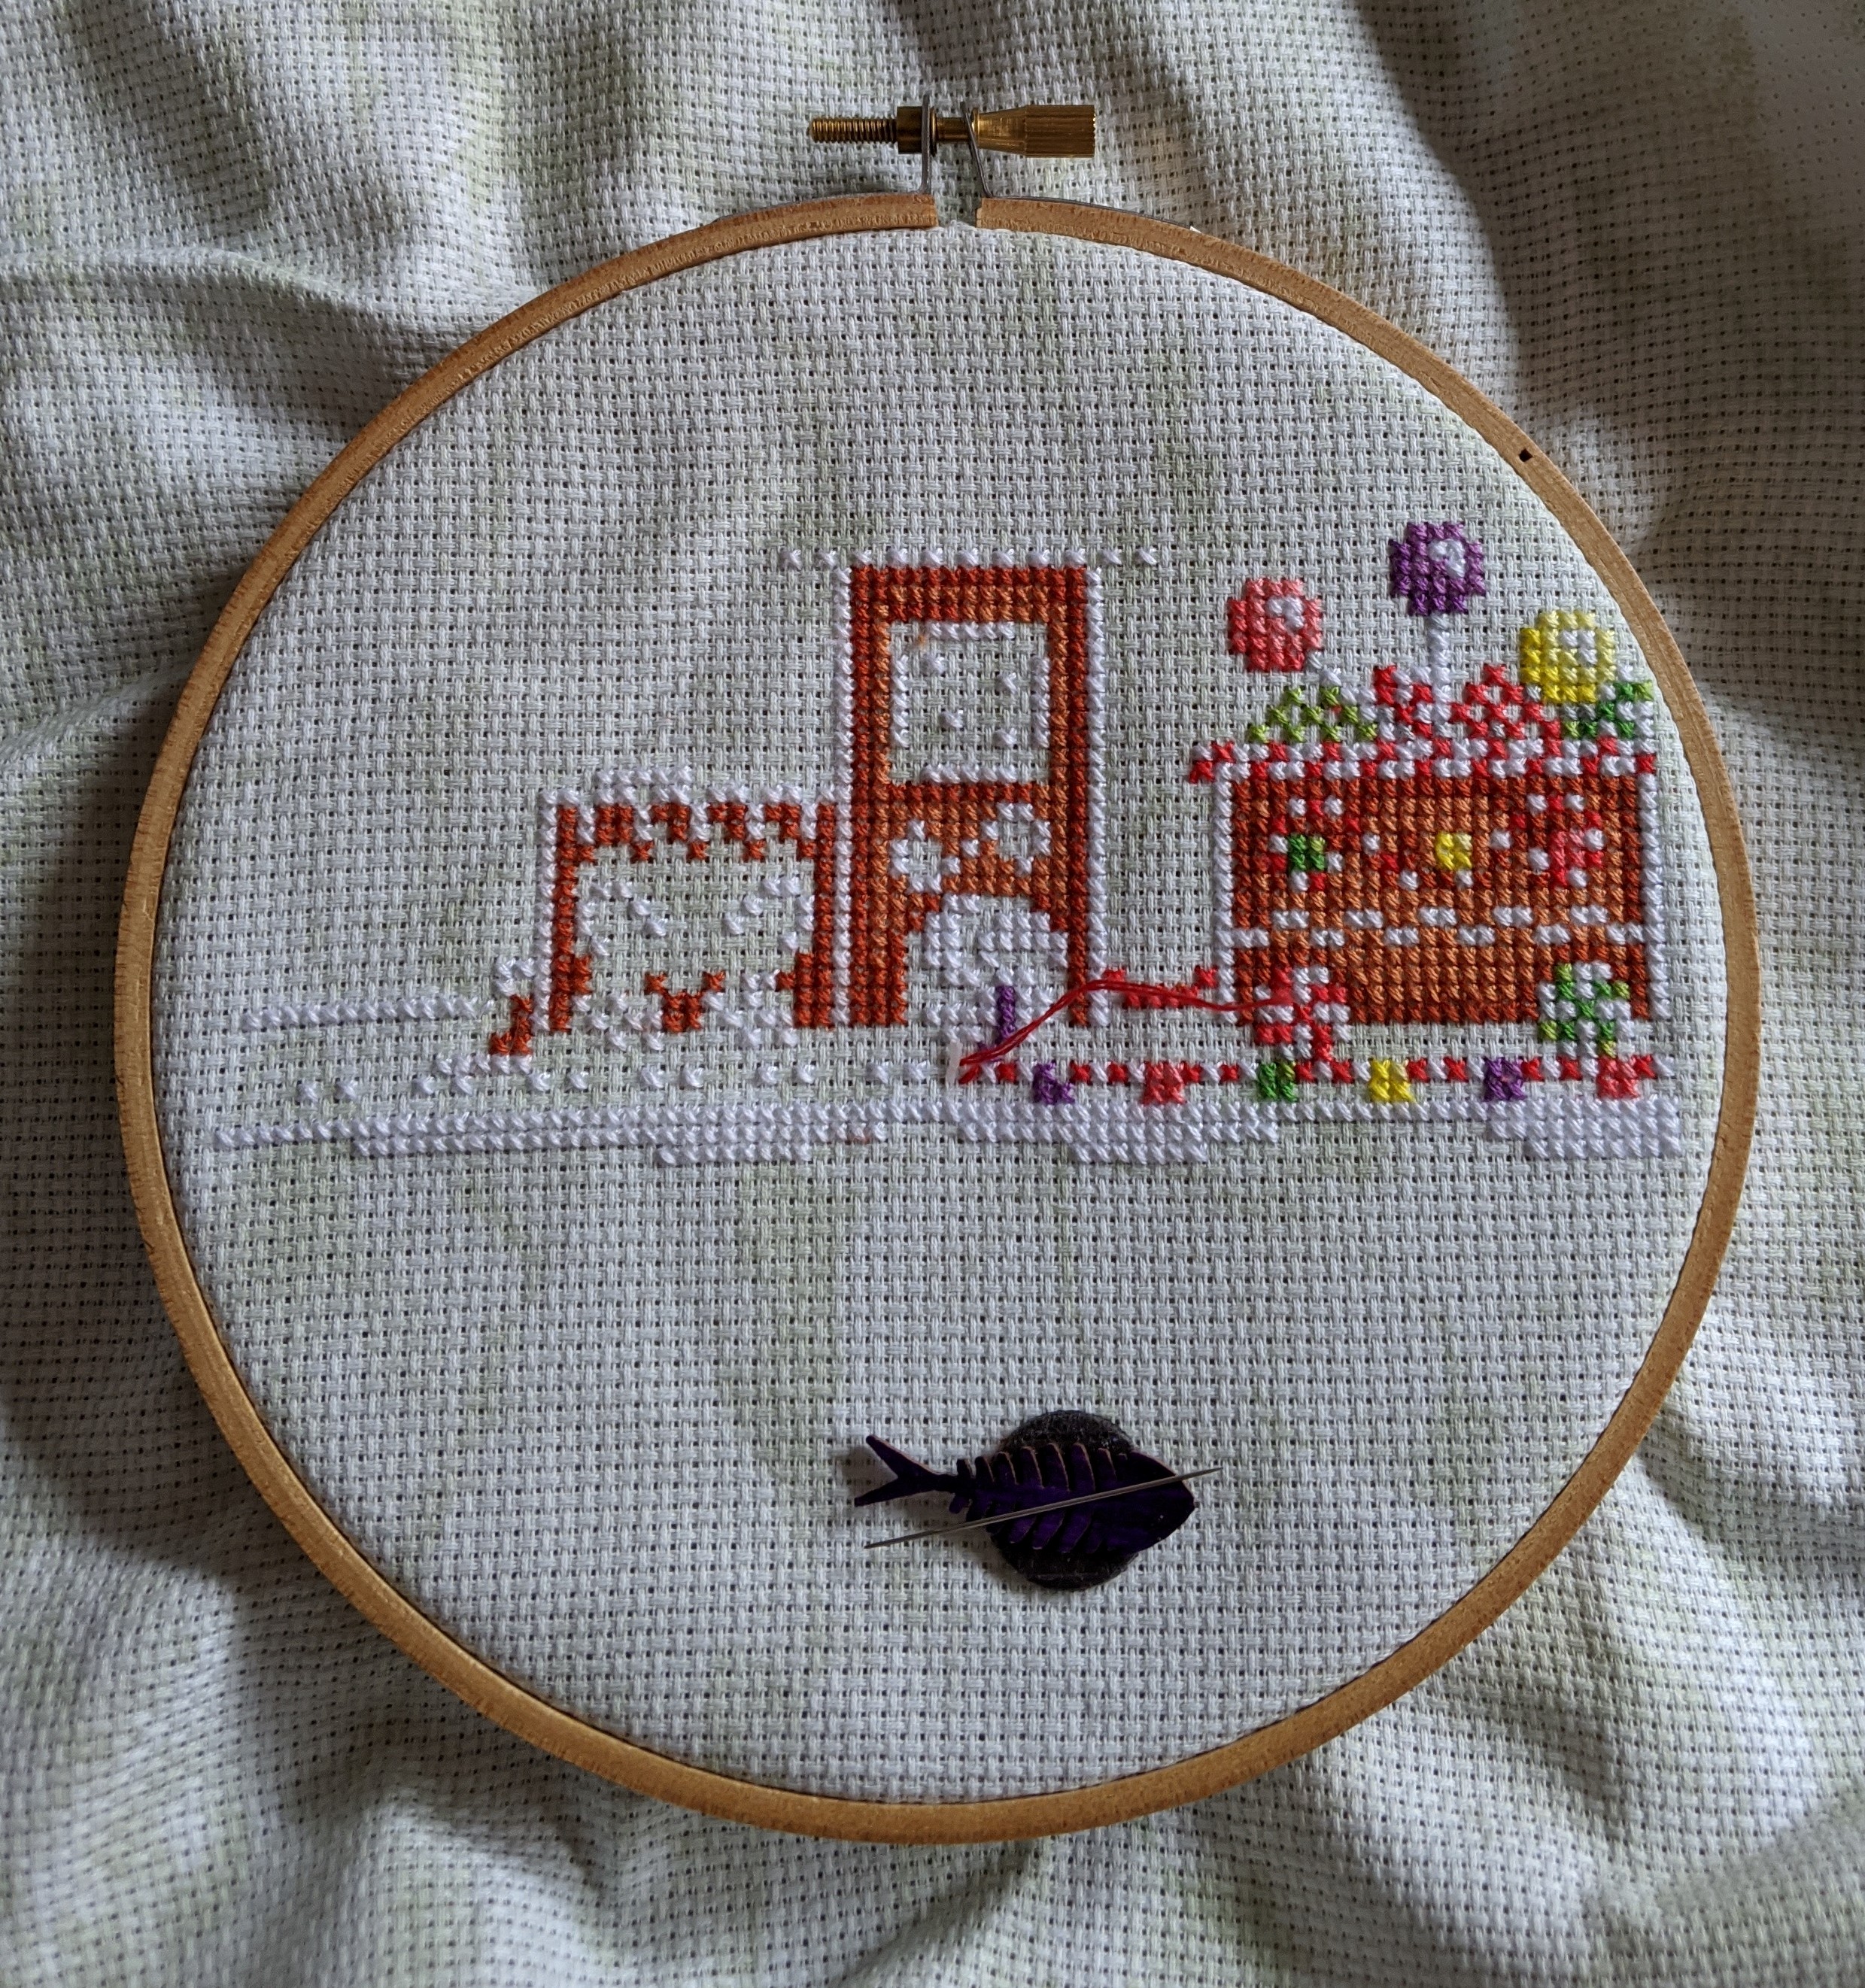
Candy Express designed by Shannon Wasilieff
I’m looking forward to eating some gingerbread when the season kicks in again. I’ve been having fun stitching it and I’m looking forward to finishing it as well! The two main things I’m dreading with this project is the back stitch and beads…As long as I keep reminding myself that it’s worth it at the end, it’ll be okay.
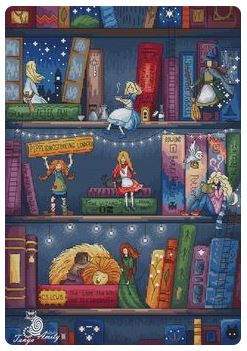
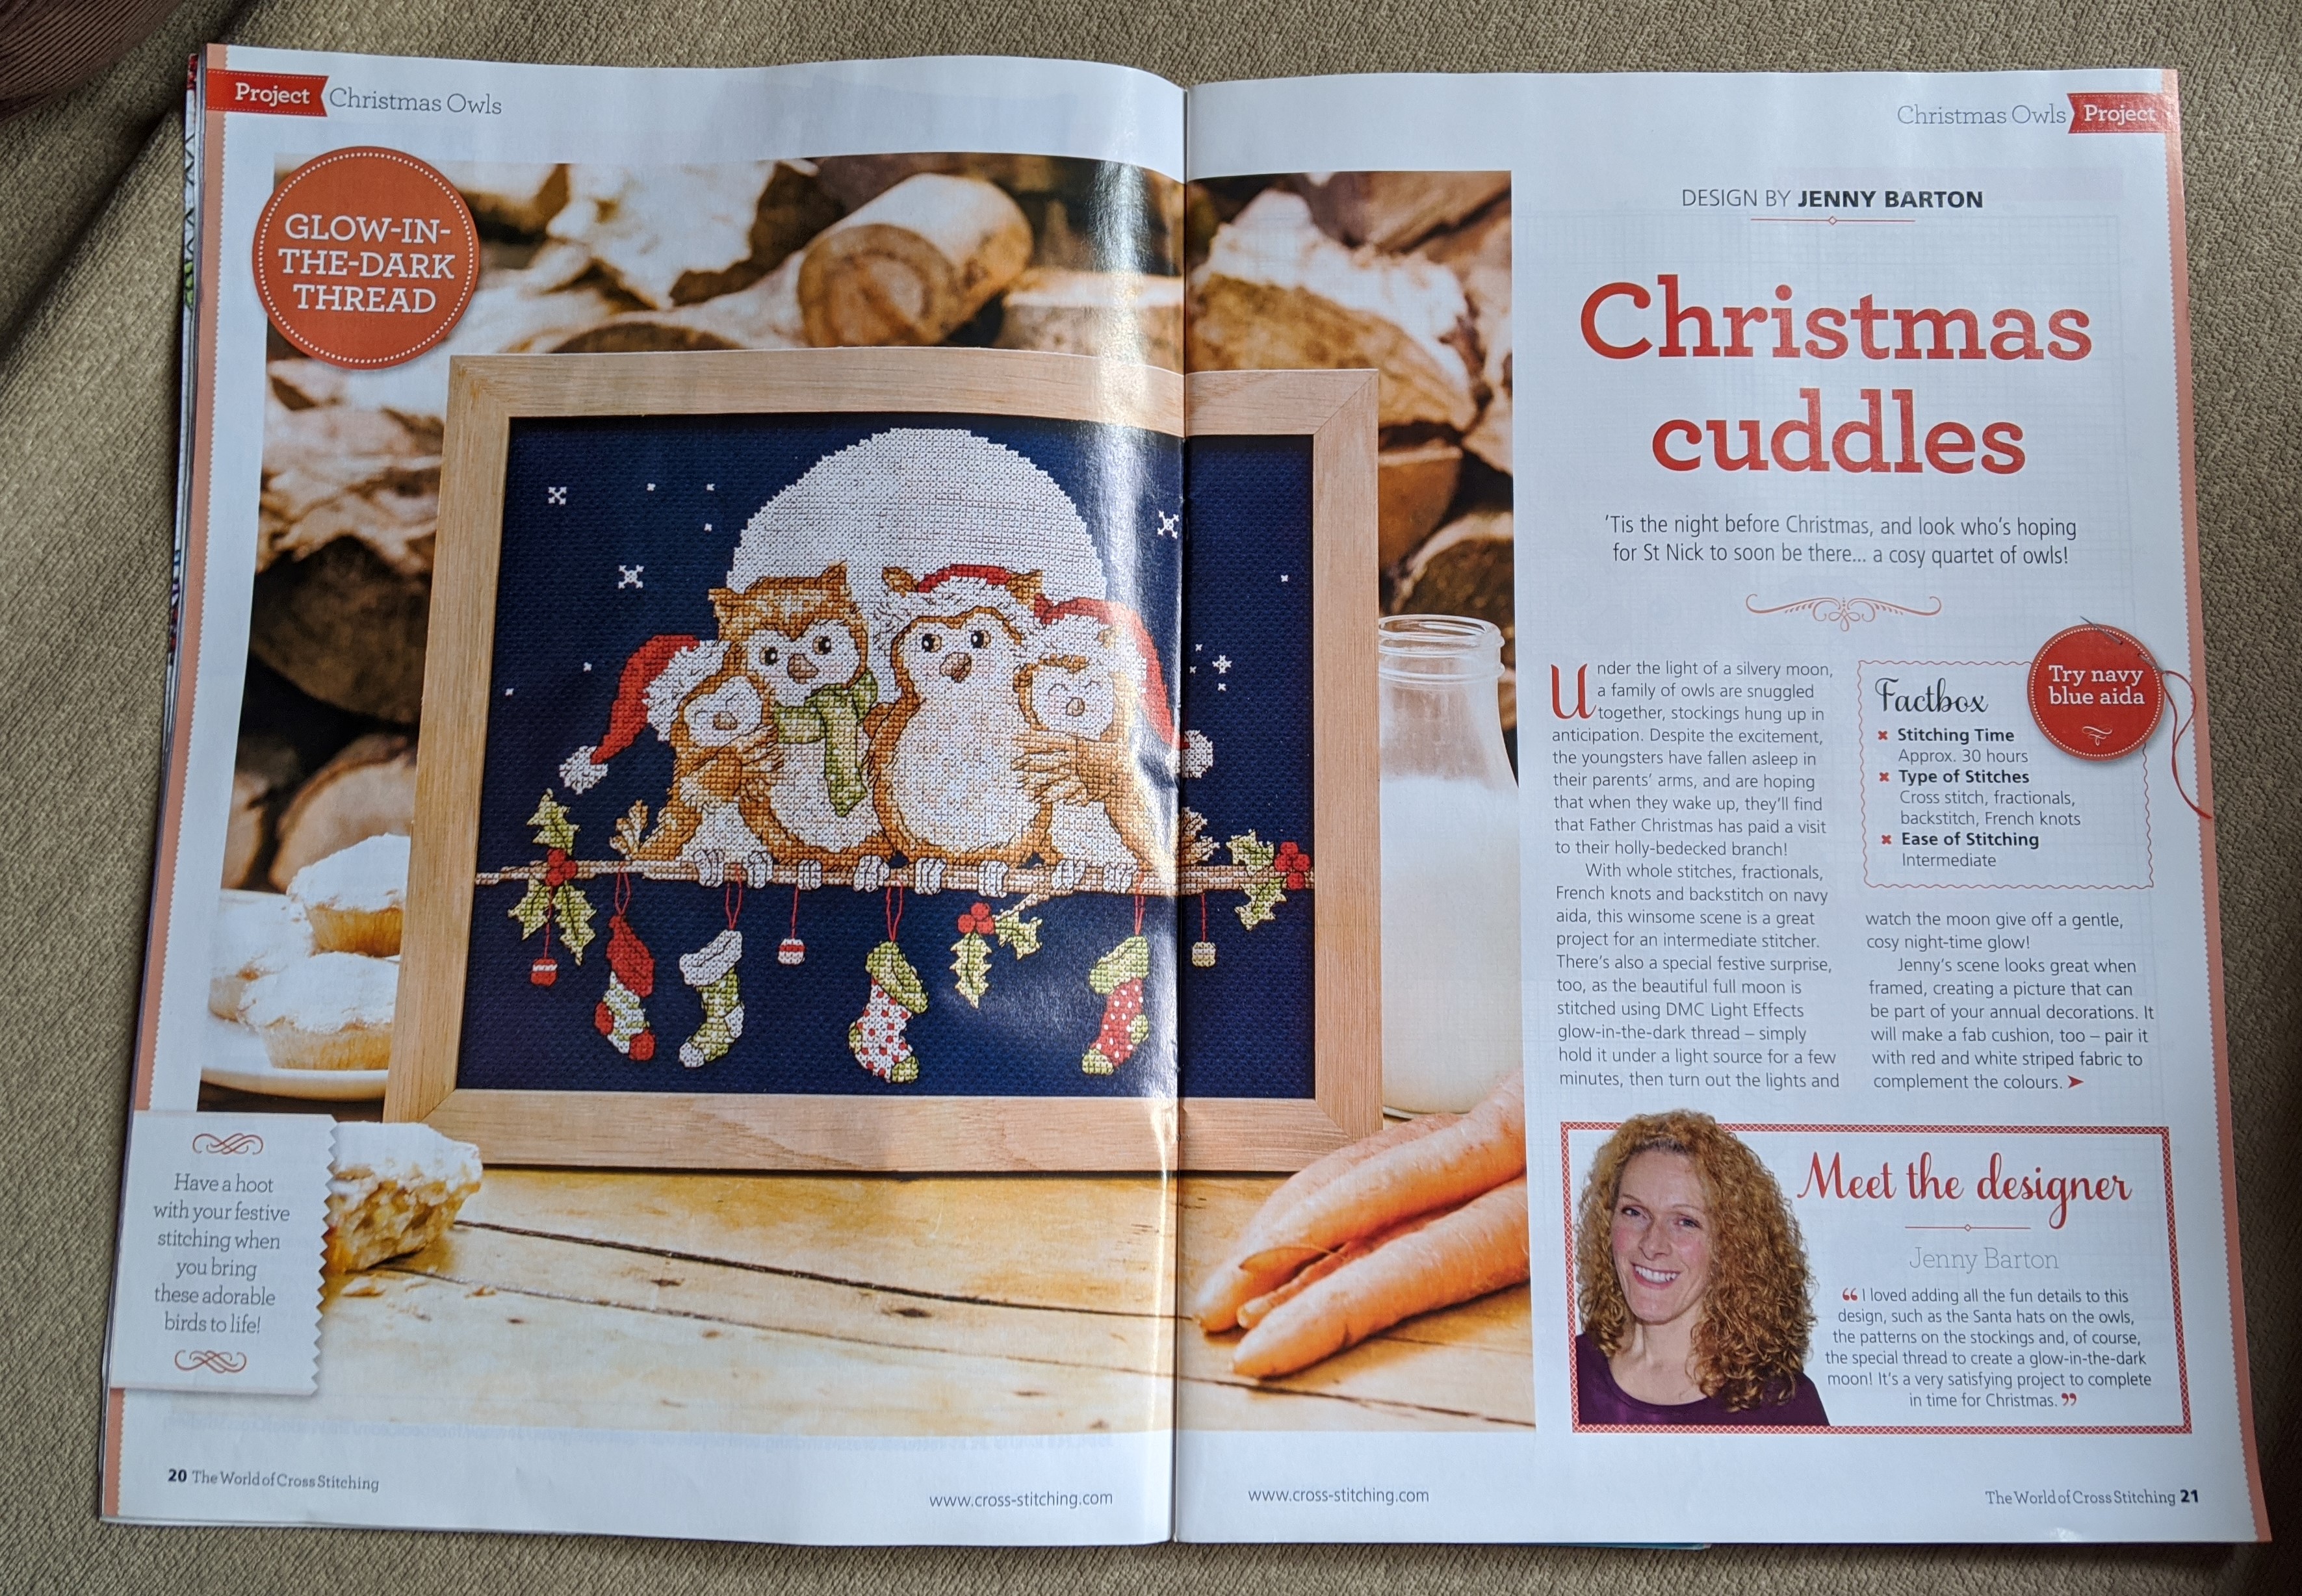
Christmas Owls designed by Jenny Barton
I’ve been working on this project most days for the last week or so and I’m really happy with how it’s progressing. My boyfriend was able to change the light in one of the rooms we hang out in, so that’s helped a bit with stitching at night. One of the things I’m looking forward to with this project is the glow-in-the-dark thread for the moon. It looks just like white DMC thread – either the Blanc or B5200 – and feels quite similar to the cottons. I’ll just have to wait and see how it is when I’m stitching with it!
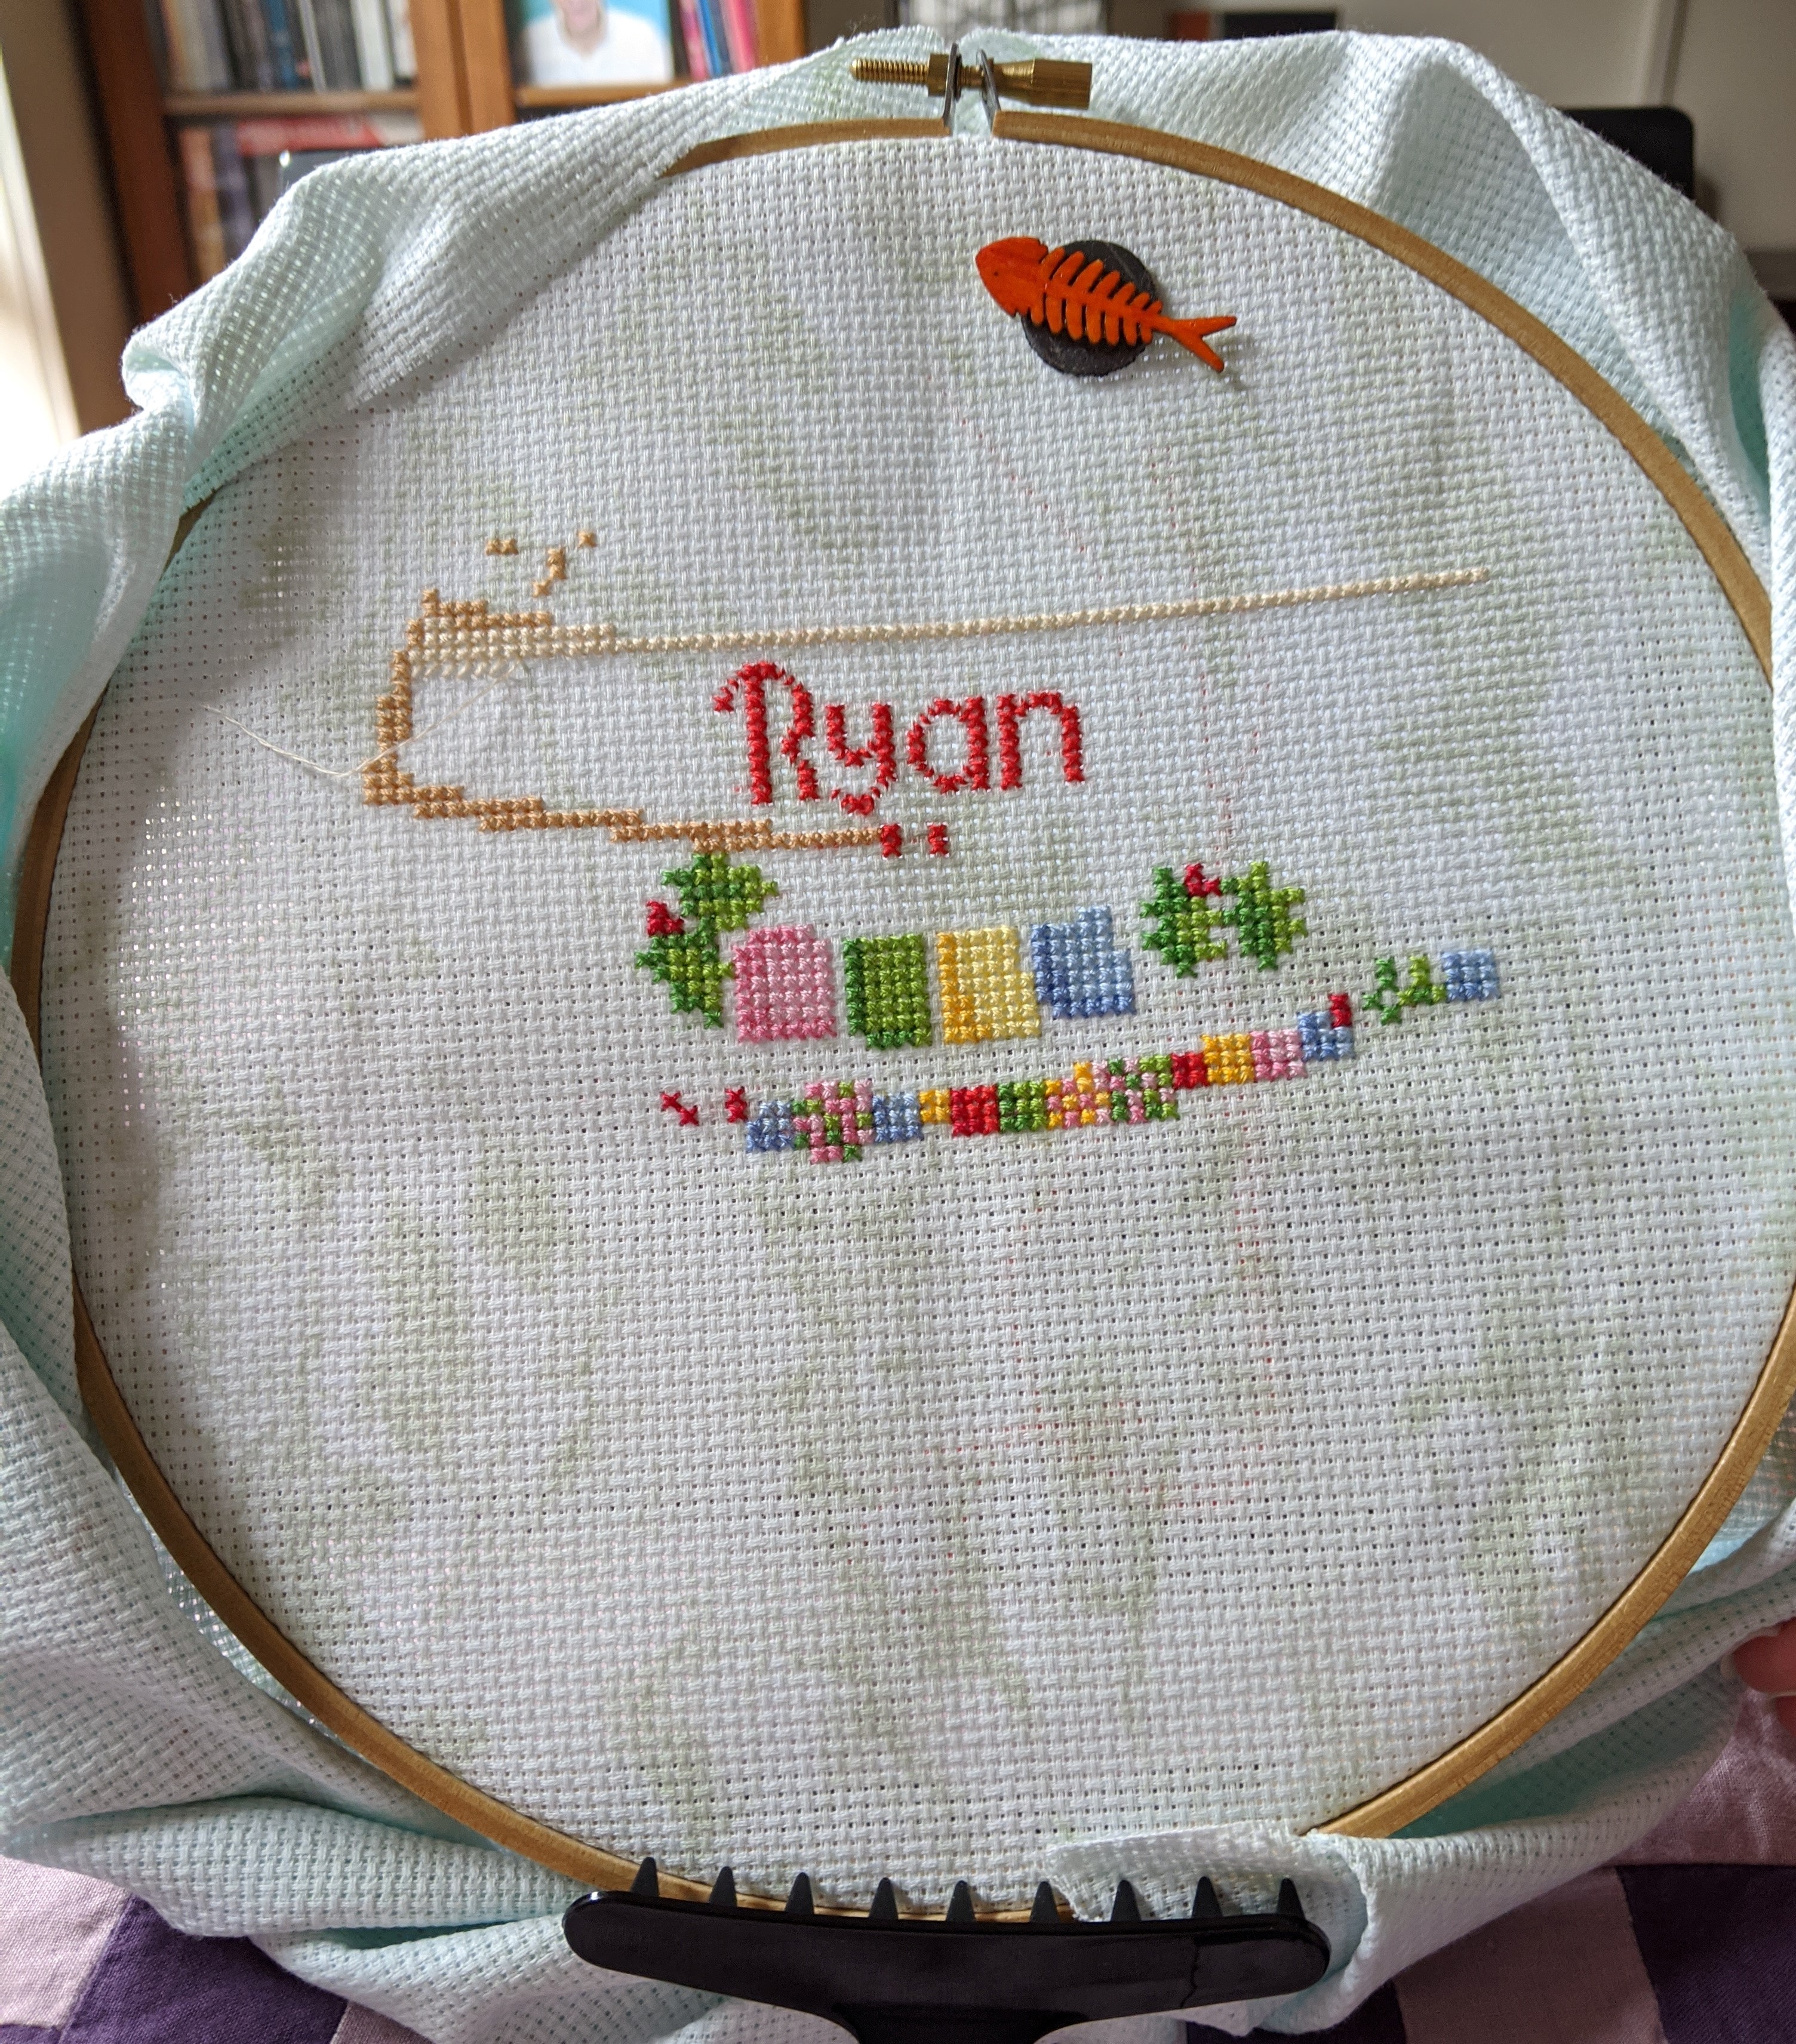
Santa’s Coming designed by Durene Jones
Last week my aim had been to finish stitching the banner and my nephew Ryan’s name. I’m really happy with how this has worked out. I haven’t had to re-stitch his name and centre it, which I’m super relieved by! I’m already thinking that if I stitch this pattern again, I might change some of the colours to different shades or tones of what you’re seeing in the images below to make them bolder. The challenge will be making sure they don’t clash.
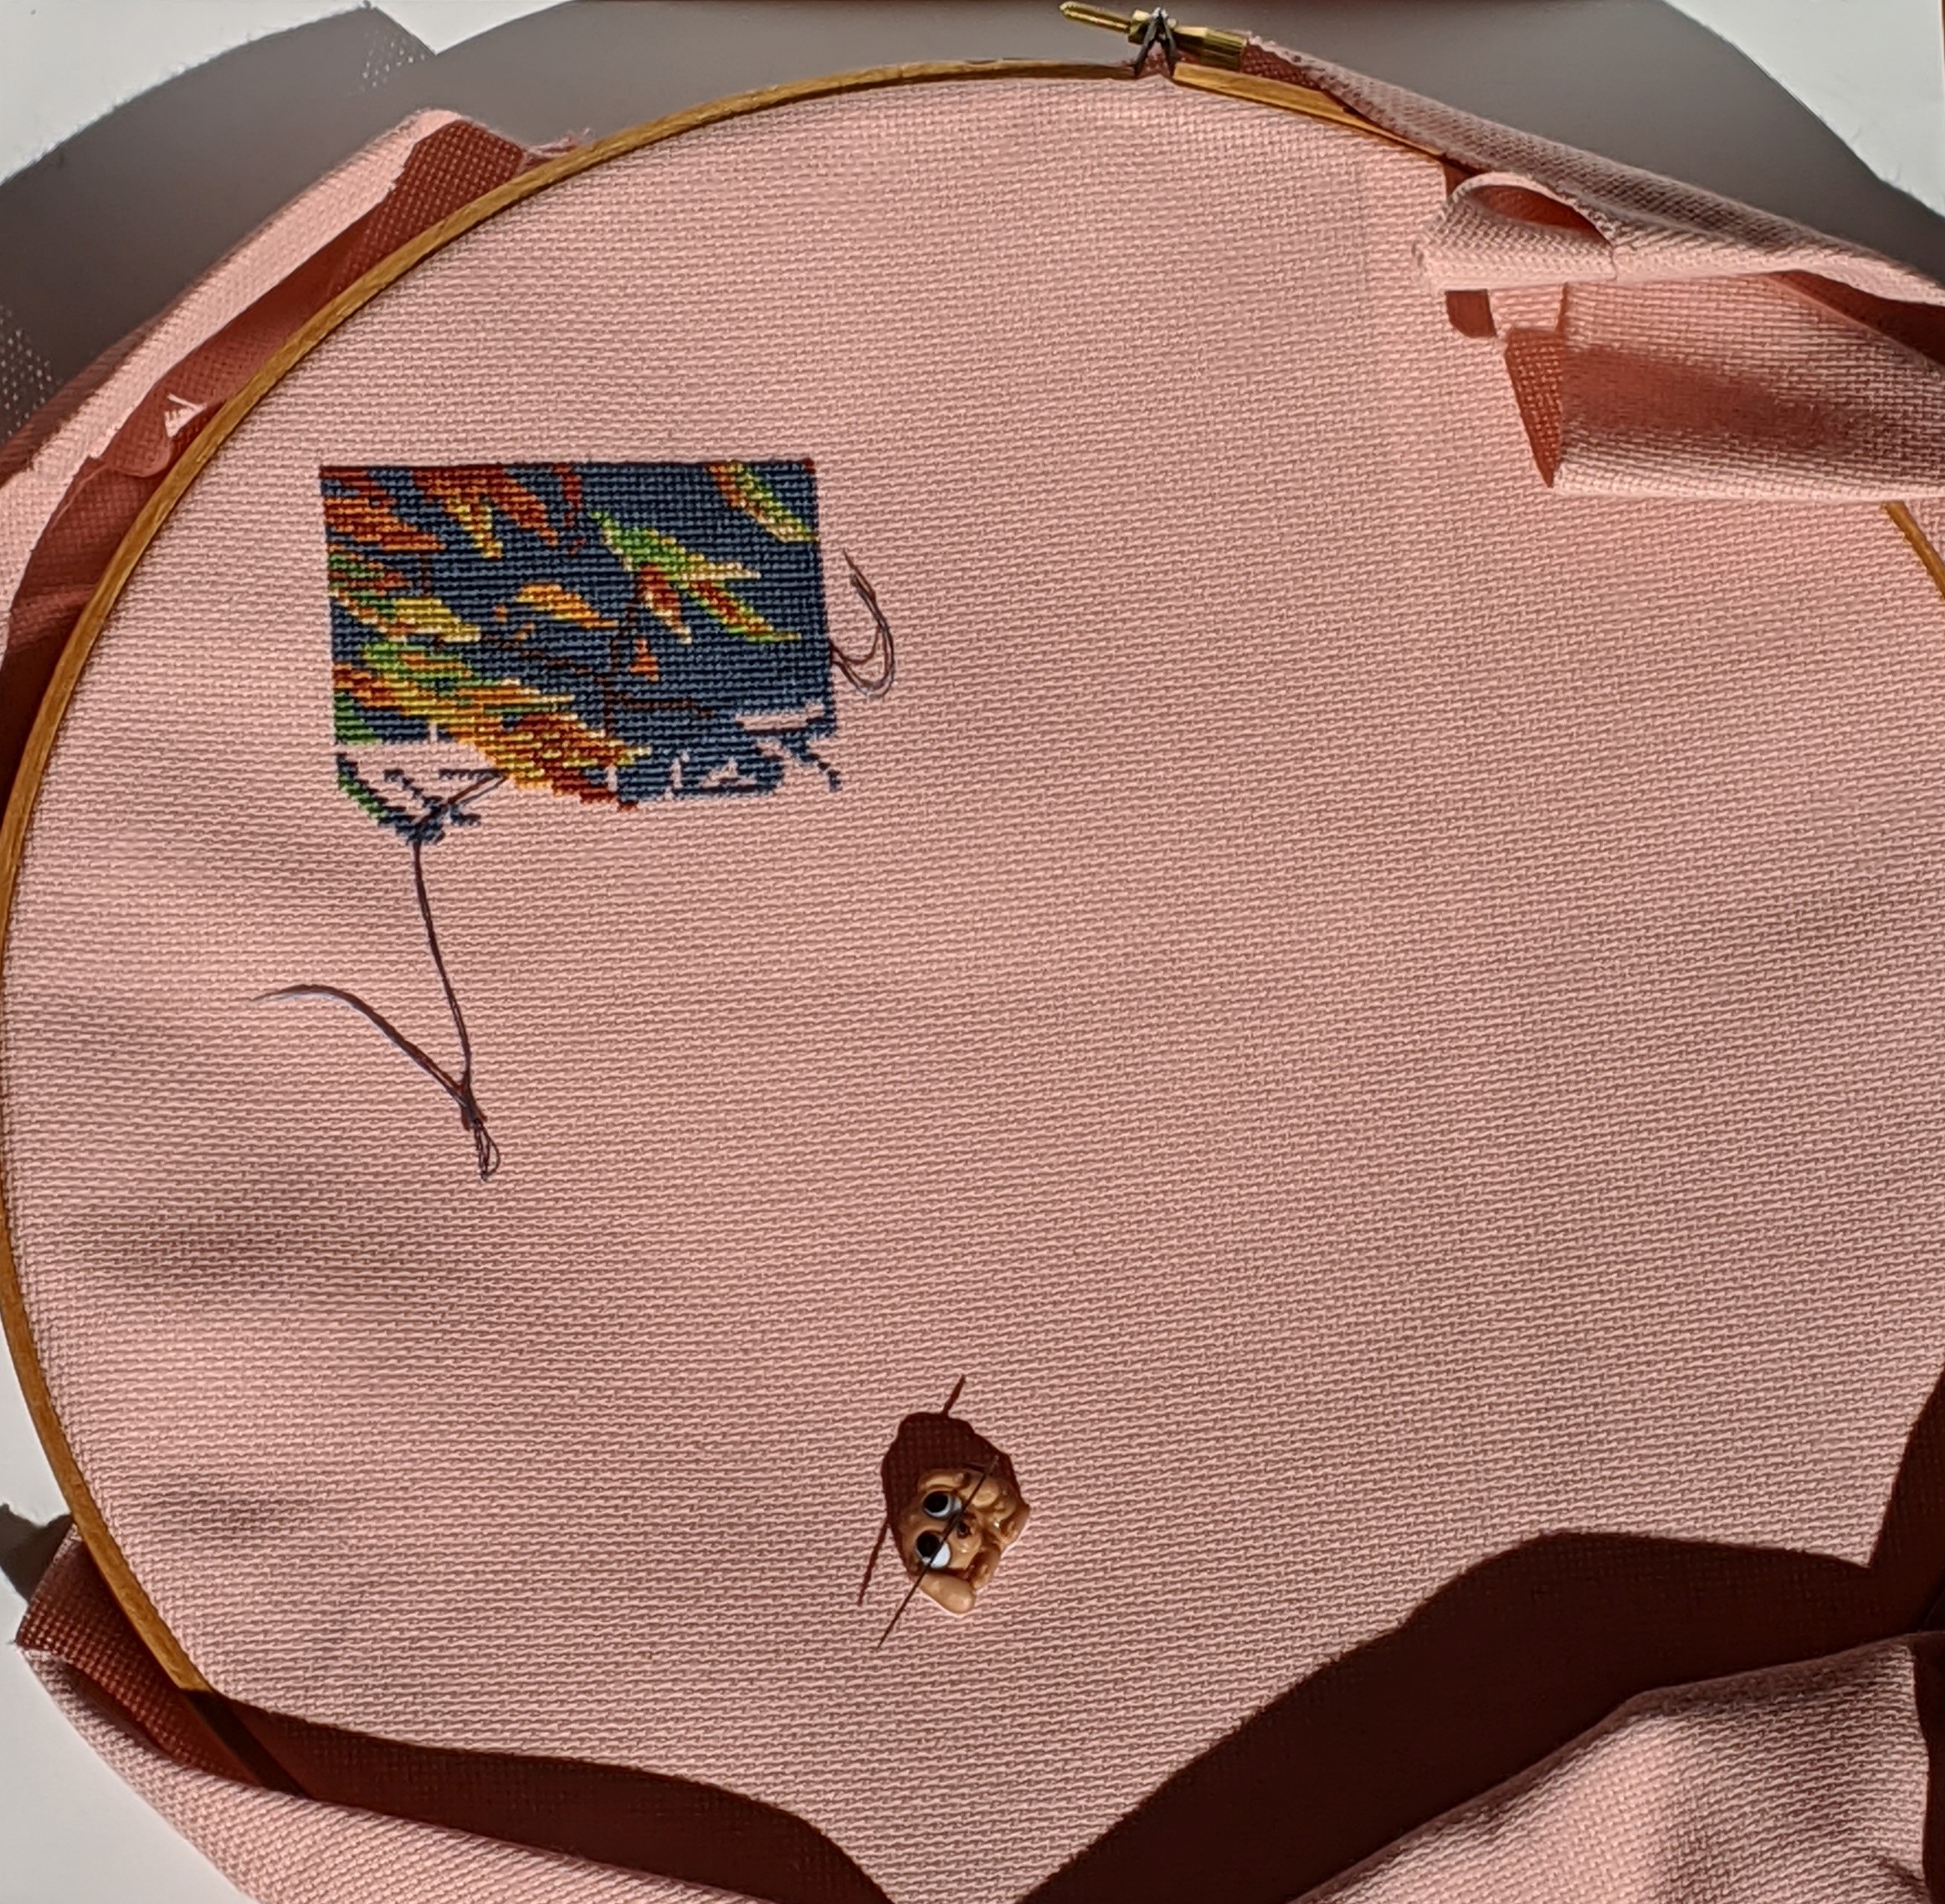
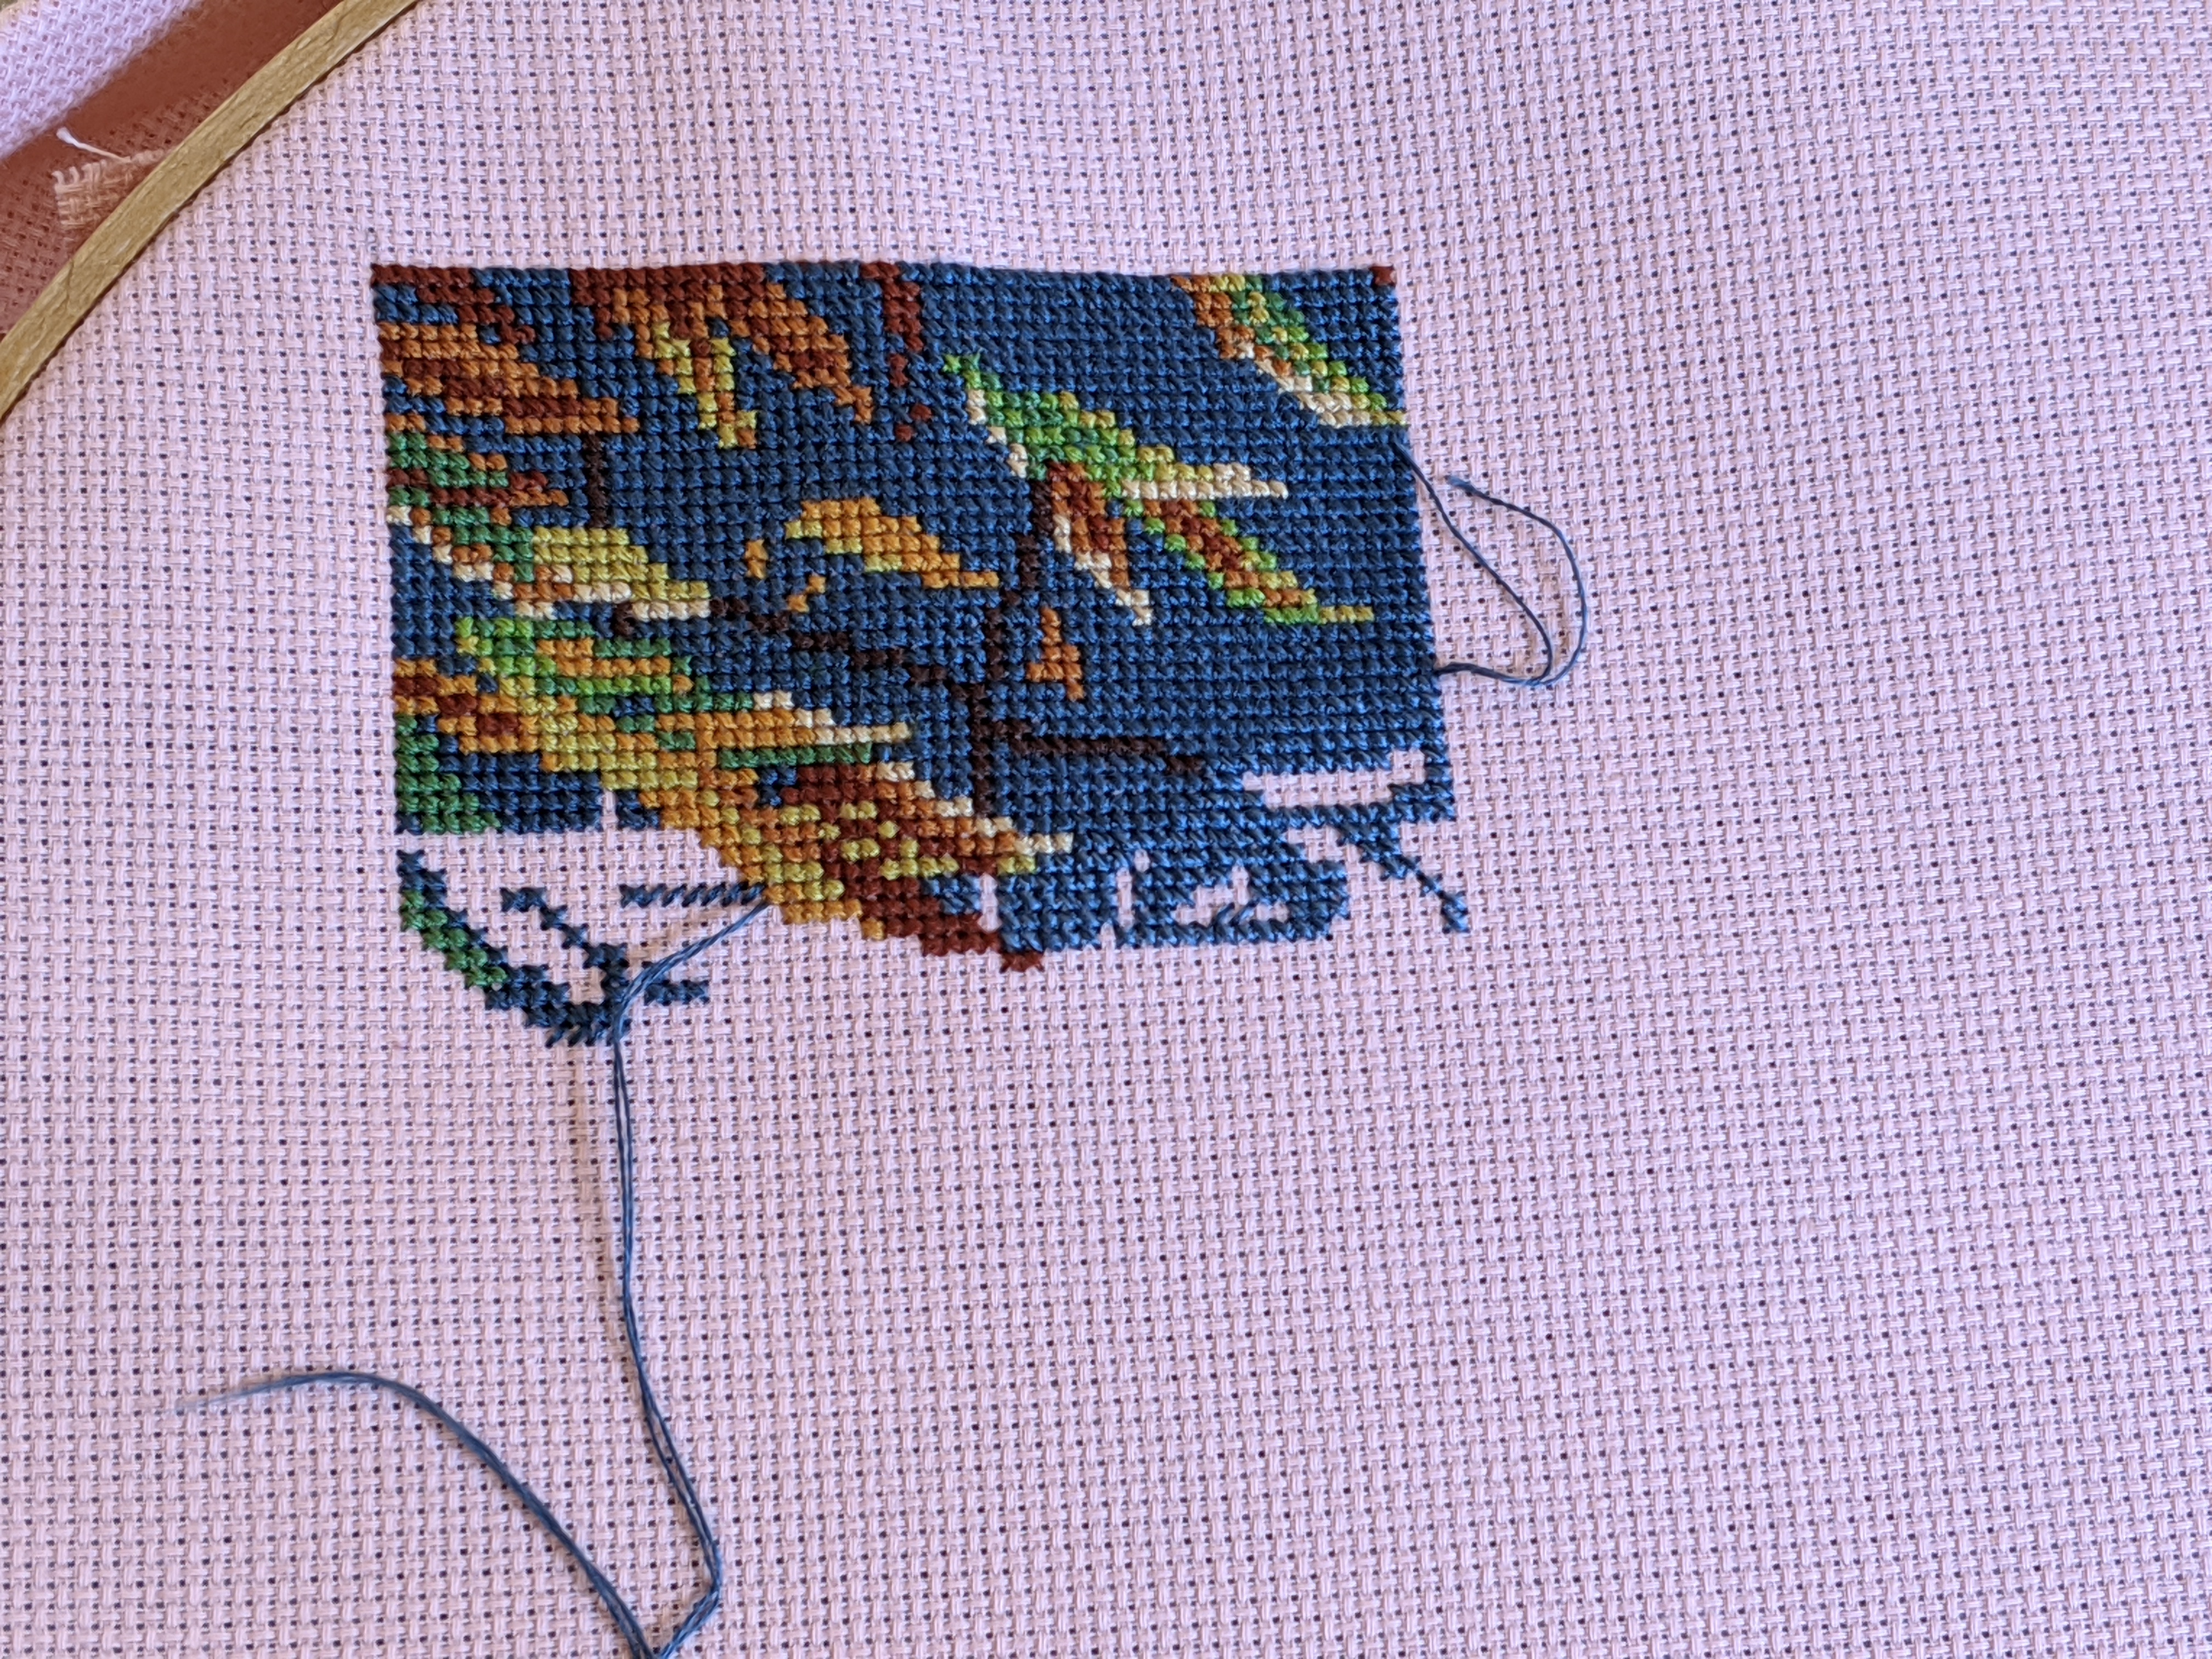
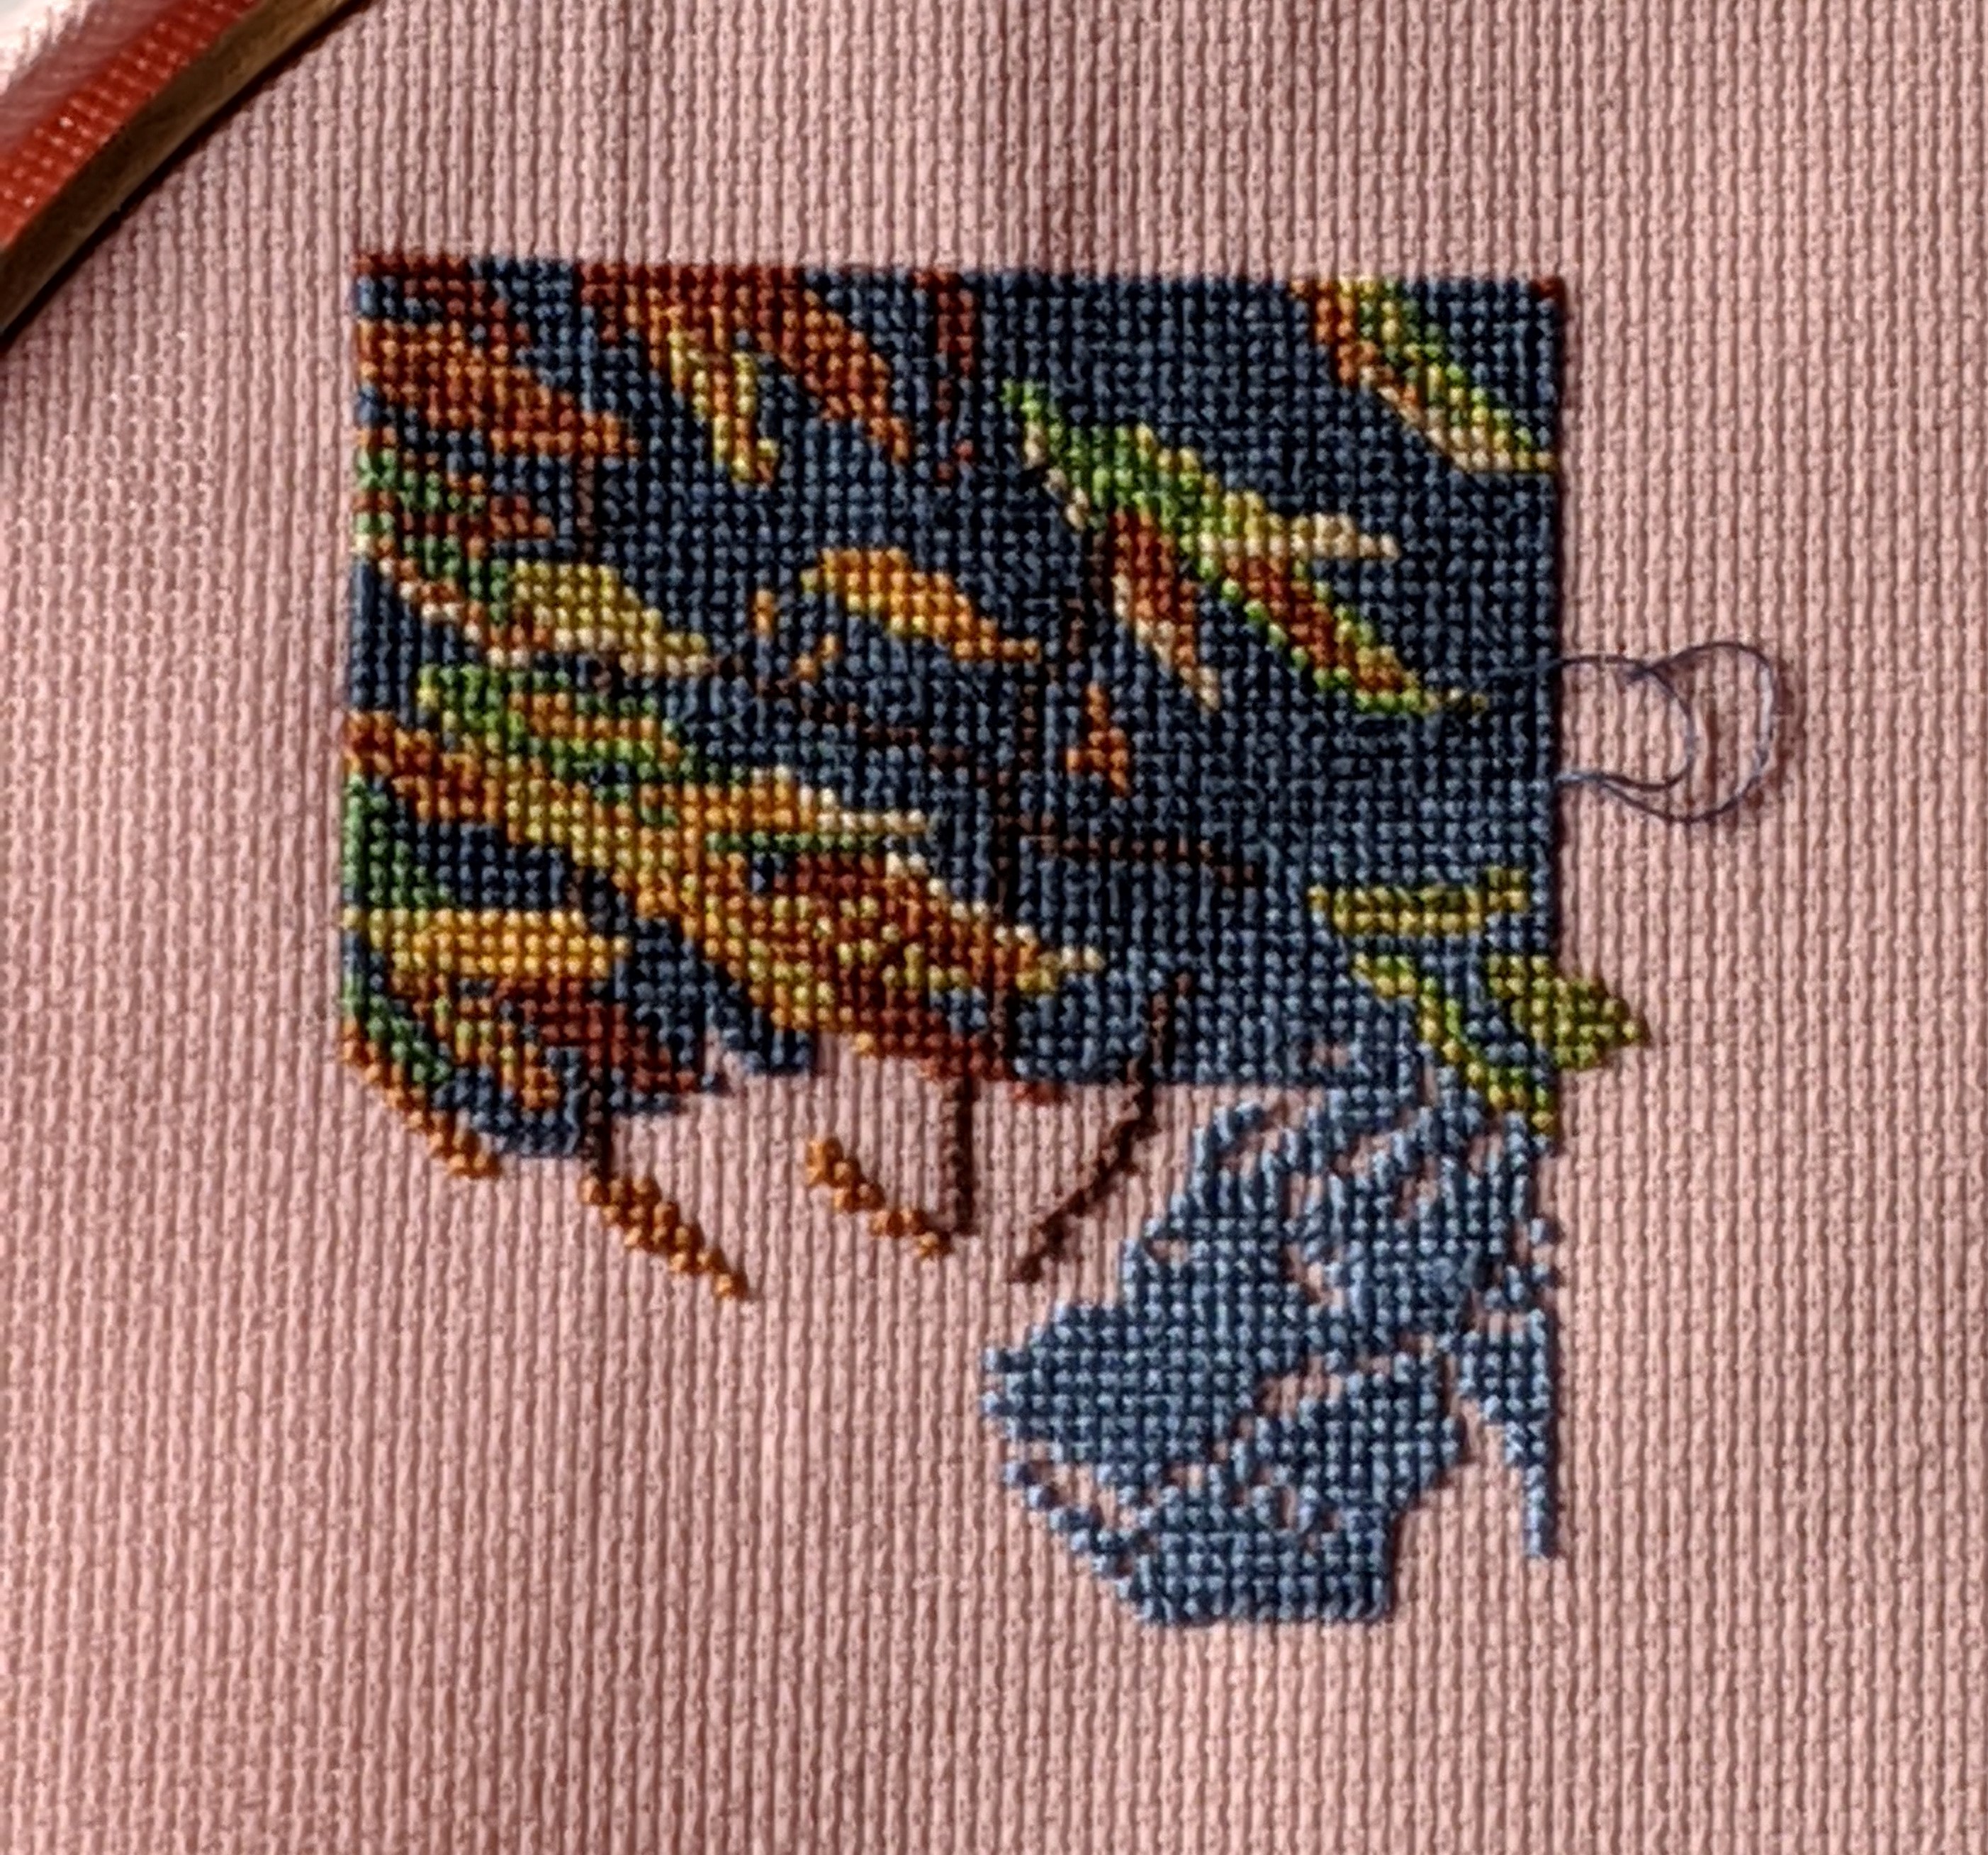
Autumn Castle designed by Evgenia Kolesnikova
I’ve slowly eased up on stitching this project. I’m still enjoying it. It has however become a little like the Fight Like a Girl project because of the amount of errors I’ve made with it so far. Something I really had not expected and I’m quite disappointed by the number of mistakes I’ve made with it so far because it’s on pink fabric and in a larger hoop! Like Fight Like a Girl, stitching on it when I’m tired is most likely the main reason why I’ve made so may errors with it. I’m just thankful that it’s a solid piece and that I’ve been stitching long enough to be able to blend my mistakes in with the rest of the project, without frogging it too much and it working out in the end.
Zebras by Design Works
I feel like I’m losing my mojo with this project, which I’m surprised by because it’s so colourful! Interestingly, the images below of the updated progress show just how stiff the Aida is – but that’s Aida to a tee! In the updated images, you may notice that the project isn’t in a hoop and it’s held its shape. I should have ironed the project before taking the pictures. I do like how the fabric frames what I’ve done so far. What do you think?
Something funny…
Every so often when I’m browsing through Pinterest I’ll come across some really cool subversive cross stitch that I think suits me to a tee. The one I recently came across is shown below:
Screen shot of a subversive design found on Pinterest
Anyone who knows me well or has seen my desk at work, knows that to the untrained eye, my desk or home looks like a bomb hit it. To me, it’s organised mess and 90% of the time I know where things are. The question is whether you can wait about 5 minutes for me to get it to you?
The other subversive cross stitch I came across that makes me chuckle when I read it is:
Designed by Solemprobler on Etsy
My sense of humour can be quite dry at times and I try to use sarcasm to defuse a situation and lighten it. If my death isn’t caused by my sarcasm, it’ll be caused by my head being in the clouds and off with the fairies daydreaming, resulting in me not paying attention to where I’m going or what I’m doing!
Over the last couple of years of watching Flosstube, I’ve found many flosstuber’s talking about Stitch-May-nia and New Year, New Starts, 24 hour stitching marathons and similar playing on words for many months throughout the year. With these things in mind, I’m aiming for a few ‘F’ themed things for February for this blog and my cross stitch that may also help you and hopefully inspire you to do something similar with your stitching!
A few weeks ago, I talked about my aim of finishing some pages of the projects I’m working on because I know I’m not going to be able to fully finish any of them! I’m hoping that this is a reasonable task to achieve considering how much of each page I need to complete for each project. However…February for my family also means a bucket load of birthday celebrations! We have my Dad and sister in the space of 2 days. A week later is my boyfriend’s mum’s birthday and a week after that is mine! Somewhere in-between all of those celebrations are birthdays of friends and a colleague at work. Who would have thought that February could be such a social month for such a short month!
A challenge for you, a challenge for me…
What ‘F’ themed stitching, that’s PG (a rating that’s applied to movies, games, television shows in Australia) / above board, could you do? Is there a funny quote or picture you’ve been eyeing off for ages, but haven’t gotten around to stitching yet?
Funny February Suggestions
Considering everything that has been happening in the world over recent months – even years – we all could do with a really good laugh to try and relieve some stress and feel better for a little while. Also, Valentine’s Day isn’t everyone’s cup of tea and unfortunately the statistics are there to show it. So lets bring on the funnies and have a really good laugh!
Subversive cross stitch – need I say more? We can say so much with just one word or mash-up of words to project a feeling of the time. The links below will take you to some pages that will hopefully make you laugh and inspire some stitching:
What about your favourite comedy or a song that makes you smile or laugh out loud every time? For a long time, I’ve loved Garfield and reading the comic strips. For me, it’s the dry sense of humour of Garfield that I like the most.
I also like showing my boyfriend funny pictures of dogs and clips of them getting up to funny things like doing mad runs around the backyard or at a dog park – especially if other dogs get involved and they’re all running around madly! Which also means that I’d be showing him pictures like the ones below that can be purchased fro LoLaLotta’s Etsy store:
Funny Pugs range from LoLaLotta’s Etsy store
Fast February?
I’ve entered myself into the 5km event of the Canberra Times Marathon Festival and my aim is to get as close to the 30 minute mark as I can. This year the course has changed, and thankfully it’s easier because it’s a lot flatter and I’ve run a similar course when I use to work on the southern side of Lake Burley Griffin.
The challenge at the moment is getting myself outside running! I’ve found many excuses not to run – some of them legitimate, like it being too smokey or too hot. However, I should use that as an opportunity to get to the gym instead and run on the treadmill to keep myself on track. If any of you have tried running on the treadmill, you may understand why focusing on the ‘dread’mill isn’t always easy!
That said, in recent days, I’ve put together a spreadsheet of all the races I’ve participated in since 2013 and the times I’ve gotten for 5km, 10km and 14km. I’ve found it inspiring and motivating to see how I’ve progressed from running 5km in 38 minutes 29 seconds through to 31 minutes and 15 seconds. At my peak, I had been running 5km nearly every day of the week – Friday’s were my day off from going to the gym and running. My motivation during my peak had been to beat my previous times and to lose a lot of the weight I had gained when I started going out with my current boyfriend. I had relaxed too much in our relationship and I had gained 20kg. Thankfully I was able to lose that weight through a combination of running, group and one-on-one sessions at the gym and changing what I ate.
Well, I hope that this has given you some inspiration and you’re able to get some finishes happening for February!
We’re now getting to the fun part of teaching someone to cross stitch! Well, fun in my opinion anyways! In this part of the series we’re going to take a look at pattern choices, starting a cross stitch project and the different ways to do cross stitch.
I’ve always loved the prospect of starting something new and seeing something new come out of a blank canvas. I love the different options available to us regarding fabric, patterns and the tools of the trade. It may be part of why it takes me a while to fully finish a project, because there are so many options out there and I want to stitch them all! But I digress…
Choosing a pattern or a kit
By now, I hope that you and your student have gotten to know each other and you know what their interests abilities are, which will enable both of you to pick out a pattern that will suit them and keep them interested long enough to finish it.
For someone who is completely new to cross stitch, it would be best for them to start with a kit, because the majority of what they need will be in the kit – i.e. fabric, threads, a needle and most importantly, the pattern. The question is…which one when there’s so much to choose from?
Patterns and kits for kids
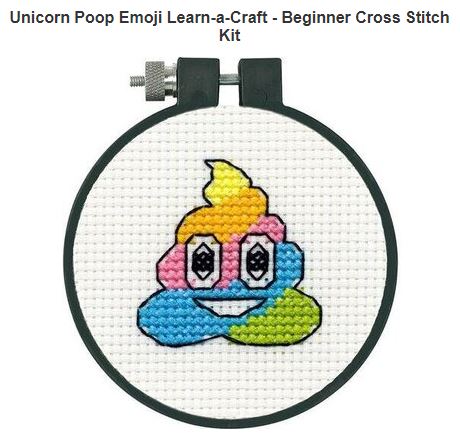
When kids are concerned, the simplest pattern design with a few different colours is probably the best one to go with. Because it has at best, 3 to 4 different symbols on a chart they need to worry about and the simple design means that the chart should be easy enough for them to read.
Examples of simple patterns and kits for kids include the following:
Image from the website 123Stitch.com – Designed by Dimensions
According to the 123Stitch.com website, this Unicorn Poop Emoji kit comes with everything, including 11 count Aida, the black hoop we see in the picture and all of the things needed to complete the project. This particular kit I think ticks alot of the boxes for kids these days because it’s poop! Also, in Australia at the moment, the unicorn theme has been strong and emojis seem to be here to stay, so why not embrace them?!
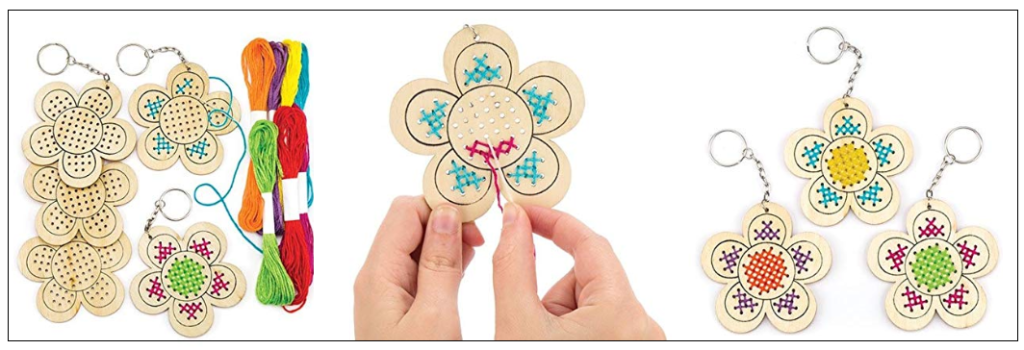
Baker Ross Wooden Flower Cross Stitch Keyring Kits for Beginners (Pack of 5) Embroidery For Kids – images from the Amazon UK site
These particular kits are from the UK Amazon site and they could be a fantastic way of introducing kids to cross stitch and embroidery. With these kits, there’s no pattern they have to follow. The holes are already drilled into the wood. All the kids need to do is decide what colours they want to use where because the kit comes with the threads and needle.
Scrolling through the Net…
Another idea is to jump onto the Net and have a scroll through some different websites that may spark some inspiration. The website OzStitch.com.au for example, has a couple of pages dedicated to kits that can be stitched by kids. Meanwhile, The Fox Collection has some pages on kids crafts and mini kits that could be of interest.
Patterns and kits for teenagers and adults
If your student is a bit older, then you have a bit more wriggle room for options in design. This is a lot to do with the complexity in the designs and your student’s potential ability to more patience and time to sit down and work on the project. It also means that your older student may be able to cope with a larger count size – e.g. 14, 16 or 18 count.
Personally, I’ve found the Country Threads patterns and kits by Fiona Jude to be absolutely awesome. The patterns are easy to read and they are comfortable size to work on. Meaning, it took me an average of three months to complete one of Country Threads patterns and that’s all the while working full time and in many circumstances, studying online part-time as well. The other thing that attracts me to the Country Threads designs is that there’s little to no backstitch and it’s a mix of full cross stitch and half stitch (aka tent stitch) and some patterns may require some French Knots.
Subversive cross stitch
This is something that may be of interest for teenagers and adults who may be more into quotes or words rather than images. The main challenges in this case, will be deciding on which font to use, how much swearing there is and which quote or word fits best with your student! Because the Internet and the stitching community has fully embraced subversive cross stitch and it doesn’t look like slowing down any time soon!
On a related note to the swearing, even if there isn’t any swearing in actual pattern, there may be a bit of swearing as the stitching commences because of the number of times that you or your student stabs themselves with the needle, the amount of un-picking that may happen and figuring out where you or they are on the pattern!
If you and you’re student still aren’t sure on what to stitch because nothing’s really jumped out at them, another idea is that your student could try designing their own pattern. All you and your student need is some graph paper and some colour pencils and some creativity and imagination to bring it to life!
A kit has been chosen…Now what?
Hemming the edges of the fabric*. Washing the fabric and threads*. Finding the middle of the fabric. Sorting or organising the threads*. Getting the rest of your supplies together. Understanding the pattern.
*These things are optional and may suit the preferences of you or your student. Personally, I’ve been really lucky with the threads I’ve used from kits and purchased individually either online or instore. When I have washed my project after completion, none of my threads have run and adversely affected the project. I have read in different forums that for some people, their threads have run and had a negative impact on their projects. Additionally, in some kits, the threads may not be as organised as you or your student need them to be.
Finding the centre of your fabric
The main times I bring out my iron and ironing board is to do something with cross stitch! When I’m finding the centre of my fabric, I prefer to iron out my fabric so that it’s as flat as possible because of the way it’s initially been folded and stored in my collection. By doing this, I know that I’ll be able to easily fold up my fabric in half and then half again, then run the iron over it while it’s folded up, so that I can cleanly see the centre.
The clip below by Stitcherista shows you what I mean…
‘Cross Stitch 101 – Finding the center of your fabric’ by Stitcherista – uploaded to Youtube on 9 October 2018
Additionally, if your student wants to use a hoop while stitching, the clip below by Spot Colours, will show them how to find the centre of their fabric and how to put it into the hoop…
‘Cross Stitch – How to Find the Center and Hoop’ by Spot Colours – Uploaded to YouTube on 22 June 2017
Hoops, Qsnaps and Frames
It’s important to note that depending on the size of the project your student is working on, that the size of the hoop, qsnap or frame will have a large impact on how well the fabric fits. For example, the smaller the size of the fabric, the smaller the tool you use to keep the tension. This may also depend on personal preference and what your student is able to use.
Personally, I have always used hoops of various sizes and I’ve recently started using a stand to hold the hoop.
Understanding the pattern
The first time your student sees the cross stitch pattern, it may look really confusing to them. Thankfully, some patterns have colours on them to make it easier to see the different areas they need to stitch with the different threads. However, if it’s a black and white pattern with a series of symbols, helping your student understand that each symbol represents a different colour in the key will be crucial. The YouTube clip below by Love Crafts shows people in a really easy and simple way how to understand and read a pattern, to enable them to start stitching:
‘How to read a cross stitch pattern for beginners’ by Love Crafts – uploaded to YouTube on 14 October 2019
Tip – Drawing the symbols from the pattern on the thread sorter
One of the things that may help – regardless of your student’s age – is to go through the key and draw the symbols on the thread sorter (if the kit came with one). I’ve found this to be really useful for some of the Dimensions kits I’ve worked on due to the way the chart and key have been written up.
Symbols I have hand drawn on the card sorter that came with a kit
Starting to stitch…
The earlier clip by Love Crafts shows people one of the ways that they can start stitching a pattern. What you will need to show your student is what they will need to do with their thread so that it doesn’t accidentally come straight through the hole of the fabric.
Floss, cotton and strands
You and your student will find that the majority of patterns and projects will require it to be stitched with two strands of cotton (aka floss). To help put things into perspective, the image below shows that the floss can be split into 6 individual threads or grouped into 3 lots of 2.
Image shows that floss can be grouped into three lots of 2 strands.
The Loop Start Method
This relates to the way the amount of strands you or your student has pulled out of the cotton and the way it has been threaded into the needle. For the loop method to be most effective, you or your student will need to pull out just one strand and then fold it in half, so that ends meet up evenly. The clip below by Mr X Stitch explains the loop method really well:
‘Start your cross stitch with the Loop Technique’ by Mr X Stitch – uploaded to YouTube on 18 July 2018
Personally, I love the loop method if I’m using two strands on a project. It makes the back of the project a lot neater and I find it to be a fantastic anchor for the first few stitches. The caveat with using this method though is that it’s only useful if I need to use two strands of floss.
Finishing off your crosses and changing colours
You may need to help your student with the first time they go to finish off their crosses in accordance with the pattern or because they’ve run out of enough thread on their needle. The aim is to fully finish the cross and then flip the project over so that you’re looking at the back of the project. Then have the needle move between the fabric and some of the crosses that have just been stitched. I’ve found this to be a very neat way of finishing the crosses and it helps to secure them. To put this into perspective, the clip below by Rainbowlune, shows us how to just this:
“How to Finish a Thread – Cross Stitch” by Rainbowlune – uploaded to YouTube on 23 February 2013
Meanwhile, changing colours is reasonably easy in cross stitch. The difficulty sometimes is deciding which colour to do next or threading the needle – depending on the size of the eye of the needle! The way that your student would start off and finish on a new colour is very much the same as they would with any other colour.
Which way to stitch – left to right, up and down, right to left, cross country or parking
If you’ve been stitching for a while, you’ll hopefully know what I mean by this heading! When you’re chatting with your student, you will be able to work with them to find out what is most comfortable for them and what the pattern allows you to do too.
Stitching left to right and right to left (aka horizontal cross stitch)
This predomenantly means that the first half of the stitches will be done left to right – just like when we’re writing something. Once we’ve reached the designated number of stitches, we then complete the crosses by stitching right to left.
Meanwhile, the stitching right to left is when you start the first half of the crosses by moving right to left and then completing the crosses by moving left to right.
To help put this into perspective, the clip below by Peacock and Fig help to put these words into motion by showing you the English and Danish methods of cross stitch (aka left to right/right to left or one cross at a time):
“Cross Stitch Techniques: English method and Danish method of cross stitch” by Peacock and Fig – posted to YouTube on 4 April 2017
Stitching up and down (aka vertical cross stitch)
This way of stitching may depend a little bit on the pattern your student may be working on. Personally, I’ve found it easiest to stitch the full cross before I move above or below the first cross. To help explain what I’m talking about, check out the clip below:
“Full Cross Stitch Vertical” by MonkeySee.com – posted on YouTube on 8 August 2008
Cross Country and Parking
The good thing with cross country cross stitch is that we don’t need to leave our chairs to do this. The main exertion with this method is keeping track of where you are on the pattern!
The aim of cross country cross stitch is to stitch as much as possible of the pattern with the one colour and where possible, using the same strand without the stopping and starting. This can make the picture look a bit pixelated or scattered. Below is an image on how cross country stitching looks on a project:
Example of cross country stitching
Meanwhile, the parking method means that your student may prefer to read the pattern line by line, like they are reading a book, and stitch each symbol on that line. This will mean a lot of threading the needle with different colours as the pattern requires it. The benefit of using the parking method is that the thread will be ready when your student next reaches the corresponding symbol on the pattern.
To help put this into perspective, the clip below will show you and your student what cross country stitching and parking looks like on a project and which methods may be most effective on which projects.
“Cross Country vs Blocks with Parking” by Pam’s Crafty Corner – uploaded to YouTube on 18 January 2017
Deep breath… you’ve finished your project, now what?
This post was surprisingly challenging to put together, which is something I had never expected! I think a lot of it has to do with cross stitch being so much of a hands-on activity, that to just write about how to do cross stitch doesn’t do the activity justice! Which is why I think that there are so many more videos out there on how to cross stitch than there are written posts.
My next post in this series will hopefully be a little shorter. In the next post of this series we’ll be looking at the finishing touches of your student’s project, which may include back-stitching, the inclusion of some beads or special stitches. There may also be questions about whether it’s worth washing the project before your student then completely finishes it.
Thank you for sticking with me during this post and the series so far!
Cross Stitch Tips – Choosing a Pattern – blog post by Julie – posted on the website Julie’s X Stitch Cross Stitch and Supplies – Date released online not known
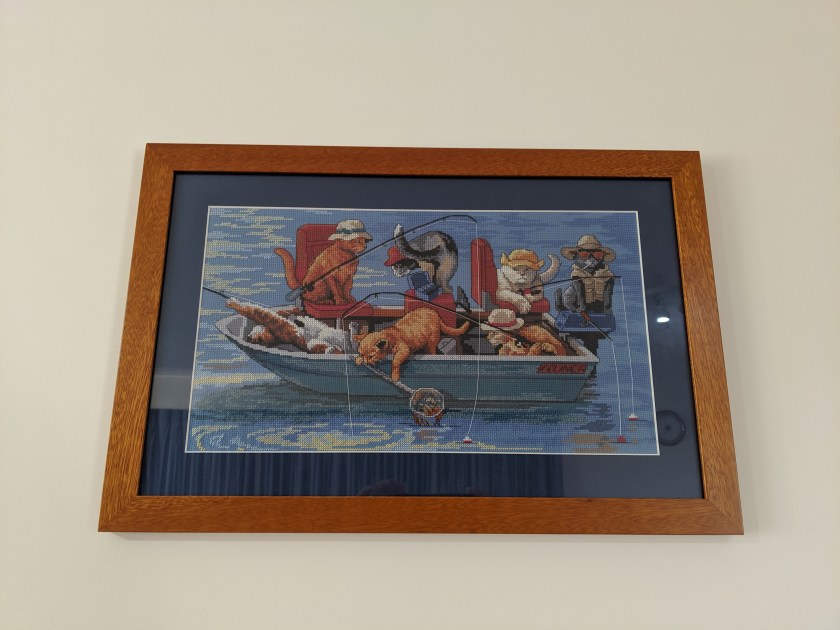
Framing my finished cross stitch projects has been my go-to finish for many years. The flat-ish finish enables me to easily and conveniently display my awesomeness on walls, shelves and other flat spaces. Also, framing can be as low cost or expensive as you want it to be or can afford it to be. Nine times out of ten I will frame my projects myself because I want to improve my framing skills and I’m impatient. However, the one project I have had professionally framed was done very well. The people who framed it had a big challenge on their hands, as I had done a major stitching faux-pas. I had the right measurements for my fabric, however, when I started stitching, I got my horizontal vs vertical around the wrong way and it wasn’t until I had stitched a significant amount of the project, that I had realised that I didn’t have enough fabric horizontally and had too much fabric vertically!
Professionally framed fishing cats project
That said, I like being quirky and unconventional at times. My logic is ‘who says I have to?’ or ‘just because they did it, doesn’t mean I have to!’ So the question is, how many variations, alternatives and options are there to framing?
Alternatives to framing…
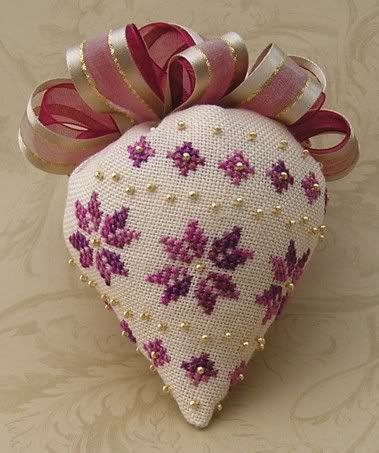
Biscornus (aka fancy pin cushions)
I’m starting to develop a love obsession with biscornus. When I first came across them, I was starting out in cross stitch and didn’t really understand how awesome and beautiful they are, let alone how many designs are available!
Biscornu
Strawberry biscornu
Wall hangings
Not quite the same thing as framing your works of art, but we’re getting close. The Youtube clip below by BexBox Stitcher will hopefully give you some ideas!
Clip by BexBox Stitcher – published on 23 April 2018
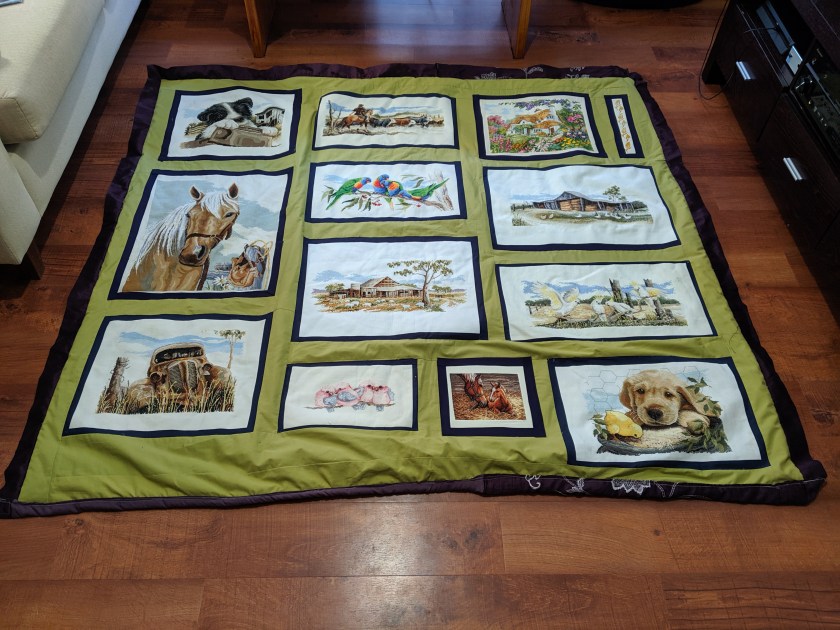
Quilts
I’ve been working on my own cross stitch country themed quilt for many years and there are two awesome things about this – 1) it’s nearly finished!; and 2) there are so many different options with quilt patterns, that as long as it turns out the way that I want it, that’s all that matters!
Seasonal/special event decorations
This includes Christmas tree decorations, celebrating the four seasons (winter, spring, summer and autumn), Mothers Day, Fathers Day, Easter, welcome home, farewell, happy anniversary and many other celebrations!
Three possible decorations options…
Cards
Cards can say as much or as little as you want them to. They can be a way of you saying thank you, sorry, congratulations, happy anniversary, happy birthday, farewell, bon voyage, welcome home, declarations of love, happy new year, happy hanaka etc. The other awesome thing is if you’re feeling a bit stuck, books and magainzes like the Ultimate Cross Stitch Magazineand the Internet more broadly speaking, can provide you with bucket loads of ideas and inspiration!
Bed coverings
Have you ever considered embellishing your pillow cases and doonah covers like the images below?
All of these images have been obtained from Pinterest. Many of these products can be obtained from eBay and Etsy.
For those of us in the know, this has been an option for a while. Thankfully, places like the Fox Collection, provide us with the ability to make our bed coverings unique and colourful.
As an introvert, revealing my name to people in anyway, shape or form to people I don’t know and not know how my name will be used, is scary and daunting. If however, you’re attending an event that requires a name tag, creating your own can be a creative way of telling people who you are and that you’re awesome at cross stitch!
Also, if the event allows, why not add your favourite quote, symbol, flower or decorative border to make your name tag even more interesting? The world’s your oyster!
Table settings
What can’t we do with our cross stitch and table settings? The options for us are endless! We can make our tables shine with, table cloths, table runners, napkins, wine bottle bibs and baby bibs to name a few. More ideas can be found at sites like Fox Collection, Needleworkersdelight and OzStitch to name a few!
Bags
Reusable bags are one of the most popular accessories a woman can have and it’s all good and well that we can purchase these bags from where-ever they’re available. But what if you could rock one that you made? Or you were able to support someone who could make one for you? Etsy for example is an awesome place to start!
Book covers and book marks
I’m an avid reader and I love writing – I should probably be writing more! Surprisingly though, I’ve not stitched many bookmarks and I’ve never done a book covering. I have however, fallen in love with the image below. Partly because purple is my favourite colour and I love the choices the designer/s of the image below have made and how they have covered the book.
Book cover by Larisa
Honourable mentions
The above list is just a sample of the options available to you. There are soooo many more options for finishing off your projects and the awesome thing is that there are many more websites, tutorials and videos you can watch to help you decide.
My go-to favourites is Pinterest and Flosstube, which has result in the following list:
Hands On Design is a website that is all things embroidery – especially cross stitch and I love the possibilities of what we can do with finishing our projects, let alone the projects we can do from Hands On Design! The additional awesomeness is that Cathy Habermann (from Hands On Design) has her own flosstube channel!
The Twisted Stitcher – aka Vonna Phiffer has her own flosstube channel as well and does some amazing finishes and she shows us how!
The flosstube clip below for example, shows you how to mount your project on artists canvas…
Alternative to Framing Tutorial by Stitcherista – published on Youtube on 22 September 2017
Have I missed anything?
There’s a pretty good chance that I’ve missed some awesome finishes out there. So I would love it if you could let me know what your favourite finishes are and why you love that particular finish – especially if I haven’t mentioned them in this post!
Many articles and blog posts have been written about the importance of mindfulness and taking time out for your self and your mental well-being. Colouring books for adults has become very popular in recent years as well as the resurgence of journaling. In my teenage years, I went through a bout of depression after seeing the movie “Saving Private Ryan”. For an unknown reason at the time, I found writing and colouring books to be therapeutic. I even remember asking my mum to buy some more colouring books as I had already finished off the kids colouring books that we had around the house (from when my siblings and I were younger) and I needed something a bit more challenging.
As I’ve gotten older and I’ve gotten back into cross-stitch, I’ve found cross stitch to be just as thereputic as colouring in and journaling. When I’m stitching on my own, I’m able to focus solely on the task at hand and have some music, tv or flosstube playing in the background. On the days when I’ve let life get to me and I’m stuck in my head (i.e. I’m unable to vocalise the mood I’m in or I know I’m in a bad mood and it’s best for me to not talk too much), I use cross-stitch as a way to focus my attention on something positive and methodical. Additionally, when my family and friends ask why I do cross-stitch, my regular reply is ‘it’s one of the few things I can do where I’m allowed to get angry and annoyed at myself and I can’t get fired for it!’
Subversive cross-stitch quote – Author of quote unknown
What I hadn’t expected or anticipated was the number of people who have written about cross stitch and embroidery being thereputic! I have known for some time that other forms of creative arts such as writing, painting, sculpting etc. have enormously positive affects for people who need a way to channel the energy they have and express their thoughts and feelings. Susan Luckman (Professor of cultural studies), Kate Dwyer and Robin Shreeves (freelance writer) are just three of the many people who have written about the positive affects of cross stitch and embroidery as ways for people to reduce their anxiety and stress levels.
Which may be why subversive cross stitch like the above image, has become so popular and given cross stitch a new lease on life. As it has given people an alternative way to express themselves and communicate their thoughts and feelings that they may not have otherwise had words for.
So how has cross-stitch and the creative arts helped you? Have you been able to help someone through cross-stitch? Alternatively, do you have a favourite saying or quote? Have you put it into stitches? I would love to hear about your experiences!