Posted in How To

How to kit up a cross stitch project from scratch

Hi Everyone

If you’re like me and started your love affair with cross stitch with kits helped a lot with learning to stitch and see the finished project. So, progressing to kitting up your next project yourself seems like the next logical step!

What you need

Some of these things may seem blatantly obvious, but can easily forgotten in the rush and excitement of starting a new project. I’ve also purposely not talked about scissors, lighting, stands, hoops, frames, needle minders or any other tools of the trade that can be used while stitching a project. If you are curious about these things, check out some of my previous posts!

The pattern

Many patterns, regardless of where you’ve gotten them from, have some really handy instructions for all stitchers. I strongly recommend you have a read through them, just in case there’s something special you need to pick up from your local craft store. The instructions will tell you what the stitch dimensions are of the finished piece and many of the designers will recommend what fabric size to stitch the project on. Sometimes, the designer may suggest what needle size to use for the corresponding fabric count.

The other component of the pattern is the key that lists all of the threads you need and how much of each colour you will need to complete the pattern. This can be in the form of number of skeins or metres. Below is an example from one of my own patterns I’ve converted from a photo I’ve taken. This is only a partial list:

Example of floss list for a cross stitch pattern, minus the symbols for each colour

The numbers you see in the column for number of skeins, shows that you would need a partial of each skein. By memory, each skein comes in 8 metres in length and you may need about 1 metre of each skein. So you will have quite a lot left over with the exception of black, where you will need the full skein / 8 metres.

I strongly recommend that you take this page of your pattern to your local craft store and use it as part of your shopping list and tick or mark off each colour as you put it into your basket.

Fabric

Sometimes the designer may not state how much extra fabric you will need to stitch your project. They will just state how big the project is and recommended fabric. For example, the stitch size may be 289w by 250h on 14 count navy blue Aida. This is where a fabric calculator can be helpful to calculate how much you will actually need. The website Crosstich.com has an awesome calculator that’s very easy to use. Below is an example of how it works, using the dimensions I’ve used in this paragraph:

Snippet from Crosstitch.com website calculating how much fabric is needed

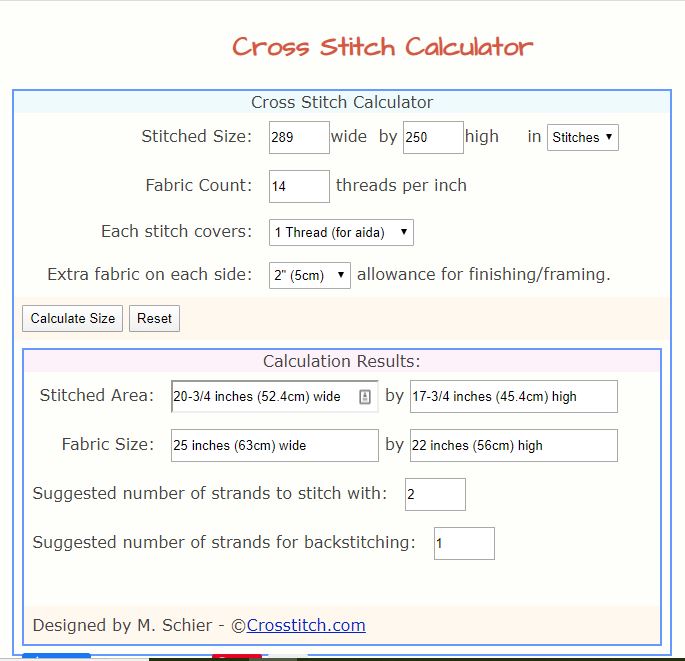
You may also see in the above snippet, is the option to select how much extra fabric you want around the edge of your project. I’ve selected 2 inches/5 centimetres. There is the option to have 3 inches/8 centimetres. This is your personal choice and potentially how much you can afford to pay for fabric.

The additional reason why I’m talking about the amount of extra fabric you need, is to help with stitching the project and finishing it. The extra fabric will mean that your project can be snugly in a hoop or stand or whatever you choose to keep the fabric taught and your stitches neat. If you choose to frame your project, there’s enough fabric to stretch it into place so that it looks just the way you want it!

It’s also your choice for the numbers you enter for the number of strands for your project. This won’t have an impact on the size of fabric the calculator recommends for you. It may have an impact on how many skeins per colour you choose to purchase!

Purchasing your fabric

In this digital age and the internet at our fingertips, we can choose to purchase our supplies online or we can find out where our local craft store is that sells the fabric we want and need. In Australia, the two major craft stores closest to where I live are Lincraft and Spotlight. From there I can purchase pre-cut Aida in a some colours, counts and dimensions. I can also go in store and purchase some fabric off the roll in a size that I need. The fabric they have on rolls will vary from store to store. Thankfully, there are smaller business that I can purchase other fabrics from and they have a wider variety of fabrics, count size and dimensions.

I’ve also really enjoyed going to craft shows and checking out the fabric section of store to see if they have any off-cuts I can purchase for potential projects down the track. I find that they have many fabric colours that I haven’t seen on the internet.

Preparing your fabric

Some people hate it when the edges of their fabric start fraying while they’re working on their project. I’ve seen on some American floss tube clips that the edges of their fabric already have been serged as part of the process that American shop owners choose to do. If you have an overlocker or know someone who has one, you can use it to go around the edges of your fabric. Another option is to use your sewing machine and use the zig-zag stitch or you can hand sew the edges.

Example of serged edge – image from Google search

If you are choosing to use Aida, some people have complained about how stiff it can be when they start using it and it’s turned them off from wanting to use it ever again. I’ve certainly experienced some stiff Aida and it has been annoying to get it into the hoop. I have found that over time, the fabric softens as I continue to work with it. I’ve also heard of people washing it before they use it and trying to soak it with fabric softener or similar products. How successful they are, I’m not sure. All I can say is do what works for you!
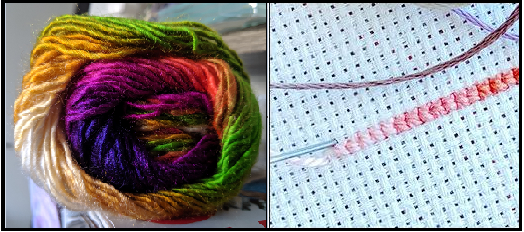
Floss

The size of your project will depend on how many colours you need to purchase. If you’re needing to purchase a lot of colours, you could:

  • purchase a few colours at a time and stitch with them until you need to purchase some more
  • purchase all of the colours in one go
  • raid your stash to see if you have some left overs from previous projects
  • have a chat with stitchy friends and family who may be able to give you some of their left over colours

Tip: If you’re purchasing your floss from a craft store, I strongly recommend you include in your basket some floss holders (aka bobbins) and a storage container to hold all of your colours. The image below is an example of what you can purchase.

Plastic Bobbins – image from the DMC.com website

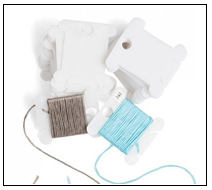
You may hear of people talking about ‘bobbinating’ their threads. What they’re doing is winding their threads onto the bobbins, like the image above (that come in plastic and cardboard) and writing on the bobbins or using stickers like the ones you can purchase in the image below. If you conduct a search in your preferred search engine, you should be able to come up with some stores who stock these awesome stickers!

DMC Floss Stickers – image from Google image search

Needles

The size of the needle you use for your project will depend on the size of fabric you’re using. Using the right needle size will mean you’re stitches will be neater and there won’t be any obvious holes from your needle. Below is a table of what needle size you’ll need for the fabric size you may be stitching on:

Needle and fabric chart – information from the websites DMC.com and mystitchworld.com

Another thing to consider with your needles, is whether they’re silver all-over or have a gold or brass colour around the eye of the needle. This comes down to personal preference. Some people find that the needles that are gold plated move through the holes in the fabric smoother than the silver needles. Some people also find that the silver needles tarnish over time from the oils and other excess moisture and crumbs from our fingers, and may impact the ease of the needle moving through the fabric and thread on their projects.

Armina from Stitch Floral wrote a great post about ’10 things to remember about hand embroidery needles’ and suggests the use of ‘a strawberry cushion filled with gritty emery powder, pull the needle all the way through it in one direction.’ The aim of this is to sharpen the needle and remove any moisture on it, resulting in your needle remaining sharp and moving through your fabric smoothly.

Admittedly, I’ve been pretty lucky with my needles in the sense that they have tarnished a bit over the years through wear and tear and moisture on my fingers. The only adverse affect my projects have had from me using these needles is me using the wrong needle for the size of the fabric I’m working on. More often than not, I’m using needles from previous kits I’ve stitched or snaffled out of my sewing box.

That said, I agree with Armina from Stitch Floral when she says that needles are inexpensive. It’s possible to pick up a pack of needles from your local craft store or online for a few dollars. If you’re not sure on what to do with your old needles that you don’t want to sew with anymore, check out the post by Superior Threads in the related reads at the end of this post!

Putting it all together

Thankfully there are many, many Flosstube clips from a variety of stitchers who have been wonderful in sharing how they organise their projects. Hopefully you find some of the clips below of use and interest!

‘How I Approach My Cross Stitch Projects’ by CatCrazyCreations. Uploaded on 13 October 2015
‘Floss Tube 8: How I Setup and Start Large Cross Stitch Projects’ by Stitching Jules – Uploaded on 2 March 2017
‘How I do large cross stitch projects’ by Stitching Jules – Uploaded on 5 December 2017
‘Tutorial – How to start a cross stitch project’ by Stitchin’ Mommy – Uploaded on 20 April 2017

Final thoughts

I hope this post has helped you with kitting up your own project. It’s been a long time since I’ve started a project that’s been kitted up for me and I find kitting up my own project can be rewarding and it can show me where the gaps may be in my collection. My boyfriend has been amazingly patient when he’s been with me in the craft stores and I’ve been busy finding all of the threads I need. He’s also started helping with finding the threads as well and that’s helped a lot!

At the end of the day, the strongest recommendation I can provide you is do what works for you. If a pattern recommends the use of linen, but you find that the count size is too small, use the calculator to find out how much fabric you need for a smaller count size. If floss bobbins aren’t your thing, floss organisers like the ones you get in your kits can be re-used. Have a chat with fellow stitchers and find out what they do. They may have a different system to what I’ve suggested in this post that works really well for you.

Until next time, happy stitching!

Related reads:

Posted in Uncategorized

A to Z of Cross Stitch

How much has changed?

It’s been 10 years since the Cross Stitch Crazy magazine has released their 120th issue with the article titled A-Z of Stitching pages 42 to 44. Which got me thinking about how much cross stitch has or hasn’t changed over the last 10 years at least. This is my take on the A to Z of Cross Stitch…

A Aida, Apps and Anchor threads, Accessories, Acronyms and Anchor patterns. Without them we wouldn’t have such awesome and amazing projects to share with everyone.

B Backstitch, Biscornus and Blogs. Backstitch can make the world of difference to a picture. Providing an added element of detail that other stitches are unable to provide. Biscornus (aka fancy pin cushions) are beautiful. And blogs about all things cross stitch, are a modern way for all of us to share and read about the different things we’re up to and learn a few tips and tricks along the way!

C Charms, Cross-Country stitching, Confetti Stitches, Craft Fairs, Country Threads, Counting and Community. **deep breath** So many C’s! Aside from backstitch, charms are another way to embellish your project and a non-stitchy element to your project. Via our communities, we can learn about we can deal with confetti stitches, when the next craft fair is on and the importance of counting for any project while we share some of the Country Thread patterns we’ve stitched. Meanwhile, cross country cross stitching is just one of the many ways in which you can stitch your project as shown in Pam’s Crafty Corner clip below.

D DIY and Digital Patterns, DMC Threads and Dimensions cross stitch kits. In recent years, we have seen an increase in the promotion of making your own patterns and the use of digital born patterns. Both of which have been aided by the IT devices we use and the necessity of the Internet. Meanwhile, DMC threads are the most commonly/frequently used threads on many commercial patterns and personal choice by many stitchers. Lastly, I love Dimensions kits because of the beautiful patterns they make and the challenge of blended threads – e.g. one strand of red with two strands of orange – that create shades and highlight areas of a project that could not be otherwise achieved.

E for Evenweave and Embracing the messy back of your work. Evenweave was also part of the Crazy Cross Stitch’s A-Z and necessary to include it here. It can be difficult to stitch on, but the affects of it can be amazing! All the while embracing the messy back of your work and remembering that how the back of your work wont matter if you have it framed…

F for Frogging, FFO’s (Framed Finished Objects) or Finished Objects. Unpicking unfortunately is a necessary evil of our craft at times. However, celebrating our framed finished objects or finished objects can be rewarding

G Get Moving. Our craft means that we sit still for long periods of time. We need to take care of our selves to ensure we can continue stitching for decades to come. How you move is up to you. I run when I can and regularly go to the gym and train with an awesome group of people and trained by two awesome trainers. The trainers and the people I train with are supportive and bring a high level of positive energy and fun to the sessions. I strongly encourage you all to find a way of moving and keeping fit and healthy that works for you and your lifestyle.

H Hoops and Heaven and Earth Designs (HAED). Hoops are just one of the ways in which we can keep tension on our WIPs such as our HAEDs. Additionally, hoops have been used as an alternate way to framing our finished objects. Peacock and Fig in their clip below provide a great tutorial on how to use hoops to frame your finished projects.

A unique way of framing your projects – published on 26 September 2016

Meanwhile, how can I not mention HAED! In my mind at least, their team of designers and artists create some of the most beautiful and intense patterns on the market. And for many people I’ve spoken with, blogs I’ve read and YouTube clips I’ve watched, they all aspire to work on a HAED one day or they have completed one or are working on at least one.

I Internet. A necessity in today’s modern world. I love that it enables us to share so many different things with each other. Which in turn means that we have information at our fingertips and it is so much easier to see and speak with someone who is in a different time zone. Let alone be part of the world when we may not always be able to physically step out into it.

J Join a club. The Cross Stitch Crazy magazine suggests this back in 2009 and it’s still very much relevant today. It can be an official club or a social/unofficial one that you have with your friends who share an interest in hand crafts. The Internet has assisted this with widening the size of the group and the areas in which their members live. Additionally, attending face-to-face club meetings or social gatherings (where possible) is vital for everyone’s health and well-being.

K Kits and Knots (not always the good kind). Whether you kit up a project yourself or purchase one, having all of your tools together for a project your working on makes life so much easier. You can just pick up the bag you have your project in and move it from one room to another or wherever you want to work on the project. Meanwhile, knots can be a good and bad thing. It just depends on what your intention is! The good kind would be French Knots and similar ones that are used to enhance a project. They are the kind of knots we want people to see. The bad kind are ones at the back of our projects when our threads have gotten twisted and tangled up.

L Lighting and the loop method. Lighting is so important to all of us – especially when we’re working on our projects. Meanwhile, I love the loop method as a way of starting off on a new colour on a project I’m working on when I’m stitching two over one. The clip below by Needlepointers shows how the loop method is used.

Published on YouTube on 10 February 2014

M Mill Hill Seed Beads, Magnifiers and Metallic Threads. Many years ago I stitch a fairy garden picture for my Mum and it had a lot of metallic threads and seed beads in it. Throughout the entire time I was stitching it, I was cursing the seed beads and the metallic threads because the beads kept going everywhere and I wasn’t use to stitching with metallic threads. The good thing is that it turned out to be a beautiful picture. Below is a sample of the Garden Fairy project I worked on…

Page 7 of the Cross Stitch Fairies book – Design by Joan Elliott – (C) 2005

Meanwhile, magnifiers are a wonderful tool to have in your stash. Especially if you are working on intense projects (e.g. a HAED or project on small count/linen) or you feel that your eye sight isn’t what it use to be or it’s the end of the day and you’re feeling a bit tired.

N Needle Minders/Needle Nannies, Needles and New projects. I love starting new projects because they’re a clean slate and it’s the excitement of starting something new. I have also fallen in love with needle minders and I wish I had come across them sooner. I received my first needle minder as a birthday gift in 2018 and purchased some more this year at the Canberra Craft Alive Fair. Meanwhile, how can I not talk about needles! Their size will always have an impact on how our projects look and potentially how many times we swear if we use sharp needles and have a tendency to poke ourselves with them! But we wouldn’t be able to do our craft without them and the clip below by Penguin and Fish provides us with an insight to the difference between embroidery and cross stitch needles…

O Online shopping, Ooos and aahs and Organisation. The Cross Stitch Crazy magazine highlighted the importance of being organised and it’s still important now. The awesome thing is that many people have written about the ways they have organised their craft rooms and how they organise their threads generally speaking and for their projects. Ultimately, organise your space and projects in a way that works for you. That way you can be sure to receive the ‘oooos and aaaahs’ you deserve when you share your WIPs and finishes with everyone! Meanwhile, I love online shopping. Especially if I’m unable to make to the shops or they don’t have what I need and what I need is only available interstate or overseas.

P Preservation, PDF patterns and Pinterest. I have an addition to Pinterest. I could spend hours and hours scrolling to the various pins and searching for inspiration for craft and fitness. Which has enabled me to fall in love with some patterns that are available as PDFs and I’ve purchased through an Etsy shop. Which has me contemplating how I’m going to preserve the digital and physical patterns I have and the longevity of projects I’ve finished…

Q Quick gifts and Q snaps. The Cross Stitch Crazy magazine loves quick gifts as their Q item and their magazine for years has provided us with beautiful and amazing patterns that we can stitch and have completed within a day through to a week. Meanwhile, I’ve recently been made aware of Q snaps as an alternate to the hoops we can use while we’re working on our projects.

R Resizing a pattern. Sometimes we can come across a pattern we love, but the recommended count size may be too big or too small. Pam Anderson on The Spruce Crafts blog has recently written about how you can adjust the size of pattern and fabric count in accordance with your preferences.

S Scissors, storage and stitch-all-the-things. At times I get overwhelmed with all of the amazing and beautiful patterns out there and I want to stitch all of them at the same time. If I had the time, I could and if I had a very organised storage system. Like the letter ‘O’, the way you store your collection of threads, fabrics, patterns and tools, will have a huge impact on how you achieve the end result! Meanwhile, scissors are one of my most valued and important tools in my kit. I’d hate to think how my projects would look if I didn’t have any scissors!

T Take your time and Travel. One of the things I love about travelling by bus from Canberra to Sydney is that I can work on my cross stitch for about 3 hours. I’ve also gone on road trips with family and friends to Mittagong, Mogo and various craft stores around Canberra to get the supplies I need. Meanwhile, when you can, take your time and enjoy the project you’re working on. Try not to rush your project because it can result in the threads being pulled too tight and causing gaps and uneven crosses.

U Unique stitches and Unfinished Objects (UFO’s). What would cross stitch be without these two things? All stitches in embroidery/needlepoint could be considered unique because of their appearance and what they add to each project. One of the most special or unique stitches I’ve come across since I’ve been watching YouTube clips is called Jessica Stitches. The clip below shows how these stitches are done:

Clip by Needlepoint Now – Published on YouTube on 1 May 2015

To help put this unique stitch into context, a blog post from October 2017 by A Stitching Love Affair shows how they can really add to the project.

Meanwhile, for many of us stitchers, we can have quite a few UFO’s that we have the best of intentions of coming back to to work on. Then a new pattern catches our eye and it spirals from there!

V Variegated threads are beautiful – Cross Stitch Crazy loved them in 2009 and nothing has changed since then. Below is an image of what variegated threads look like and how they can look when used in cross stitch:

Variegated yarn on the left that I picked up from the Canberra Craft Alive Fair and the image on the right is from Peacock and Fig.

W Waste material that comes from us trimming our projects once we’ve completed them. In 2009 Cross Stitch Crazy they were fully supportive of reusing waste Aida and similar fabrics for other projects such as book marks, tags for gifts, cards and Christmas decorations to name a few. Then there’s the waste threads we have from our projects that we could use for the filling of pin cushions, pillows, Biscornu’s and similar projects.

X Could this be one of our favourite letters in the alphabet? Without the X what would our craft be called? Then there’s the X stitching websites, businesses and blogs such as The XStitching Runner!

Y Your stitching thoughts. It was relevant in Cross Stitch Crazy in 2009 and it is well and truly relevant in 2019. The internet has enabled all of us to share our thoughts and perspectives on cross stitch through social media and I for one is more than thankful for this ability!

Z Zombies, Run! This app is amazing for helping me getting up and moving and taking a break from stitching. You are Runner 5 and you are part of Able township. With the help of Sam and a team of runners, you are searching for a solution to the zombie apocalypse and saving any survivors.

Related posts and links: