Posted in How To, Tips and Tricks

How can board games help to prompt you with your cross stitch?

Hi Everyone

When I’ve been watching some flosstube clips, people have talked about homework and their involvement with an online group called ‘Magical Stitches’. My understanding is that the Magical Stitches group focus on certain authors or books throughout the year and they have prompts that come from those books that translates to their stitching. For example, a book may be Red Riding Hood and one of the prompts could be ‘200 stitches on a project with red in it’. Another prompt may be ‘work on a project that starts with the same letter/s of the author of the book’.

Similarly, I’ve seen some people use the decision maker app on their phones to help with deciding what project to work on next; especially during Stitch Maynia. I’ve considered using a similar app for the next time Stitch Maynia comes around, because it leaves a bit of mystery around what I’m going to stitch next.

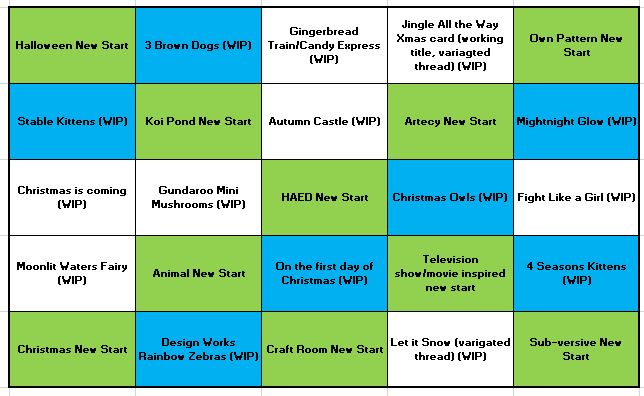
More recently though, I’ve seen some people on Flosstube talk about WIPGO. The premise is drawing up a bingo card that has all of your works in progress (WIP’s) and potentially some new starts, depending the size of the board you want to have. The image below is a mock-up of what the board could look like. I’ve inserted my own WIPs and potential new starts. The new starts are in green and the blue squares are animal based WIPs.

WIPGO inspired board based upon my own works in progress and potential new starts

Monopoly as a decision maker?

The traditional game of Monopoly has been around for decades. In recent years, variations of the game have been created, including DMC’s version called Stitch-opoly. The premise for Monopoly – regardless of what version or variation you’re playing is to become a real-estate mogul and force the other players into bankruptcy. But what if you also used it as a way of deciding what you were going to stitch, when and how long for?

Classic Monopoly Board Game – image from Amazon.ca website

How it would work:

Using the traditional board, each property represents different projects in your stash. The price to purchase each property is the number of stitches you need to apply to or stitch on that project. For example, one of the projects in my stash is the Gundaroo Mini Mushrooms. It’s a big, intense project that has taken me over a year so far to get nearly half way. Using the Monopoly board, I would apply that project to the Mayfair and if I landed on it and ‘purchased’ it, I would have to put 400 stitches into it because of its purchase price.

Alternatively, the colours used for each property series – red, green, dark blue, light blue, yellow, orange, purple, mauve, railway stations and utilities – could be applied to the projects in your stash. For example, you may have three projects that have a lot of orange in them or the name of the projects or the name of the artist/creator have a strong connection to the word orange and how it’s spelt. The idea behind this link to your projects and the colour is based upon a Facebook group called ‘School of Magical Stitches and Literature‘. Each year the theme changes and this year the group is for people who wish to read and Cross stitch the Disney Kingdom Keepers by Ridley Pearson and the Villans series by Serena Valentio. A reading list is available for the group so that you can read along with your fellow group members and help you with understanding where the prompts come from for what, when and where you apply your stitches.

The additional variation to the Monopoly game and how you could apply it to your projects, is the meaning behind the roll of the dice. For example, you roll the number 3 and that could mean you have 3 days to complete the number of stitches required for the project (property) you land on.

What if I go to gaol (jail) or land on free parking?

If you go to gaol, then the following things could happen:

  • You work on a project you’re struggling with. The amount of time you spend on that project is based upon how many times it takes you to roll a double to get out of gaol. If you’re unable to roll a double within 3 turns, then you stitch an additional 50 stitches because the game traditionally requires you to pay $50 to get out.
  • You work on a project that is connected to reasons why you could go to gaol or the people or services who protect people from others who try do the wrong thing. For example, tributes to emergency service workers. The amount of time you spend on that project is based upon how many times it takes you to roll a double to get out of gaol. If you’re unable to roll a double within 3 turns, then you stitch an additional 50 stitches because the game traditionally requires you to pay $50 to get out.

Meanwhile, if you land on Free Parking, then you can do whatever you want. You can take a break or start a new project or purchase a new project. Or anything else you want to apply to that square.

Chance, Community Service, Taxes and Passing Go or Landing on Go

The Chance and Community Service cards could be awesome wild cards to make things interesting by helping or hindering the choices you make with your projects and how much time you spend on them.

Meanwhile, the taxes squares will remain as the squares you don’t want to land on because they are the penalty squares that will determine how much longer you spend on your projects.

Normally in the game of Monopoly, you get $200 for passing or landing on Go. This can be a blessing if you’re struggling and need the money to stop you going bankrupt. Alternatively, the additional funds can help you with purchasing more houses and hotels for the sets you’ve purchased. In the context of how this can help you with your cross stitch projects, this will depend upon how you’re progressing in the game. If you have a ‘set’, then your additional funds could be used to make your ‘competitors’ squirm. If you have a ‘set’ and someone lands on your property/project, they will have to stitch the amount of ‘rent’ allocated to that property that has however many houses or hotels on it. Alternatively, if you’re at the other end of the scale, the additional credits can help you with being able to ‘afford’ the ‘rent’ of the ‘property’.

What about ‘sets’ and landing on other ‘properties’?

Like the traditional game of Monopoly, how you obtain property sets remains the same for this style of the game. You can negotiate with the other players if they have a colour or property you need to complete your set. Alternatively, you can wait until you have landed on that square.

Meanwhile, if you land on someone else’s ‘property’, then you need to stitch the amount of ‘rent’ that would be traditionally paid to the owner. If another player lands one your ‘property’, then you receive credits or ‘rent’ and that player would have to stitch the ‘rent’ owed.

How do you know when someone has won?

Like the traditional game of Monopoly, it can be based upon the amount of ‘credits’ each player has left to the point where all players except for one has ‘credits’. Alternatively, before the game starts, all players can agree to a set period of time that the game lasts for. Another option is all players agree upon some modern rules that other varieties of the game use make it interesting.

What if I don’t have anyone to play with?

The beauty of technology means that the Monopoly game can be played on most gaming consoles. This means that you can play against the computer or you can play online with people from around the world.

It’s been a while since I’ve done any gaming, but I do love playing Monopoly on Playstation 3 and 4. If I were going to play Monopoly in the context of what we’ve talked about here, I would make sure I’m prepared enough for most of the scenarios that could happen in the game.

For example, I would allocate all my WIP’s and other potential projects to the different properties. Any properties I’m able to purchase I highlight and properties that are purchased by the computer, I cross out. Next to each property I do purchase, I note down what number I rolled to get there and what I paid for it. I also mark what is paid to me if any of my components/competitors land on what I’ve purchased.

PropertyProjectProperty purchase priceDice RollRent receivedTotal number of stitches
Old Kent RoadChristmas Cards$200 = 200 stitches5 = 5 stitches$2200 over 5 days and 2 days credit
MayfairHalloween$4004$1000400 stitches over 4 days and 10 days credit
Park LaneGundaroo Mini Mushroom$3506$500350 stitches over 6 days and 5 days credit
Bond StreetMoon Lit Waters$3002$200300 stitches over 2 days and 2 days credit
PiccadillyThree Puppies$20012$22200 stitches over 12 days and 2 days credit
Example of how to track actions taken during the came of Monopoly

Related Reads:

Posted in How To, Tips and Tricks

What do you need to know about framing your cross stitch?

Hi Everyone

How many variations are there for you to use to frame your cross stitch? Using the phrase “how to frame cross stitch” – including the quotation marks – 21,000 results came up in my Google results. Many of the results in this search talk about the possibilities of using glass, not using glass, stretching your project over canvas, using sticky board to assist with the framing, using matting board and not using matting board.

Considering how many posts and YouTube clips there are on how to frame cross stitch, the aim of this post is to share with you, some of the most popular ways to frame your cross stitch on a shoestring budget.

The most common threads from the most popular results will tell you about:

Washing your finished project

This can be a personal choice and be dependant upon your choice of fabric and threads. There are some threads may run if they are washed or weren’t pre-washed before you stitched with them. I’ve been really lucky with all of the projects I’ve washed before framing. I’ve only used Anchor or DMC threads, mostly because they’re the most accessible brands to me and up until the last 12 months or so, I hadn’t known about or heard of any other type of threads to stitch with! Tapestry wool being the exception!

I have accidentally spilt coffee and chocolate crumbs on my projects and I’ve been very lucky to have them easily wash out. Or I’ve been able to stitch over the spots without any worries – if a mark has been left after the washing.

One of the important things I want to note is that for the majority of my projects, I’ve hand washed them in the basin of my bathroom with a little bit of hand soap – liquid or bar – in warm to cool water. I’ve tried not to rub my stitches too much, but enough to remove any crumbs or marks if there had been any. I’ve also rinsed my project with warm to cool water to remove any soap residue. I’ve then lightly squeezed my project to remove the excess water and laid it flat on a towel to dry over night.

From an audio-visual perspective, below are a couple of clips that may help you with washing your projects, if you’re feeling a bit uncertain about what to do…

‘My gridding pen washed out super easy…’ by Stitching Jules – uploaded to YouTube on 8 December 2017
‘Washing your cross stitch and embroidery’ by Peacock and Fig – uploaded to YouTube on 17 September 2016

Once dry, I’ve ironed the front and back side of my project, taking care with areas that have beads and backstitch. You may find that some people are quite particular about which side of their project should be ironed – if at all. I’ve been lucky and not had any problems. It’s also been the main times I’ve brought out the iron and ironing board!

Measurements

How large your finished project is will have a major influence on the frame size you choose. The measurements will also impact your choice in mat board and what board you have to back your project. It’s also important to note that the amount of excess fabric you have around your project will have an impact on how you frame it. For example, do you really need a metre of fabric around your project? This example is excessive, but you get my point! On average, having an inch or two – 4 maximum (5 to 10 centimetres) around your project is the perfect amount because it gives you enough room to effectively stretch your fabric and have it centred in the frame.

Choosing acid-free materials

The acid-free materials will range from the foam and mat boards to the sticky board or threads you use to lace your project. This is important because they will ensure the longevity of your project and hopefully it will become a family heirloom!

Lacing

When I first started cross stitching and the term ‘lacing’ was mentioned, I thought it was something to do with lace in fashion and homewares. But it’s actually to do with the process of stretching your project over some foam board or cardboard, so that it’s nicely centred in your frame. Below is a clip to help further explain how lacing works and how you can do it too!

‘Lacing the lazy way’ by Lindy Stitches – uploaded to YouTube on 8 August 2019

Mat board

This can be a personal choice as well. Many frames you can purchase from the shops come with its own mat board. When you have pulled apart the frame, place the matting board over the top of your project to see if the matting board enhances or detracts from your project. It’s also important to note that the purpose of mat board is to stop your project from touching the glass – if you choose to frame your project with glass. According to the Frame Shop, mat board can protect your project from moisture because of the small gap it creates between the project and the glass.

If you find the perfect frame, but you need to adjust the mat board it comes from, Peacock and Fig has put together a great clip on how to customise the mat board to suit your needs.

‘How to cut a mat’ by Peacock and Fig – uploaded to YouTube on 28 May 2015

Frames

Whenever I’ve decided to frame a project, I’ve taken my project with me to the shops I want to get my frame from. This enables me to see what’s on the shelf and see if the project works with the frame. Felt Magnet recommends this in their post about framing your project as well. The aim is to find a frame that compliments your project. Tip: choose a colour in your project that you have used a little bit of. Find a frame in that colour or find some paint that you can use to paint the frame you’ve chosen. Alternatively, you may choose to wrap the frame in fabric or paper or any other medium that suits your project. Additionally, your frame can be made out of whatever materials you think suit and compliment your project. I’ve seen on the internet, how creative people have gotten with their frames. Some people have chosen to utilise materials from around their home or local stores that enhance their projects. Below are some images of what people have done:

Image from Google search. See diyinspired.com for a closer look at this frame and more ideas.
Image from Google search. See websiteherpetologistsleague.com for a closer look at the image and more framing ideas.
Image from Google search. See amazinginteriordesign.com for a closer look at this idea and more framing ideas.

Summary

When I’ve framed my own projects, I’ve taken a stab in the dark. I’ve not looked up anything on the internet. I’ve usually had an idea of how I’ve wanted the project to look in the frame and had a go at making it right. I’ve made the mistake of racing out to purchase a frame without my project with me and purchased a frame that’s been too big or too small. I still have some of those frames hanging around my home, in the hope that one day I’ll have a project that will suit it.

I’ve kept the glass in all of my projects and I’ve taken the risk with some of the projects by not using matboard and having the project right up against the glass. This is a huge risk with ‘The World’ project (see image below) because I’ve got it hanging up in my ensuite.

I’ve rarely used the lacing method of securing my projects in the frame. More often than not, I’ve used acid-free double sided tape to secure the project to the paper or board that has come with the frame. I have had to be careful to not have the standard picture that’s come with the frame showing through my project. I made that mistake with my ‘The World’ project (see below), but I think it’s worked out for the better. What do you think?

‘World Map: The Elements’ designed by Maria Diaz – notice the darker background. This was unintentional. The darker colours you see in the background are because of the side I used for backing the cross stitch project.

I also recommend you check out YouTube for tutorials on how to frame your cross stitch projects. They will give you the confidence and guidance on how to do what you want with your project. They may also enhance what this post has touched on.

Until next time, happy stitching!

Related reads:

Posted in How To

How to kit up a cross stitch project from scratch

Hi Everyone

If you’re like me and started your love affair with cross stitch with kits helped a lot with learning to stitch and see the finished project. So, progressing to kitting up your next project yourself seems like the next logical step!

What you need

Some of these things may seem blatantly obvious, but can easily forgotten in the rush and excitement of starting a new project. I’ve also purposely not talked about scissors, lighting, stands, hoops, frames, needle minders or any other tools of the trade that can be used while stitching a project. If you are curious about these things, check out some of my previous posts!

The pattern

Many patterns, regardless of where you’ve gotten them from, have some really handy instructions for all stitchers. I strongly recommend you have a read through them, just in case there’s something special you need to pick up from your local craft store. The instructions will tell you what the stitch dimensions are of the finished piece and many of the designers will recommend what fabric size to stitch the project on. Sometimes, the designer may suggest what needle size to use for the corresponding fabric count.

The other component of the pattern is the key that lists all of the threads you need and how much of each colour you will need to complete the pattern. This can be in the form of number of skeins or metres. Below is an example from one of my own patterns I’ve converted from a photo I’ve taken. This is only a partial list:

Example of floss list for a cross stitch pattern, minus the symbols for each colour

The numbers you see in the column for number of skeins, shows that you would need a partial of each skein. By memory, each skein comes in 8 metres in length and you may need about 1 metre of each skein. So you will have quite a lot left over with the exception of black, where you will need the full skein / 8 metres.

I strongly recommend that you take this page of your pattern to your local craft store and use it as part of your shopping list and tick or mark off each colour as you put it into your basket.

Fabric

Sometimes the designer may not state how much extra fabric you will need to stitch your project. They will just state how big the project is and recommended fabric. For example, the stitch size may be 289w by 250h on 14 count navy blue Aida. This is where a fabric calculator can be helpful to calculate how much you will actually need. The website Crosstich.com has an awesome calculator that’s very easy to use. Below is an example of how it works, using the dimensions I’ve used in this paragraph:

Snippet from Crosstitch.com website calculating how much fabric is needed

You may also see in the above snippet, is the option to select how much extra fabric you want around the edge of your project. I’ve selected 2 inches/5 centimetres. There is the option to have 3 inches/8 centimetres. This is your personal choice and potentially how much you can afford to pay for fabric.

The additional reason why I’m talking about the amount of extra fabric you need, is to help with stitching the project and finishing it. The extra fabric will mean that your project can be snugly in a hoop or stand or whatever you choose to keep the fabric taught and your stitches neat. If you choose to frame your project, there’s enough fabric to stretch it into place so that it looks just the way you want it!

It’s also your choice for the numbers you enter for the number of strands for your project. This won’t have an impact on the size of fabric the calculator recommends for you. It may have an impact on how many skeins per colour you choose to purchase!

Purchasing your fabric

In this digital age and the internet at our fingertips, we can choose to purchase our supplies online or we can find out where our local craft store is that sells the fabric we want and need. In Australia, the two major craft stores closest to where I live are Lincraft and Spotlight. From there I can purchase pre-cut Aida in a some colours, counts and dimensions. I can also go in store and purchase some fabric off the roll in a size that I need. The fabric they have on rolls will vary from store to store. Thankfully, there are smaller business that I can purchase other fabrics from and they have a wider variety of fabrics, count size and dimensions.

I’ve also really enjoyed going to craft shows and checking out the fabric section of store to see if they have any off-cuts I can purchase for potential projects down the track. I find that they have many fabric colours that I haven’t seen on the internet.

Preparing your fabric

Some people hate it when the edges of their fabric start fraying while they’re working on their project. I’ve seen on some American floss tube clips that the edges of their fabric already have been serged as part of the process that American shop owners choose to do. If you have an overlocker or know someone who has one, you can use it to go around the edges of your fabric. Another option is to use your sewing machine and use the zig-zag stitch or you can hand sew the edges.

Example of serged edge – image from Google search

If you are choosing to use Aida, some people have complained about how stiff it can be when they start using it and it’s turned them off from wanting to use it ever again. I’ve certainly experienced some stiff Aida and it has been annoying to get it into the hoop. I have found that over time, the fabric softens as I continue to work with it. I’ve also heard of people washing it before they use it and trying to soak it with fabric softener or similar products. How successful they are, I’m not sure. All I can say is do what works for you!

Floss

The size of your project will depend on how many colours you need to purchase. If you’re needing to purchase a lot of colours, you could:

  • purchase a few colours at a time and stitch with them until you need to purchase some more
  • purchase all of the colours in one go
  • raid your stash to see if you have some left overs from previous projects
  • have a chat with stitchy friends and family who may be able to give you some of their left over colours

Tip: If you’re purchasing your floss from a craft store, I strongly recommend you include in your basket some floss holders (aka bobbins) and a storage container to hold all of your colours. The image below is an example of what you can purchase.

Plastic Bobbins – image from the DMC.com website

You may hear of people talking about ‘bobbinating’ their threads. What they’re doing is winding their threads onto the bobbins, like the image above (that come in plastic and cardboard) and writing on the bobbins or using stickers like the ones you can purchase in the image below. If you conduct a search in your preferred search engine, you should be able to come up with some stores who stock these awesome stickers!

DMC Floss Stickers – image from Google image search

Needles

The size of the needle you use for your project will depend on the size of fabric you’re using. Using the right needle size will mean you’re stitches will be neater and there won’t be any obvious holes from your needle. Below is a table of what needle size you’ll need for the fabric size you may be stitching on:

Needle and fabric chart – information from the websites DMC.com and mystitchworld.com

Another thing to consider with your needles, is whether they’re silver all-over or have a gold or brass colour around the eye of the needle. This comes down to personal preference. Some people find that the needles that are gold plated move through the holes in the fabric smoother than the silver needles. Some people also find that the silver needles tarnish over time from the oils and other excess moisture and crumbs from our fingers, and may impact the ease of the needle moving through the fabric and thread on their projects.

Armina from Stitch Floral wrote a great post about ’10 things to remember about hand embroidery needles’ and suggests the use of ‘a strawberry cushion filled with gritty emery powder, pull the needle all the way through it in one direction.’ The aim of this is to sharpen the needle and remove any moisture on it, resulting in your needle remaining sharp and moving through your fabric smoothly.

Admittedly, I’ve been pretty lucky with my needles in the sense that they have tarnished a bit over the years through wear and tear and moisture on my fingers. The only adverse affect my projects have had from me using these needles is me using the wrong needle for the size of the fabric I’m working on. More often than not, I’m using needles from previous kits I’ve stitched or snaffled out of my sewing box.

That said, I agree with Armina from Stitch Floral when she says that needles are inexpensive. It’s possible to pick up a pack of needles from your local craft store or online for a few dollars. If you’re not sure on what to do with your old needles that you don’t want to sew with anymore, check out the post by Superior Threads in the related reads at the end of this post!

Putting it all together

Thankfully there are many, many Flosstube clips from a variety of stitchers who have been wonderful in sharing how they organise their projects. Hopefully you find some of the clips below of use and interest!

‘How I Approach My Cross Stitch Projects’ by CatCrazyCreations. Uploaded on 13 October 2015
‘Floss Tube 8: How I Setup and Start Large Cross Stitch Projects’ by Stitching Jules – Uploaded on 2 March 2017
‘How I do large cross stitch projects’ by Stitching Jules – Uploaded on 5 December 2017
‘Tutorial – How to start a cross stitch project’ by Stitchin’ Mommy – Uploaded on 20 April 2017

Final thoughts

I hope this post has helped you with kitting up your own project. It’s been a long time since I’ve started a project that’s been kitted up for me and I find kitting up my own project can be rewarding and it can show me where the gaps may be in my collection. My boyfriend has been amazingly patient when he’s been with me in the craft stores and I’ve been busy finding all of the threads I need. He’s also started helping with finding the threads as well and that’s helped a lot!

At the end of the day, the strongest recommendation I can provide you is do what works for you. If a pattern recommends the use of linen, but you find that the count size is too small, use the calculator to find out how much fabric you need for a smaller count size. If floss bobbins aren’t your thing, floss organisers like the ones you get in your kits can be re-used. Have a chat with fellow stitchers and find out what they do. They may have a different system to what I’ve suggested in this post that works really well for you.

Until next time, happy stitching!

Related reads:

Posted in How To, Tips and Tricks

How Do You Teach Someone to Cross Stitch? Part 5 – The Final Touches

Hi Everyone

This is the last post of the series and looking at the date (in Australia, it’s Sunday 29th December, 2019), the last post for this year!

We’ve come a fair way in this series. We’ve considered who our student is and what their learning styles and abilities are, and some of the tools of the trade that may help them with starting out in cross stitch and hopefully enjoying it! We’ve had a quick look at some of the different patterns that are out there, with the strong recommendation of starting your learner out on a kit before embarking on chart and kitting things up themselves. Let alone embarking on a project that has a fabric count size 20 or over!

With these things in mind, we now need to have a chat with our learner about how they want to finish their project and the potential for back-stitch, beads, French Knots and what should be done with it when we’re done.

Back-stitch – is it overrated or a necessary evil?

Over the years I have definitely complained about doing back-stitch on many of my projects. Sometimes it’s because there’s so much of it and it’s felt like I’ve been working on the project for a really long time. Other times it’s because I’m just really keen to get moving onto a different project and I’m procrastinating the inevitable. That said, I know that really, back-stitch isn’t really all that hard. Tedious at times yes, but not hard. It also makes the world of different to a project and makes things stand out in a way that other stitching wouldn’t be able to do – that I’m aware of. If anyone does know of another stitch similar to back-stitch that can be used in cross stitch, I challenge you to show me!

Reading the pattern however, for doing back-stitch on a project – that may be another reason why I grumble about it. Because the pattern will remind me where I’ve fudged things on the project and when I go to try and follow where the back-stitch needs to be, I get annoyed at myself all over again. To help you understand why this is, the two clips below by Peacock and Fig, explain how back-stitch works in cross stitch projects:

“Backstitch tutorial for embroidery and cross stitch” by Peacock and Fig – uploaded to YouTube on 14 November 2015
“Intermediate backstitch techniques: handling long runs of backstitch” by Peacock and Fig – uploaded to YouTube on 31 October 2017

For some of the projects I’ve worked on that have had long runs or long lines of back-stitch, I’ve carried my thread from point A to point B without any stops in-between. This could cover a number of centimetres and I’ve then gone back and put some small anchors along the line to secure the thread. I’ve found this to have a bit more of a cleaner view rather than stitching the individual stitches and it saves a bit of time. You may need to help your student with starting and finishing the back-stitch to ensure the stitches stay put.

French Knots or Beads

This is something you and your student will need to have a chat about, regarding whether or not your student wants to give them a go. Personally, it’s taken me a very long time to get the hang of doing French Knots and I have used beads instead of the knots. An example of how this can look is shown below:

“Angel Bear with Candle” – design by Joan Elliott (C)2006 – stitched by Kristen Gawronski (The XStitching Runner)

The additional tip I can provide you and your learner with if either of you choose to use beads, is the smaller the bead, the fiddlier they are going to be to use in the project and you’re going to need to use a thinner needle than what was used to stitch the project. The image below shows the needle I use for beading. Unfortunately I’ve lost the packaging that the needles came in, so I’m unable to let you know the details of the brand and needle size. What I do like about these needles is that they are a little longer and thinner than the regular embroidery needle and I’m able to get a little Mill Hill Seed Bead on the end of the needle. Which helps a lot when I’m trying to pick a bead out from the packaging and adding it to the project, like the ‘Angel Bear with Candle’. I like to grow my fingernails a bit and I find it difficult to pick out just one of the little beads out of the packaging because of my nails!

Needles I use for beading. Brand and needle size unknown.

Additionally, I use one strand of cotton that’s the same colour (or as close as possible) as the bead I’m attaching to the project. My logic for doing this is to make it as seamless as possible and the centre of the bead is sometimes so small that it can only handle one or two strands at the most.

Washing your final project

Have you ever taken a project out of a stand, hoop or frame and found that your hands weren’t as clean as you thought they were – even though you thought you were diligent about washing them before working on the project? Don’t worry. Accidents happen. Even with the best of intentions!

Washing a project after it’s been finished is a personal preference for many people. If I’ve been working on light coloured fabric, I prefer to wash my projects to be absolutely sure I’ve not left any grubby marks on it. My logic behind this is I want the project to last for as long as possible. By removing any contaminates from the fabric, it puts my mind at ease knowing that I’ve done what I could to remove anything that could increase the deterioration of the fabric or threads.

It’s important to note that whenever I’ve washed my projects, I’ve hand washed them in the basin with some warm water and hand soap. Nothing fancy. I’ve rinsed the project in cool to warm water and gently wrung the project out and laid it out flat on an old, clean tea towel. I’ve usually left it overnight and then used an iron to smooth it all out. I’ll usually iron the back side of the project to ensure the iron doesn’t catch on any of the back-stitch or cause any problems with the French Knots or beads.

However, this is a personal preference and you will need to have a chat with your student about what they want to do about washing their finished project. Aside from potential marks from dirty hands or accidental spillages, another deciding factor will be what your student wants to do with the finished project. Do they want to frame it? Make a card? Turn it into a pin cushion? No decisions have to be made straight away. There are a lot of options out there regarding the way a cross stitch project can be fully finished. In the related posts section at the end of this post, is a link to an earlier post I wrote on what finishing options there are, if you or your student choose not to frame.

End of a series, but not goodbye…

It’s been fun and interesting writing this series. I hadn’t anticipated parts of it being so difficult to write – mostly the parts about doing the actual stitching! I’ve likened it to teaching someone to drive. Whilst the two activities are very different, it’s the fact that both activities are so hands on, that at times it can be easier to just jump straight in and make adjustments as you go!

Thank you for bearing with me throughout this series. I hope that you have picked up on some different things that help you and your student. I’ve certainly learnt a bit about different learning styles and going through my stash has reminded me how much I have and how much I want to stitch!

So until next time, happy stitching!

Related posts:

Posted in How To, Tips and Tricks

How do you teach someone to cross stitch? Part 4 – Patterns, Projects and Stitching

Hi Everyone

We’re now getting to the fun part of teaching someone to cross stitch! Well, fun in my opinion anyways! In this part of the series we’re going to take a look at pattern choices, starting a cross stitch project and the different ways to do cross stitch.

I’ve always loved the prospect of starting something new and seeing something new come out of a blank canvas. I love the different options available to us regarding fabric, patterns and the tools of the trade. It may be part of why it takes me a while to fully finish a project, because there are so many options out there and I want to stitch them all! But I digress…

Choosing a pattern or a kit

By now, I hope that you and your student have gotten to know each other and you know what their interests abilities are, which will enable both of you to pick out a pattern that will suit them and keep them interested long enough to finish it.

For someone who is completely new to cross stitch, it would be best for them to start with a kit, because the majority of what they need will be in the kit – i.e. fabric, threads, a needle and most importantly, the pattern. The question is…which one when there’s so much to choose from?

Patterns and kits for kids

When kids are concerned, the simplest pattern design with a few different colours is probably the best one to go with. Because it has at best, 3 to 4 different symbols on a chart they need to worry about and the simple design means that the chart should be easy enough for them to read.

Examples of simple patterns and kits for kids include the following:

Image from the website 123Stitch.com – Designed by Dimensions

According to the 123Stitch.com website, this Unicorn Poop Emoji kit comes with everything, including 11 count Aida, the black hoop we see in the picture and all of the things needed to complete the project. This particular kit I think ticks alot of the boxes for kids these days because it’s poop! Also, in Australia at the moment, the unicorn theme has been strong and emojis seem to be here to stay, so why not embrace them?!

Baker Ross Wooden Flower Cross Stitch Keyring Kits for Beginners (Pack of 5) Embroidery For Kids – images from the Amazon UK site

These particular kits are from the UK Amazon site and they could be a fantastic way of introducing kids to cross stitch and embroidery. With these kits, there’s no pattern they have to follow. The holes are already drilled into the wood. All the kids need to do is decide what colours they want to use where because the kit comes with the threads and needle.

Scrolling through the Net…

Another idea is to jump onto the Net and have a scroll through some different websites that may spark some inspiration. The website OzStitch.com.au for example, has a couple of pages dedicated to kits that can be stitched by kids. Meanwhile, The Fox Collection has some pages on kids crafts and mini kits that could be of interest.

Patterns and kits for teenagers and adults

If your student is a bit older, then you have a bit more wriggle room for options in design. This is a lot to do with the complexity in the designs and your student’s potential ability to more patience and time to sit down and work on the project. It also means that your older student may be able to cope with a larger count size – e.g. 14, 16 or 18 count.

Personally, I’ve found the Country Threads patterns and kits by Fiona Jude to be absolutely awesome. The patterns are easy to read and they are comfortable size to work on. Meaning, it took me an average of three months to complete one of Country Threads patterns and that’s all the while working full time and in many circumstances, studying online part-time as well. The other thing that attracts me to the Country Threads designs is that there’s little to no backstitch and it’s a mix of full cross stitch and half stitch (aka tent stitch) and some patterns may require some French Knots.

Subversive cross stitch

This is something that may be of interest for teenagers and adults who may be more into quotes or words rather than images. The main challenges in this case, will be deciding on which font to use, how much swearing there is and which quote or word fits best with your student! Because the Internet and the stitching community has fully embraced subversive cross stitch and it doesn’t look like slowing down any time soon!

On a related note to the swearing, even if there isn’t any swearing in actual pattern, there may be a bit of swearing as the stitching commences because of the number of times that you or your student stabs themselves with the needle, the amount of un-picking that may happen and figuring out where you or they are on the pattern!

If you and you’re student still aren’t sure on what to stitch because nothing’s really jumped out at them, another idea is that your student could try designing their own pattern. All you and your student need is some graph paper and some colour pencils and some creativity and imagination to bring it to life!

A kit has been chosen…Now what?

Hemming the edges of the fabric*. Washing the fabric and threads*. Finding the middle of the fabric. Sorting or organising the threads*. Getting the rest of your supplies together. Understanding the pattern.

*These things are optional and may suit the preferences of you or your student. Personally, I’ve been really lucky with the threads I’ve used from kits and purchased individually either online or instore. When I have washed my project after completion, none of my threads have run and adversely affected the project. I have read in different forums that for some people, their threads have run and had a negative impact on their projects. Additionally, in some kits, the threads may not be as organised as you or your student need them to be.

Finding the centre of your fabric

The main times I bring out my iron and ironing board is to do something with cross stitch! When I’m finding the centre of my fabric, I prefer to iron out my fabric so that it’s as flat as possible because of the way it’s initially been folded and stored in my collection. By doing this, I know that I’ll be able to easily fold up my fabric in half and then half again, then run the iron over it while it’s folded up, so that I can cleanly see the centre.

The clip below by Stitcherista shows you what I mean…

‘Cross Stitch 101 – Finding the center of your fabric’ by Stitcherista – uploaded to Youtube on 9 October 2018

Additionally, if your student wants to use a hoop while stitching, the clip below by Spot Colours, will show them how to find the centre of their fabric and how to put it into the hoop…

‘Cross Stitch – How to Find the Center and Hoop’ by Spot Colours – Uploaded to YouTube on 22 June 2017

Hoops, Qsnaps and Frames

It’s important to note that depending on the size of the project your student is working on, that the size of the hoop, qsnap or frame will have a large impact on how well the fabric fits. For example, the smaller the size of the fabric, the smaller the tool you use to keep the tension. This may also depend on personal preference and what your student is able to use.

Personally, I have always used hoops of various sizes and I’ve recently started using a stand to hold the hoop.

Understanding the pattern

The first time your student sees the cross stitch pattern, it may look really confusing to them. Thankfully, some patterns have colours on them to make it easier to see the different areas they need to stitch with the different threads. However, if it’s a black and white pattern with a series of symbols, helping your student understand that each symbol represents a different colour in the key will be crucial. The YouTube clip below by Love Crafts shows people in a really easy and simple way how to understand and read a pattern, to enable them to start stitching:

‘How to read a cross stitch pattern for beginners’ by Love Crafts – uploaded to YouTube on 14 October 2019

Tip – Drawing the symbols from the pattern on the thread sorter

One of the things that may help – regardless of your student’s age – is to go through the key and draw the symbols on the thread sorter (if the kit came with one). I’ve found this to be really useful for some of the Dimensions kits I’ve worked on due to the way the chart and key have been written up.

Symbols I have hand drawn on the card sorter that came with a kit

Starting to stitch…

The earlier clip by Love Crafts shows people one of the ways that they can start stitching a pattern. What you will need to show your student is what they will need to do with their thread so that it doesn’t accidentally come straight through the hole of the fabric.

Floss, cotton and strands

You and your student will find that the majority of patterns and projects will require it to be stitched with two strands of cotton (aka floss). To help put things into perspective, the image below shows that the floss can be split into 6 individual threads or grouped into 3 lots of 2.

Image shows that floss can be grouped into three lots of 2 strands.

The Loop Start Method

This relates to the way the amount of strands you or your student has pulled out of the cotton and the way it has been threaded into the needle. For the loop method to be most effective, you or your student will need to pull out just one strand and then fold it in half, so that ends meet up evenly. The clip below by Mr X Stitch explains the loop method really well:

‘Start your cross stitch with the Loop Technique’ by Mr X Stitch – uploaded to YouTube on 18 July 2018

Personally, I love the loop method if I’m using two strands on a project. It makes the back of the project a lot neater and I find it to be a fantastic anchor for the first few stitches. The caveat with using this method though is that it’s only useful if I need to use two strands of floss.

Finishing off your crosses and changing colours

You may need to help your student with the first time they go to finish off their crosses in accordance with the pattern or because they’ve run out of enough thread on their needle. The aim is to fully finish the cross and then flip the project over so that you’re looking at the back of the project. Then have the needle move between the fabric and some of the crosses that have just been stitched. I’ve found this to be a very neat way of finishing the crosses and it helps to secure them. To put this into perspective, the clip below by Rainbowlune, shows us how to just this:

“How to Finish a Thread – Cross Stitch” by Rainbowlune – uploaded to YouTube on 23 February 2013

Meanwhile, changing colours is reasonably easy in cross stitch. The difficulty sometimes is deciding which colour to do next or threading the needle – depending on the size of the eye of the needle! The way that your student would start off and finish on a new colour is very much the same as they would with any other colour.

Which way to stitch – left to right, up and down, right to left, cross country or parking

If you’ve been stitching for a while, you’ll hopefully know what I mean by this heading! When you’re chatting with your student, you will be able to work with them to find out what is most comfortable for them and what the pattern allows you to do too.

Stitching left to right and right to left (aka horizontal cross stitch)

This predomenantly means that the first half of the stitches will be done left to right – just like when we’re writing something. Once we’ve reached the designated number of stitches, we then complete the crosses by stitching right to left.

Meanwhile, the stitching right to left is when you start the first half of the crosses by moving right to left and then completing the crosses by moving left to right.

To help put this into perspective, the clip below by Peacock and Fig help to put these words into motion by showing you the English and Danish methods of cross stitch (aka left to right/right to left or one cross at a time):

“Cross Stitch Techniques: English method and Danish method of cross stitch” by Peacock and Fig – posted to YouTube on 4 April 2017

Stitching up and down (aka vertical cross stitch)

This way of stitching may depend a little bit on the pattern your student may be working on. Personally, I’ve found it easiest to stitch the full cross before I move above or below the first cross. To help explain what I’m talking about, check out the clip below:

“Full Cross Stitch Vertical” by MonkeySee.com – posted on YouTube on 8 August 2008

Cross Country and Parking

The good thing with cross country cross stitch is that we don’t need to leave our chairs to do this. The main exertion with this method is keeping track of where you are on the pattern!

The aim of cross country cross stitch is to stitch as much as possible of the pattern with the one colour and where possible, using the same strand without the stopping and starting. This can make the picture look a bit pixelated or scattered. Below is an image on how cross country stitching looks on a project:

Example of cross country stitching

Meanwhile, the parking method means that your student may prefer to read the pattern line by line, like they are reading a book, and stitch each symbol on that line. This will mean a lot of threading the needle with different colours as the pattern requires it. The benefit of using the parking method is that the thread will be ready when your student next reaches the corresponding symbol on the pattern.

To help put this into perspective, the clip below will show you and your student what cross country stitching and parking looks like on a project and which methods may be most effective on which projects.

“Cross Country vs Blocks with Parking” by Pam’s Crafty Corner – uploaded to YouTube on 18 January 2017

Deep breath… you’ve finished your project, now what?

This post was surprisingly challenging to put together, which is something I had never expected! I think a lot of it has to do with cross stitch being so much of a hands-on activity, that to just write about how to do cross stitch doesn’t do the activity justice! Which is why I think that there are so many more videos out there on how to cross stitch than there are written posts.

My next post in this series will hopefully be a little shorter. In the next post of this series we’ll be looking at the finishing touches of your student’s project, which may include back-stitching, the inclusion of some beads or special stitches. There may also be questions about whether it’s worth washing the project before your student then completely finishes it.

Thank you for sticking with me during this post and the series so far!

Until next time, happy stitching!

Related resources:

Posted in How To, Tips and Tricks, Uncategorized

How do you teach someone to cross stitch? Part 1 – Who is your student?

Hi Everyone

Have you ever been approached by family, friends, friends of friends or colleagues and asked if you could teach them how to cross stitch?

I’ve been contemplating this question for some time now and wondered what the best approach would be. Many years ago I would have just jumped straight into it with whomever my student would be. Not really considering their preferred learning style, choice of pattern and materials, their age and abilities, let alone my teaching style!

This series is going to cover all of these things and more in case you are approached and asked to teach someone to cross stitch. So without further adieu…

Why age matters

How old we are and our life experiences can make the world of difference in how we learn new things and sometimes, how long it takes us to learn those new things.

For example, the blog post by the TEFL Academy (posted on 16 January 2017) titled ‘6 Differences between teaching adults and young learners’ talks about the importance of using different approaches based upon the age of your student. Based upon the blog post by the TEFL Academy, you will need to consider the following things if you are teaching adults or children and adolescents:

Adults Children and teenagers
Are autonomous and independent and prefer to work things out for themselves, with minimal direction. You will need to be in charge and provide the young learner with clear instructions on what they need to do with their needle and thread and fabric.
You may find that you and your adult learner can spend a lot more time on the cross stitch project due to extended attention spans. Your young learner may have a genuine interest in cross stitch, but will need a bit of variety to keep them interested. This is where the choice of pattern is crucial. Starting off on a small picture that the young learner is interested in will make the difference.
Keeping things fun is still important for your adult learner. This is where stitch ‘n’ bitch sessions may be more applicable. Having a relaxed environment where there is minimal pressure may help your learner with being anxious about learning something new. Keep it as fun as possible for your young learner – especially for your very young learners. Their key interest is play and having fun. How you do that is up to you!
Finding the motivation for why your person wants to cross stitch is important. It’s just like you needing to find the motivation to stitch a project. This may be closely linked with keeping it fun and having a design or project that they really want to stitch. Finding the motivation for why your person wants to cross stitch is important. It’s just like you needing to find the motivation to stitch a project. This may be closely linked with keeping it fun and having a design or project that they really want to stitch.
Depending on the type of relationship you have with your adult learner, having some ground rules may still be necessary to ensure you both are on the same page. Each person is different. Use your judgement on this one.   Discipline. How you approach this may vary from person to person. For example, setting up some ground rules may help for some people. The challenge will be following through on the consequences should any of those ground rules be broken. E.g. running with scissors, poking others with needles and scissors = no stitching for x amount of time.
Life experience will play a very large part with your adult learner and it can have an enormous impact on their motivation for wanting to learn how to do cross stitch. It will be worth having a chat with your learner to find out why they want to learn cross stitch. Also, you may find that you learn something from your learner while you’re teaching them! The TEFL Academy recognises the enthusiasm and curiosity that young people bring to learning. It will be worth keeping this in mind and trying to enhance their enthusiasm and curiosity while teaching them cross stitch. For example, linking story telling with cross stitch may be one way of keeping it fun and piquing their curiosity!

What about gender?

In this day and age, gender shouldn’t matter – anyone can do cross stitch – what does matter, is the way gender can influence the way you teach your student and how your student learns.

If your student considers themselves to be male, they may initially feel embarrassed about learning how to cross stitch, even though they have a strong interest in it. All because cross stitch and embroidery has historically have been considered something women and girls have done – even though some of the most famous fashion designers are men – e.g. Karl Largerfeld, Hugo Boss, Pierre Cardin, Giorgio Armani and Tommy Hilfiger to name a few. To put this into context, the flosstube video below is the first one from Shaun/ Sean who has wanted to do cross stitch for a long time, but has felt embarrassed and fearful about taking it up, because of the perceptions around who does cross stitch.

Flosstube clip by Sean/Shaun – uploaded to YouTube on 30 January 2019

So what I’m trying to say here is that some of your male students may need some extra praise and encouragement to help them feel comfortable with doing cross stitch. The patterns they stitch may help a lot too. The same may be for your female students and other students who are part of the LGBTQI community who are really interested in cross stitch, but feel uncomfortable about taking up the craft because of some old perceptions about our craft.

So what do you think so far? Have you already taught someone to cross stitch? Has their age and gender had an impact on how you have taught them?

Until next time, happy stitching!