Posted in WIP's and Plans, WIPs and Finishes

2021 Cross Stitch Plans, WIP’s and Finishes

Hi Everyone

Happy New Year! I hope it’s been a good start to the new year for you, as much as it can be.

It’s been a while since I’ve published a post because I’ve been on holidays since Boxing Day through to Tuesday 12th January 2021 and enjoying my stitching bubble. So much so, I’ve finished a project I didn’t expect to finish so soon and I have made a lot of progress on another project that has needed a lot of attention!

Plans

WIPGO 2021

In my last post, I talked about many of my Works in Progress (WIP) being part of WIPGO 2021 and below is the board I’ve put together:

WIPGO Board for 2021

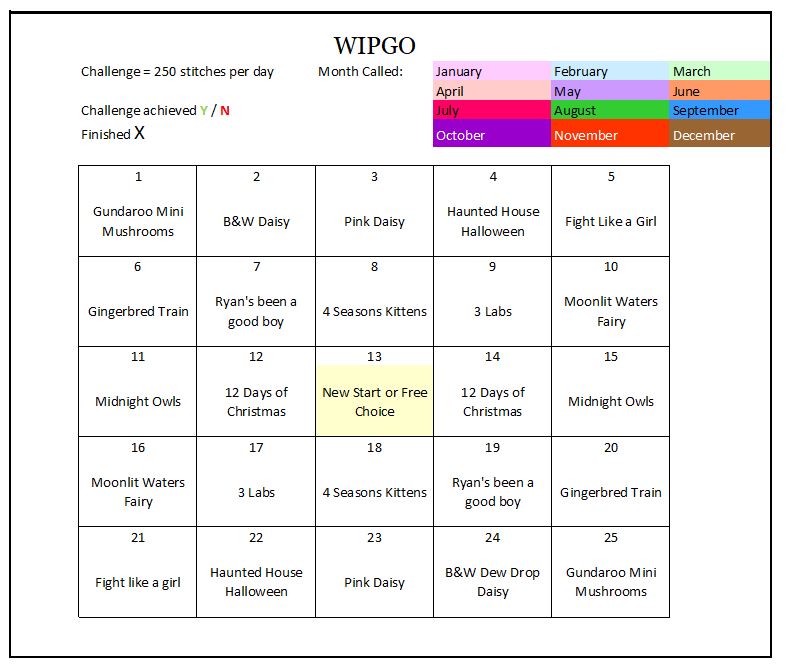
How it works in a nutshell

The idea behind WIPGO is that it’s like a bingo board in the sense that the squares are numbered and Jessie Marie who runs / is the organiser for the Facebook group (I’ve come across her on Youtube via her Flosstube channel called Jessie Marie Does Stuff), uses a random number selector app to select two numbers between 1 and 25 per month. Jessie Marie would then post those two numbers in the Facebook group and that would help all participants to use their boards and know which projects they were going to be working on.

Side note: I hadn’t realised until recently, that a standard sized bingo board has 25 squares, and to make it easier, it’s the reason why the numbers between 1 and 25 are selected for WIPGO! Also, the numbers for the next month are drawn and posted on the Facebook group on the 27th of each month (in the case of numbers for January, they were posted in December 2020), so we have time to prepare our projects if need be for the next month.

Any rules?

The other cool thing with WIPGO is that there are few rules we, as a collective, need to abide by. We get to make our own rules and goals for our own boards, because everyone is different and the aim is to keep it fun and light. In my case, I’ve chosen to aim for stitching 250 crosses per day for each project that has been selected for that particular month.

Numbers called

For January, three numbers were selected – numbers 13, 6 and 18. The space for number 13 is a free space and we can do whatever we want with that space. In my case I chose to have a new start or free choice because I didn’t want to be limited to anything specific if I didn’t want to. I could have chosen to leave this square blank and just cross it off as being complete.

Which leaves me with squares 6 and 18 – the Gingerbread Train and 4 Seasons Kittens and my goal to stitch 250 crosses for the Gingerbread Train and 250 crosses or stitches on 4 Seasons Kittens per day for the whole month of January or until the project is complete – whichever happens sooner.

Getting organised

Last year when I was participating in Stitch Maynia, I learnt quickly that trying to count my stitches after I’ve stitched them (when using paper patterns) was time consuming and took some of the fun out of it. I tried to make it a little easier for myself by using coloured pencils to help differentiate between each time I sat down and worked on the projects, and it did help a little.

With that memory in mind, I made the most of the coloured pencils at the coast house and made my paper patterns for Gingerbread Train and 4 Seasons Kittens look like a rainbow! Each colour and section on the patterns would represent 250 stitches and a particular day – e.g. red = day 1, orange = day 2 etc, regardless of which pattern it was. That way I would know which section I was going to work on for that day and that it added up to 250 stitches.

When I was sorting out the pattern for Gingerbread Train, I realised pretty quickly that I would have the project completed within the first 2 weeks or so of January (including backstitching and beading)! And if I was motivated enough with 4 Seasons Kittens, I’d have the Spring quarter 90% to 95% complete with some backstitching and French Knots to complete the next time it was called up.

What happens if I reach my goals before the end of the month?

That’s up to me. I can start some new projects to fill in the time until February starts or I can take a break from stitching and do some other crafty things instead or whatever I want (within reason). I can also work on some other WIP’s that haven’t made it onto the board.

In the case of the Gingerbread Train, I have chosen to replace it’s second listing on the board with a different project that didn’t make it onto the board, first time around. So when the number 20 is called, I’ll be working on Curglaff designed by Michelle Bendy Stitchy (the pattern can be purchased from her Etsy store).

I won’t be winning any prizes if I finish any of my projects ahead of time or complete a Bingo line before anyone else. I can however, choose to reward myself with setting aside some money to purchase a new pattern or cross stitch related item for every project I complete or line I complete. I’ve noticed in the Facebook group that some people have allocated certain rewards for every goal they achieve which I think is really cool, and a great way to help with the motivation with some projects that can be a struggle to work through.

For me, the reward is sticking to my goals and achieving them. I struggle to stick to my goals (for many parts of my life, not just cross stitch!) and I’m really excited about this WIPGO board and sticking with it because there are enough elements to it that will keep me motivated. There’s enough structure where I know what projects I will be working on and I have them organised enough so that there’s not much effort involved with bringing them out when they’re called. Then there’s the surprise or random element that keeps it interesting. I don’t know what numbers will be drawn until the 27th or 28th of January and that’s the random element I like.

The reward element may change over time and that’s my prerogative! As I’m writing this and thinking about what rewards I could incorporate are:

  • purchasing a new pattern
  • starting a new pattern or kit
  • creating a wishlist of patterns I would like, that family or friends could purchase for birthday’s or Christmas
  • getting a massage or manicure – or both!
  • road trip to a new craft store (if practical) or one I haven’t visited for a while
  • join a cross stitch class or group that meets face to face
  • learn how to crochet
  • re-organise and improve my crafty spaces (you may get to see my crafty space in future posts and you’ll see why this would be a reward!)

Stitch Maynia and March Madness

I’m still working on how this two months and events can fit into my WIPGO plans or if they can at all. Especially since I’m working full time and who knows what the year will bring work wise!

At the moment I’m liking the idea of participating in both and the idea of starting new things. The tricky thing is being organised and finding the right storage space for them. Which has me thinking about the project bags I’ve seen a lot of people talking about on Flosstube and how I can make them work for the projects I have. However that’s a new and different rabbit hole for me to scamper down!

Cross Stitch Project bags – what are they?

I’ve learnt that project bags come in a variety of sizes and can have handles to that they can be carried like a bag or just have zips, clips, velcro or anything that works well to keep everything contained inside the bag. The image below shows a very small sample of the huge variety of bags available that I’ve seen talked about on Flosstube.

Google image search results to find Cross Stitch project bags

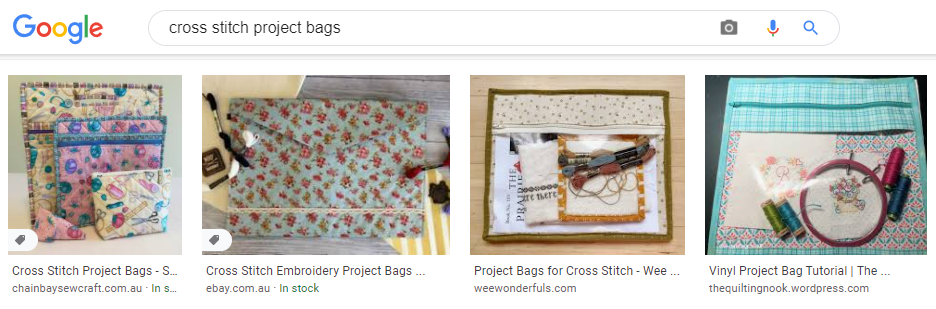
I like the bags that have the clear vinyl at the front so that you can see what’s in the bag and what project should be inside. My struggle is having a bag big enough to fit the boxes I use for some of my large projects (that have over 100 colours), as well as the hoops and everything I need for the project.

The good thing is that there are larger bags that are akin to small luggage/suitcase style bags available to suit my needs and I will need to do some more searches online to see what could work for me. My struggle at the moment is to have something slim enough to easily store away when I’m not working on it and easy enough to take with me when I’m travelling. Yet large enough to fit all of the tools I need for the project without it compromising the project.
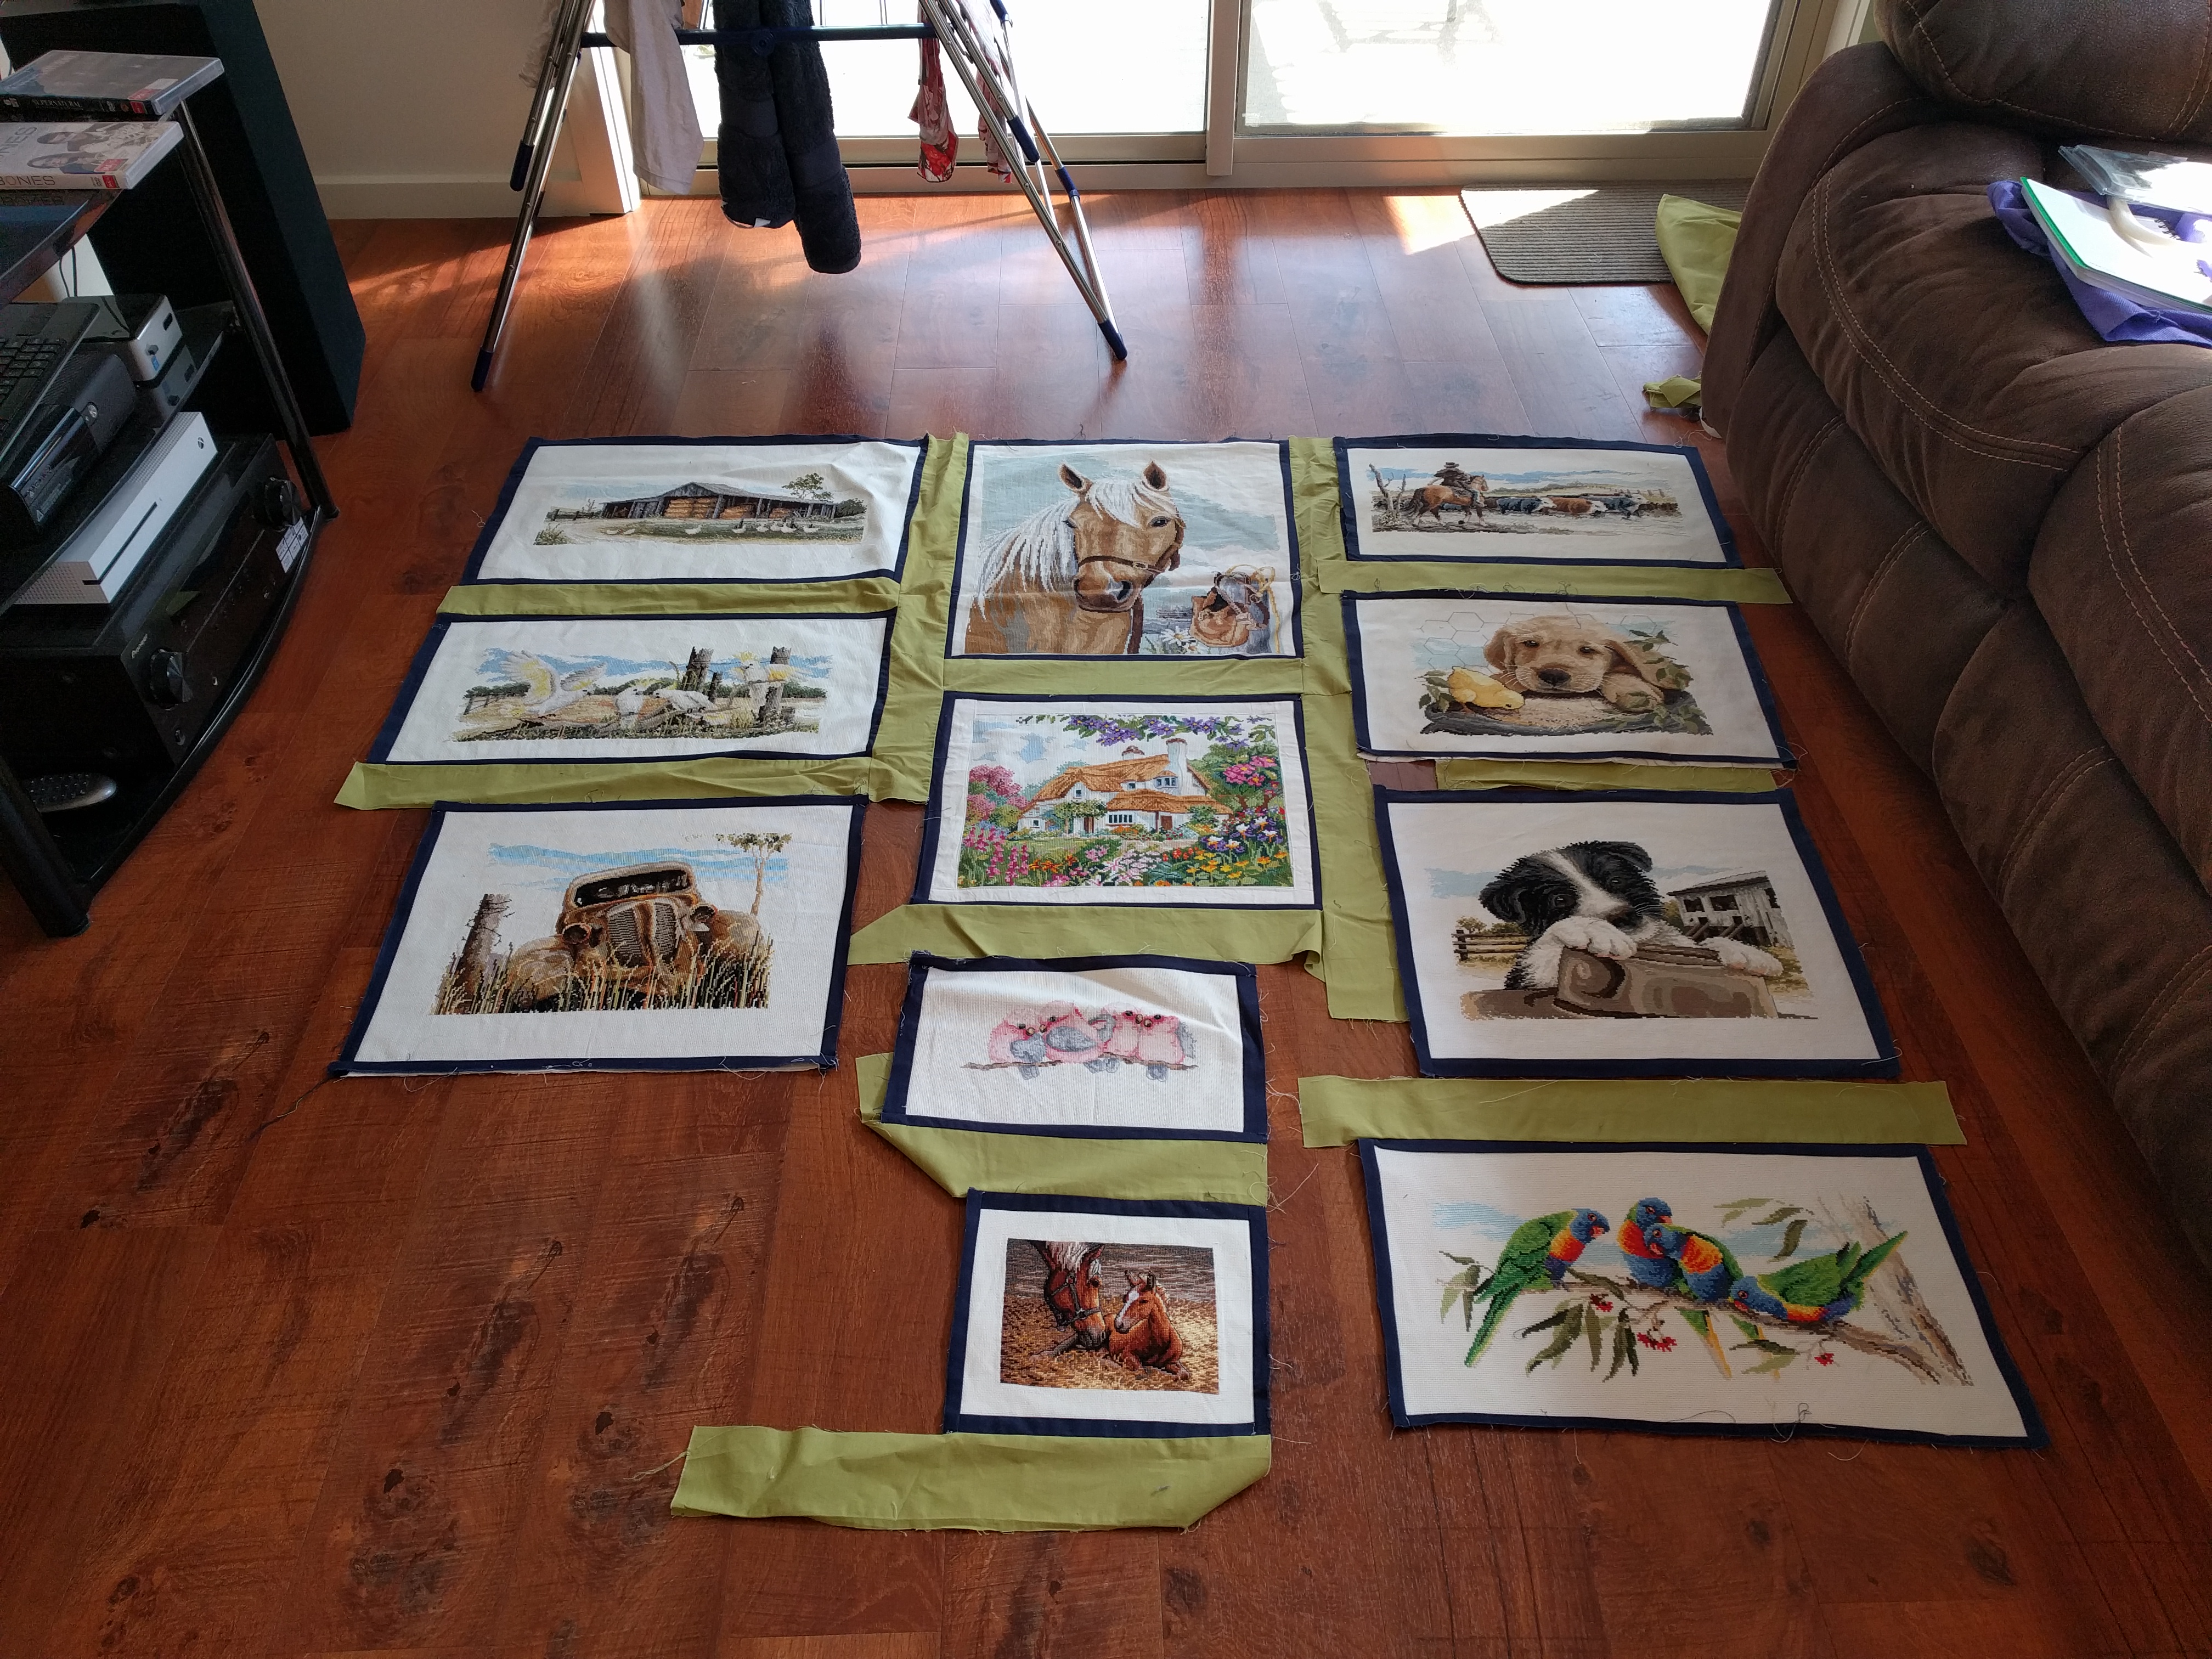
WIP’s

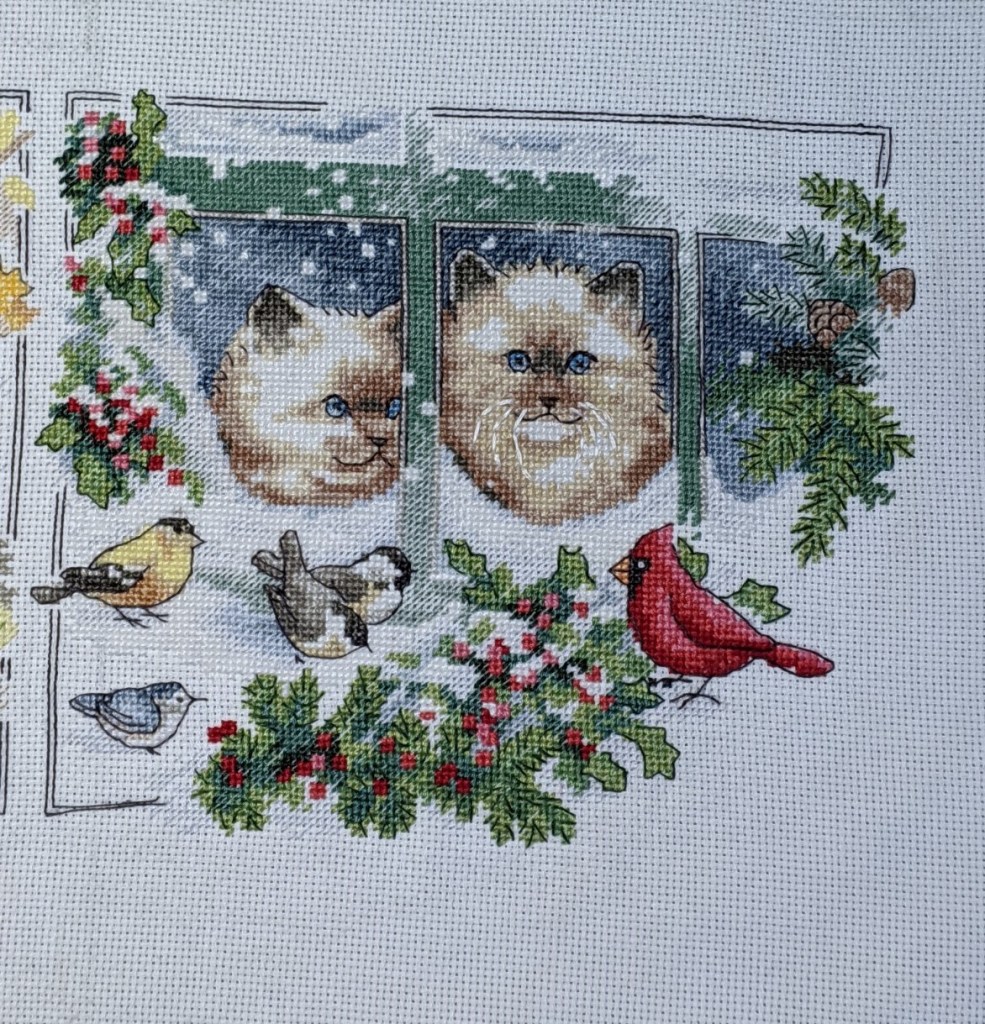
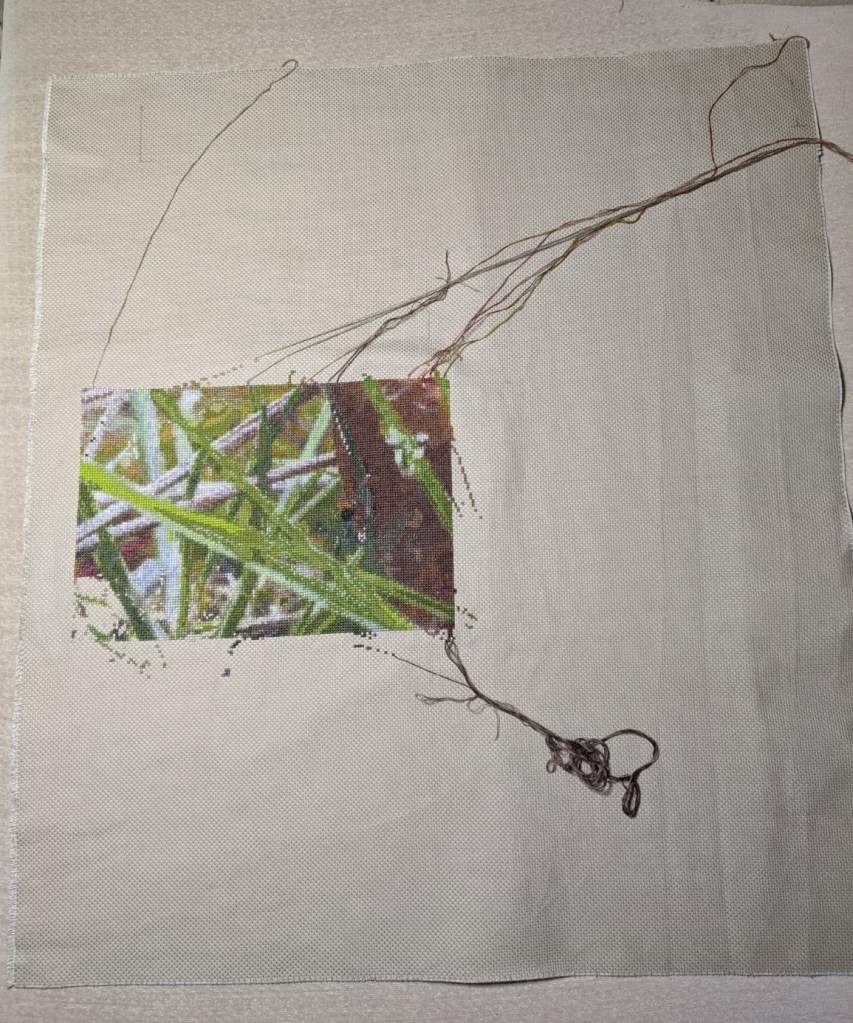
I have been stitching the 4 Seasons Kittens by Dimensions methodically since it’s number was called for on the WIPGO board – and even more so since I finished the Gingerbread Train on 16th January 2021.

The first image below shows what I’ve done since 1st January 2021 through to 17th January 2021. I’ve probably spent more time on this project than the Gingerbread Train because of the amount of half stitch this project has. Also, I need to do nearly double the amount of stitches on this project than the Gingerbread Train that is just full crosses, to enable me to be satisfied with reaches the goals I’ve set for it.

Four Seasons Kittens by Dimensions – Progress as of 17 January 2021

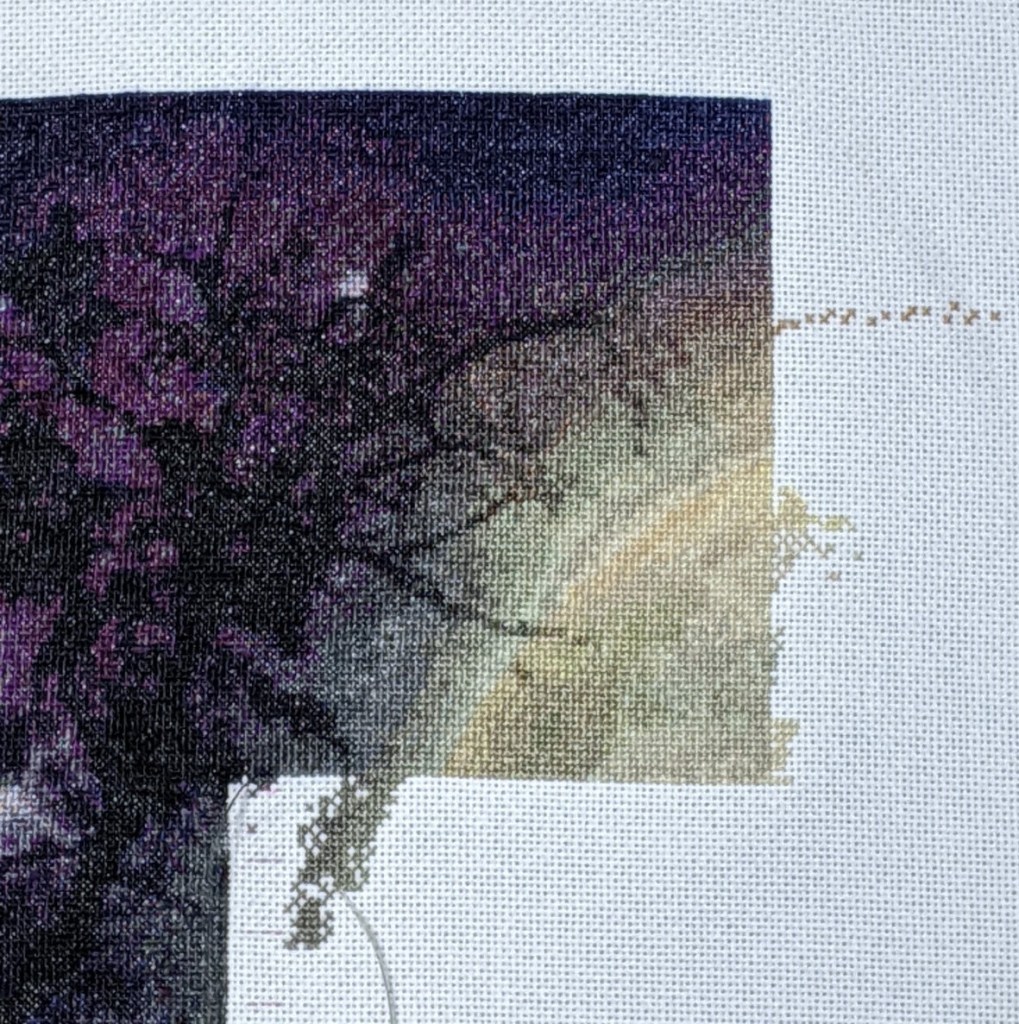
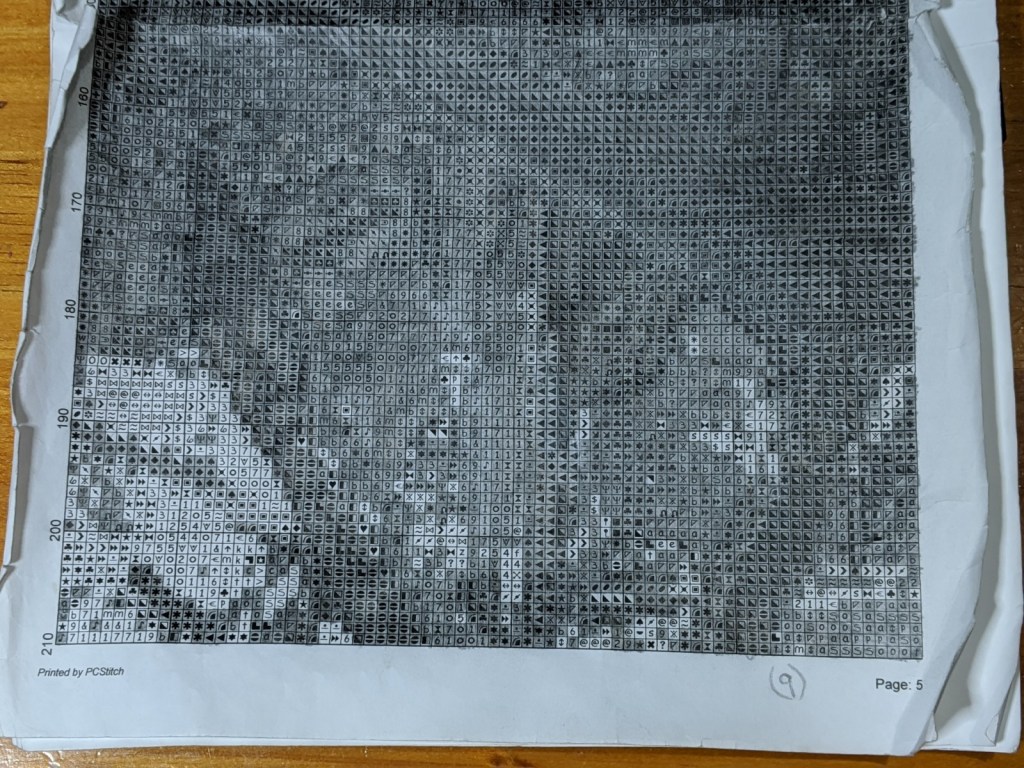
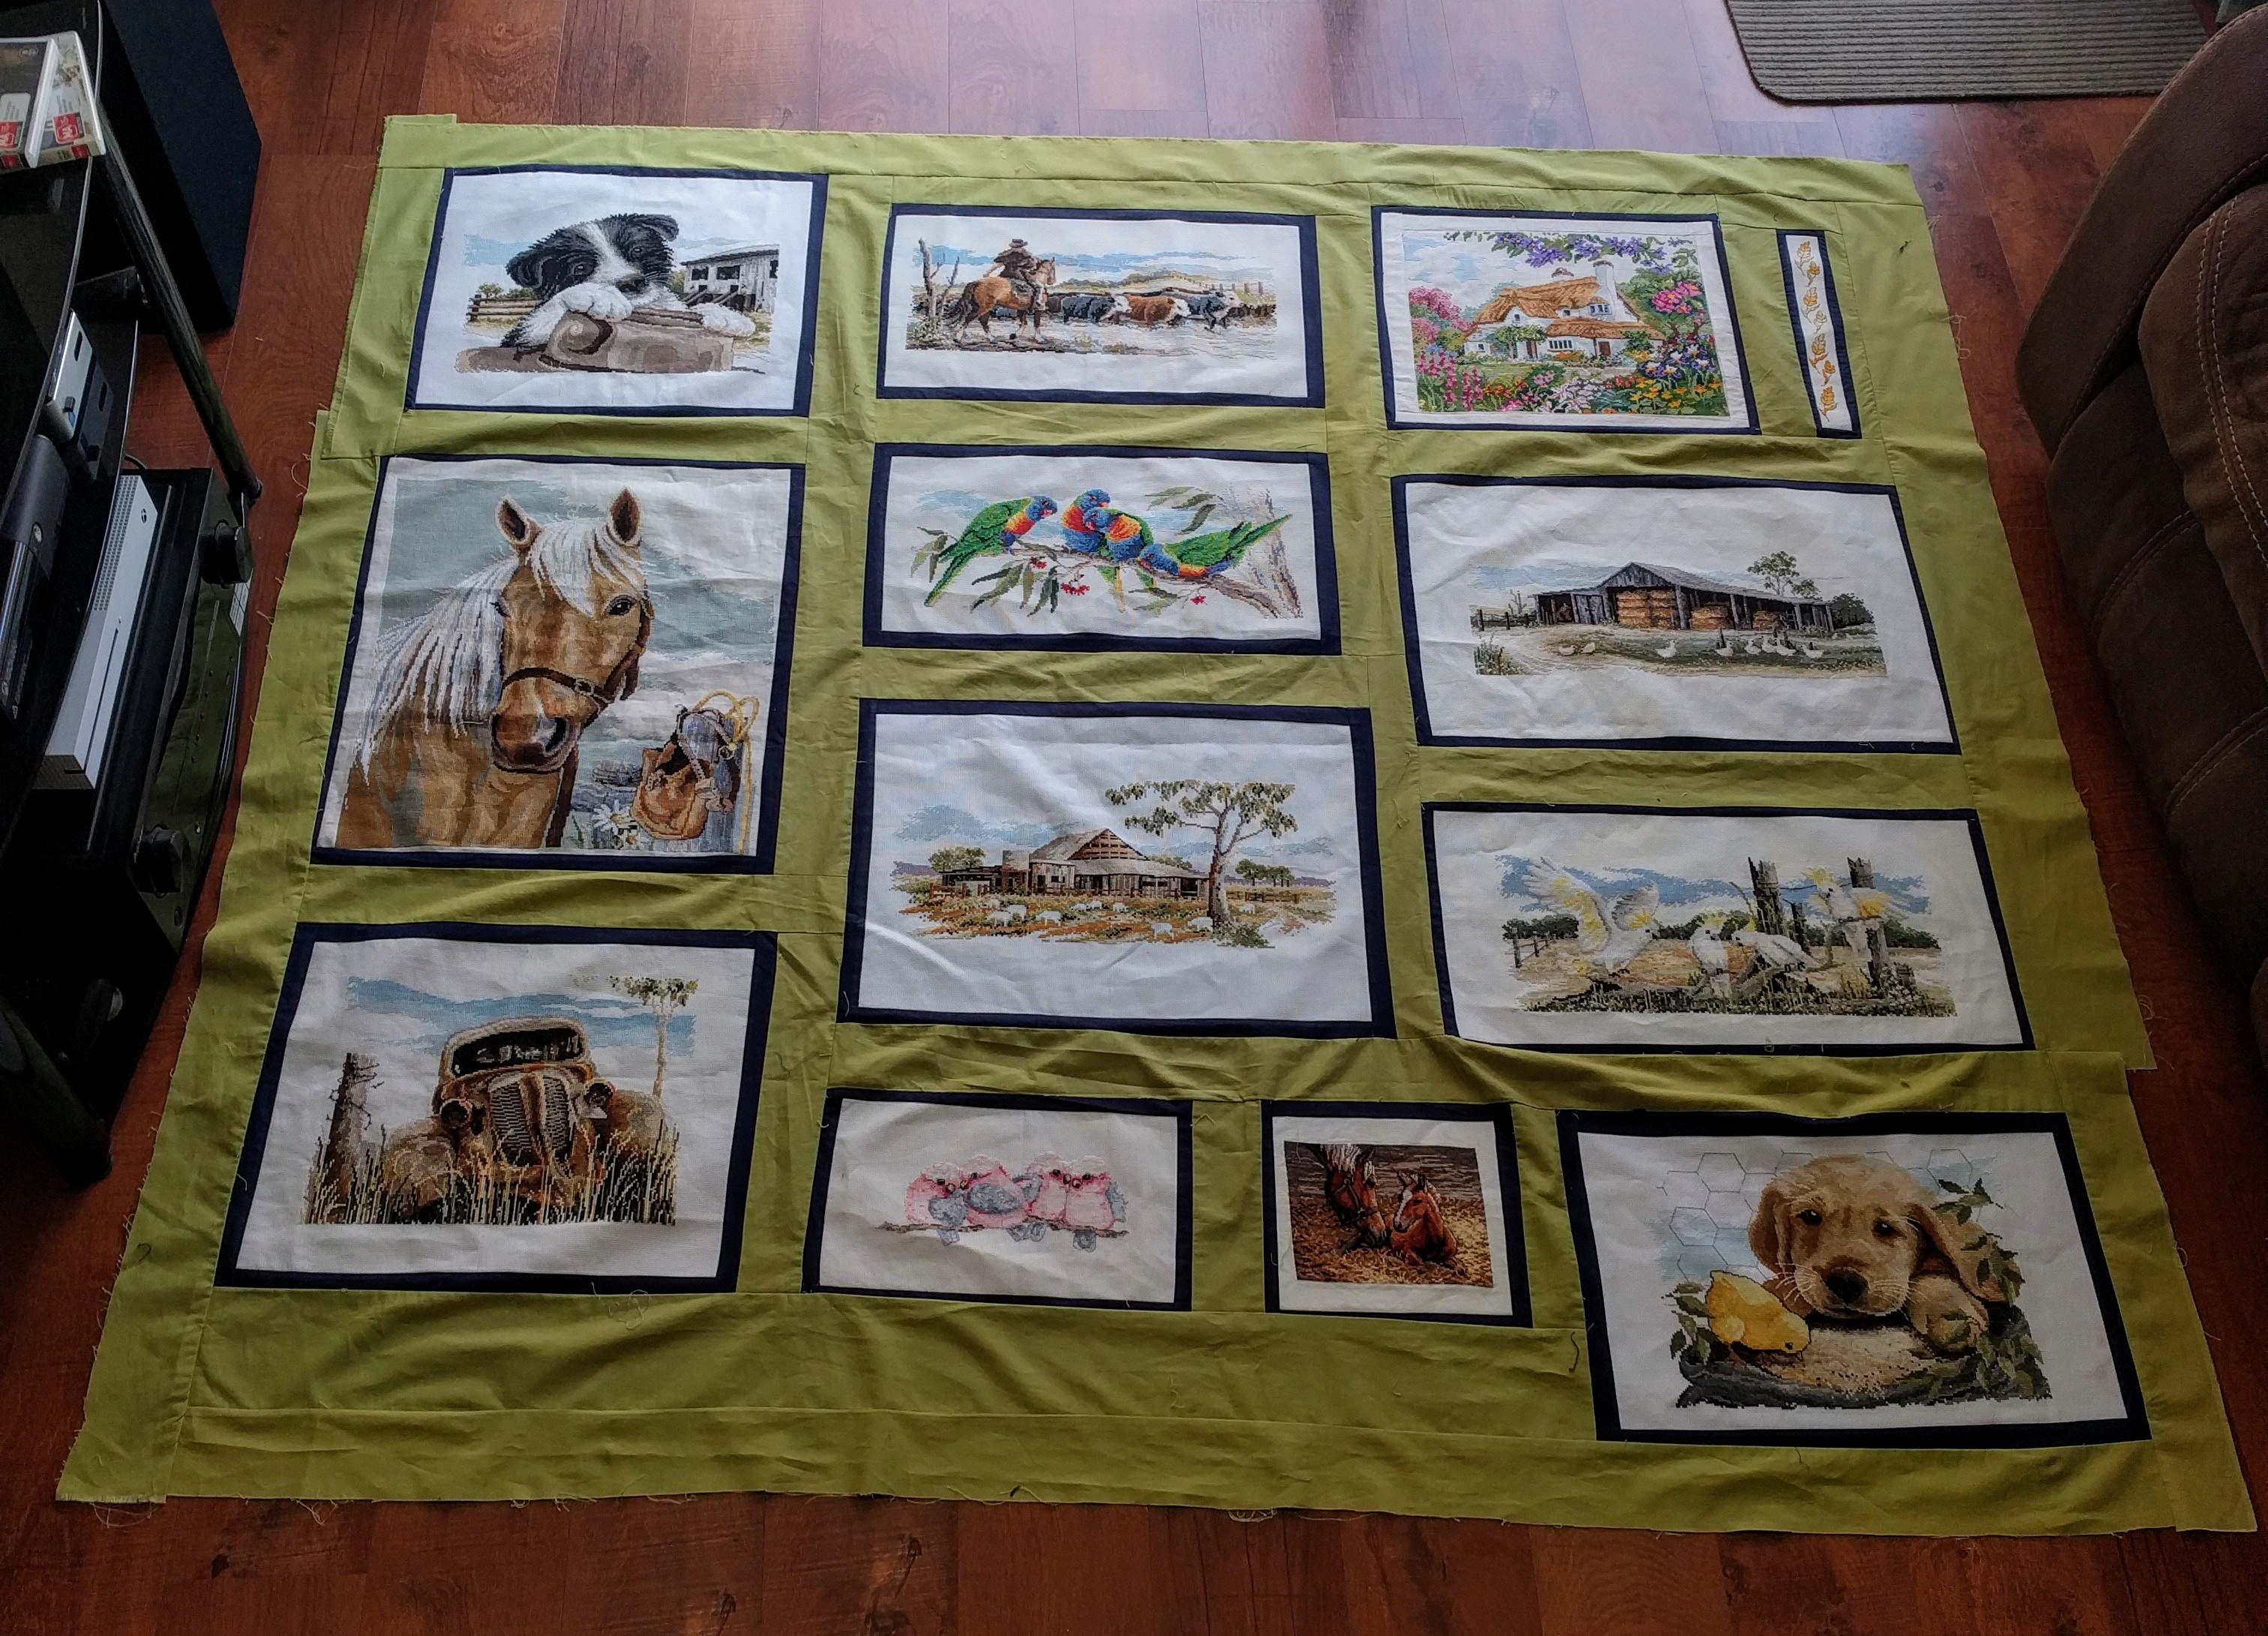
To help put this progress into perspective, below is the progress I had made on the project by the end of 2020:

Four Seasons Kittens by Dimensions – Progress as of December 2020

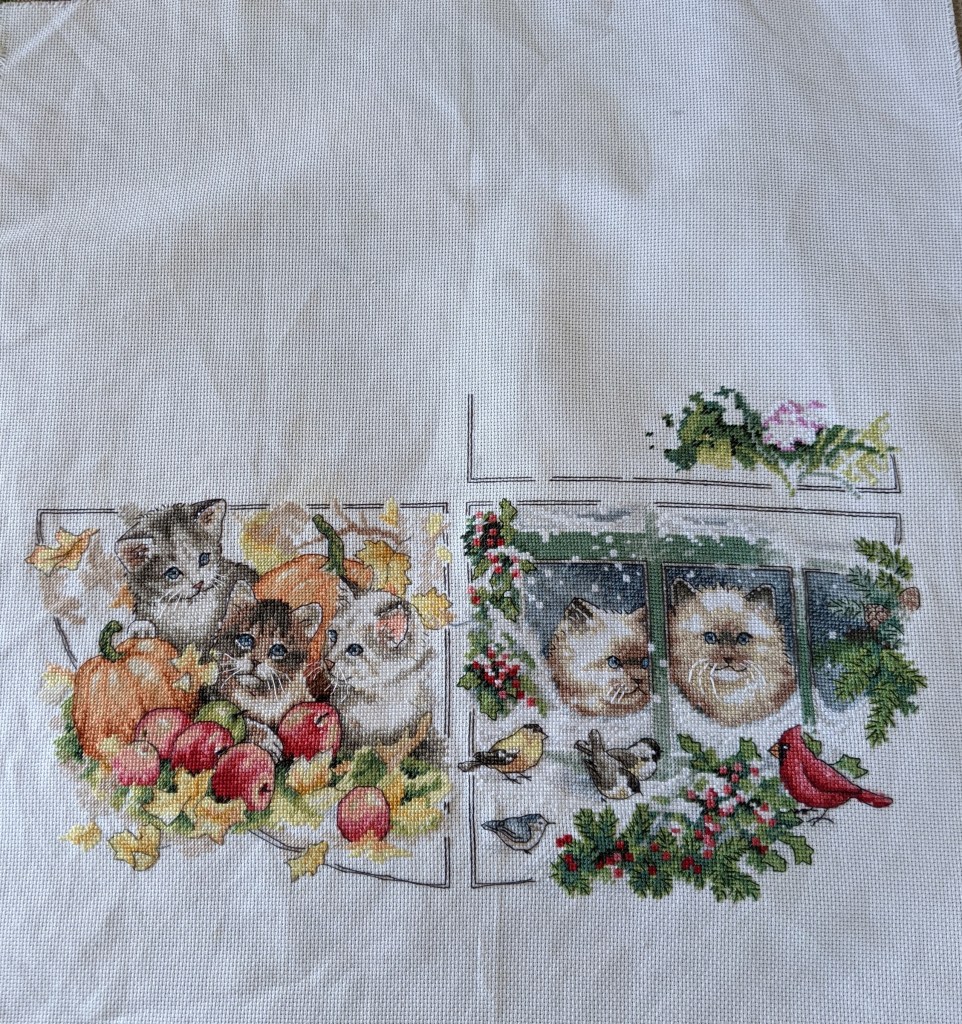
Because of the significant progress I’ve made on the Spring quarter of this project, I think I’ll be able to get it done!

2021 Finishes

Gingerbread Train designed by Shannon Christine

Gingerbread Train – designed by Shannon Christine – pattern from Ultimate Christmas

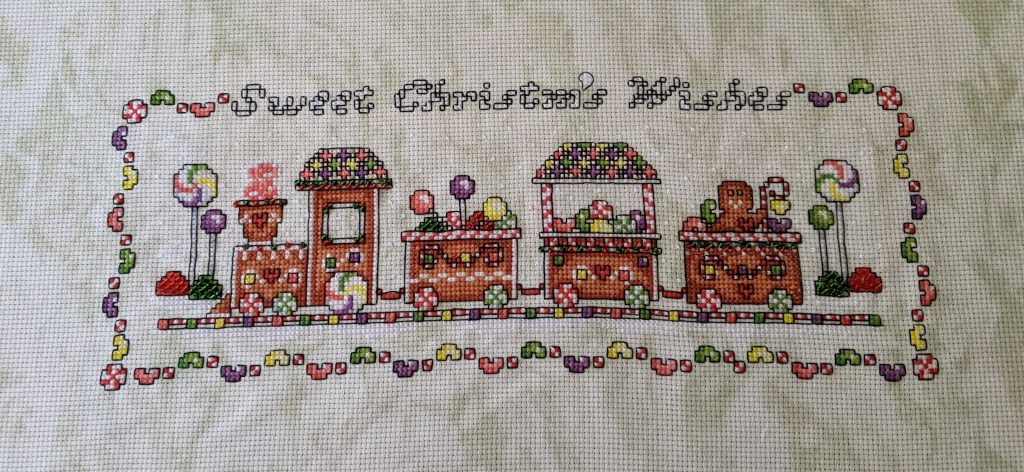
I really enjoyed stitching this project. It was colourful and fun and I really like the patterns from Shannon Christine Designs because they are easy to read and I love her colour choices.

This pattern called for it to be stitched on 28 count Sky High evenweave fabric. At the time I may not have had 28 count fabric or enough for this pattern, so I stitched it on 14 count Aida from Threaded Needle that had the green marble look you see in the above image, printed on one side of the fabric. All threads are DMC and all bar two colours are the called for colours. The two colours I altered were because I didn’t have them in my stash at the time and I don’t think it’s detracted from the pattern in the slightest.

If I were to stitch the pattern again, I would ensure to give myself enough room to stitch all of the letters for ‘Sweet Christmas Wishes’ and I’d see if I could adjust the font for the letters or change the colour I use for the outline of the letters. I might also have the white dots as beads instead of individual white crosses.

The other really good thing about this pattern, is that it got me over my reluctance to use beads in patterns. This pattern reminded me that as long as I’m careful with getting the beads on the special beading needle and I remain patient, everything will be okay!

For now I have this project ironed and rolled up with my other completed but not FFO’ed (fully finished objects) projects. I’m thinking that I could turn it into a sign that could be hung or nicely displayed somewhere. My mind will probably change multiple times before I finally finish it too!

Related resources and reads

Posted in Cross Stitch Haul and Stitching Progress, WIP's and Plans

February Page Finishes

Hi Everyone

At the start of this month, I set myself the goal of finishing the page I was working on for each of the active projects I have on rotation. I have been stitching my little heart out for most of this month and I think I’ve done pretty well. Especially since last post I was feeling a bit down and flat and not thinking that I would be able to achieve the progress I’ve wanted for each project.

There have been a few days where I’ve not stitched because I’ve been too tired from work and I’ve not slept well the night before, or I’ve been busy with other things. So without further adieu, lets get into it and see how I’ve gone!

Four Seasons Kittens

I have finished all of the half stitch and full crosses the pattern has asked for and I’ve gotten the majority of the back-stitch around the called for areas. I just need to give one of the kittens some whiskers and finish off the frame for the quarter, and I’ll be able to move onto spring or summer!

‘Four Seasons Kittens’ by Dimensions – Progress as of 29 February 2020
‘Four Seasons Kittens’ by Dimensions – progress as of 11 January 2020

Midnight Fairy

A page finish and then some…

Moonlit Waters Fairy by Heaven and Earth Designs – Progress as of 29 February 2020

Because there was some confetti that I had to finish on this page, I wanted to make the most of the thread I had on the needle at the time. So I started looking at neighbouring pages to see if I could stitch anything there and what you see is the result of what I found.

Fishing

I achieved a page finish with this project! The area I have been focusing on for February, is the bottom of the pattern that has a lot of greys and browns it. There is a bit of back-stitch needed for this area to help give the hat, some bullrushes and fence some definition. I’ll get to that when I’ve finished all of the full and half stitching for the project. Theoretically it should be easier if I do that!

‘Fishing’ progress as of 29 February 2020
‘Fishing’ close-up of my focus area and page finish as of 29 February 2020

Gundaroo Mini Mushroom

I’ve been battling some leg pain while stitching some of this page and I’m really annoyed that I haven’t gotten more done. The short story is that I don’t stretch as much as what I should after my gym sessions and runs and I’m an office worker. As a result of so much discomfort I’ve been experiencing lately, I haven’t been able to finish the page for this one. I am frustratingly close as you will see in the pictures below…

‘Gundaroo Mini Mushroom’ by Kristen Gawronski – progress as of 29 February 2020

To help put the image below into context, I’ve completed page 6, which is more the the centre of the fabric, and I’m close to finishing page 5. I’ve decided to start in the centre of the fabric because I’m not sure if I’ll have enough fabric to finish the entire project. The other thing to bear in mind with this project is, when I first put this pattern together, I had told the software that it would need to fit onto 28 count fabric – or there abouts. I then changed my mind and decided to keep most of the dimensions but try and stitch it on 14 count fabric instead…

‘Gundaroo Mini Mushroom’ by Kristen Gawronski – progress as of 29 February 2020

The annoying component with this pattern is the amount of confetti stitching for the bottom left corner of this page, which you will see in the photo I’ve taken of my pattern. It’s not as bad as other projects I’ve worked on over the years or even now with the HAED I’m working on.

However, in recent days when I’ve been stitching it, I’ve been seriously been contemplating scanning the pattern and seeing if it would be compatible with pattern keeper app. If it does work, it would make my life soooo much easiser! Because there are 148 colours in this pattern and some of the symbols are very similar. So it can take me a few minutes just to find the symbol on the key, to figure out which thread I need for a couple of squares!

‘Gundaroo Mini Mushrooms’ by Kristen Gawronski – pattern showing the confetti stitching and what remains to be stitched for the page as of 29 February 2020

Now that February is over for another year…

What now?

As I’m writing this post, Sunday, 1st of March is drawing to a close and whilst I have many new projects lined up and ready to go, I’m not sure if I’m ready to start them yet. Starting new pages of my existing projects would be exciting and I’d be significantly closer to getting the projects finished and off rotation for good. The question is though, do I need a break from them because I’ve been working on them so intensely for the last 20 odd days? Should I bring back into rotation some other projects that have been sitting idol?

One of the positive things for March though and the rest of this year is that I’m not going to be doing any official study with uni. Earlier this year, I had written about being accepted into the University of Canberra to complete a graduate certificate and I had been really excited about doing it. However, as time got closer to classes starting and getting the schedule for them organised, it all became a bit too hard. That process also helped me to realise that I really wasn’t as keen to do the study as what I thought I would be, when I had enrolled in the course back around August 2019! The good thing through, I that I have shown myself that I can get back into uni if I want to and it’s still an option later down the track. I’ve got work to focus on at the moment and I really want to keep progressing things with this blog and my stitching.

Small running update

It’s been a long time since I’ve talked about running and how things are going there. For the last few weeks I’ve been experiencing some muscle pain in my left leg that has stemmed from me not stretching enough. It has also meant that I’ve not been motivated to get out and about and go for a run or walk. With the help of my trainer at the gym and a remedial massage with a physio, the muscles are getting better. So much so that I’ve been able to get out running again! They’ve been short runs so far – 2 to 3km in distance and intervals, meaning I would run a full kilometre and walk for a minute or two then run again until I was done.

I need to pick up my game a lot more for this month because of the 5km fun run I’ve booked myself in for the first weekend of April 2020. I really want to feel prepared for the run rather than be feeling too casual and hoping for the best. Also, the course is different this year and I’m feeling pretty confident with it because it’s a similar course I’ve run during my own free time.

Anyway, that’s enough from me for this week. Stay tuned and until next time, happy stitching!

Posted in Uncategorized

My First Cross Stitch Country Quilt

Years in the making

This quilt has been years in the making. Each picture has taken me an average of 3 months to complete, whilst working full-time and studying part time (for 6 years) and other projects in between. The pictures that make up this quilt are mostly Country Threads. The cottage and cat at the fish pond are from two different cross stitch magazines I’ve had for years. The mare and foal are a Dimensions Gold Collection kit (aka Dimensions Good Morning (Horse and Foal)).

Representations

Each picture represents an element of my family’s farm. Growing up we always had two dogs, two cats, many horses, many cows and bulls, chooks (aka chickens), ducks, geese and briefly, a flock of sheep. We’ve also had wild foxes, wombats, cockatoos (that love eating the oats and grass seeds in the round bales of hay), lorikeets, rosellas, galahs, crows, rabbits, hares, the odd echidna and once a pelican! On the farm, we also have a shearing shed that we’ve never used as an actual shearing shed. Instead, it has been a fantastic place for us to store our horse-riding gear, cattle drenching equipment, a place for chooks and ducks to hatch and raise their young, places for the cats to snooze (sleep) and catch mice and rabbits, a place to store square bales of hay, a place for the horses to shelter from the weather and mend from illness or injury. The shearing shed has also been a place for us to store bits and pieces we have wanted to store from the weather.

The creative process

For years I’ve known that I’ve wanted to make a quilt out of these pictures, but I’ve never had a firm idea of how it would look, how big it would be and how many pictures it would exactly it would have. As the pictures progressed and accumulated, I started thinking about the farm on a broader scale and the common colours they involve. Which is how I decided upon the blue and green shades you see in the pictures.

Image shows how the navy blue and lime green looks as the border and connecting pieces for the cross stitch pictures.
Choosing the colours for quilting fabric.

The closer I got to finishing the pictures and being ready to assemble the quilt, Pinterest became my best friend for all quilt related things – to the point that I created a board on Pinterest! I also decided that I would back/line the cross-stitch pictures with calico before I attached the navy blue and green borders. Below is how I attached the pictures to the calico and I made the most of the huge floor space at my parents space.

Five metres worth of calico flat on the floor with cross stitch pictures pinned to it for me to cut out and sew.
Cross stitch pictures pinned to calico.

Layout options

Once I had the cross stitch pictures lined with calico and the pictures had the navy blue borders, I had a lot of fun and stress with trying to figure out how it should be set out. The images below are just a few of the ways I had the pictures set out before I decided on the final setting…

Quilt lay out option 1. Row 1 - left to right: Mare and foal, lorikeets, rose and border collie. Row 2 - left to right: Butterflies, small cat, Palamino horse, wheat, rusty old car and galahs. Row 3 - left to right: Labrador puppy with chick, English cottage, droving cattle across a creek.
Quilt layout option 1.
Quilt layout option 2. Row 1 - left to right: Hay shed, palamino horse, droving cattle across a creek. Row 2 - left to right: cockatoos, English cottage, labrador puppy with chick.
Row 3 - left to right: Rusty car, galahs, border collie.
Row 4 - left to right: mare and foal, Lorikeets.
Layout option 2
Layout option 3
Layout option 3

Once I was happy with the layout, joining it all together with the green fabric proved to be harder than I thought it would be – mostly because I wasn’t following an official pattern and I didn’t have any specific measurements in mind. All I knew was that I wanted it to be as square as possible in the end.

Things I have learnt to date about this quilt.

To date, this quilt has taught me a lot about myself and as much as it may frustrate me, I can make decisions on the fly. Other things I have learnt include:

  • Patience when I’m frogging something (a cross stitch term I’ve recently learnt that refers to un-picking something – aka ‘ribbit’ like the sound a frog makes);
  • The amount of thread I’ll go through for the sewing machine because of the amount of frogging and because I’m not following a set pattern;
  • How heavy the quilt becomes the more it comes together;
  • Best intentions with sewing straight (including having pre-determined guidelines to follow) doesn’t always mean that I will sew straight!
  • Perfection. In quilting I’ve found the need for it is more important than ever – especially if I want things to be square and line up just so;
  • Where there’s a will there’s a way. I accept that this quilt will not be as perfect or as flat or as straight or as square as I want it to be. However, I have found that there are alternate ways to achieve what I want.

Where to from here?

Quilt progress as of 3rd February 2019.

Now that the quilt is reasonably square, I can now measure it up for batting that I aim to purchase soon. Meanwhile, I have purchased additional navy blue quilting fabric that I will sew over the top of the existing navy blue borders around each cross stitch picture. My aim is to have the borders as even as possible whilst trying to flatten out the quilt as much as I can. In the image above, I’ve tried to flatten it out as much as I can with no avail. To try and ensure that the borders don’t slip as I’m sewing them, my aim is to use double sided tape to hold the fabric in place. My additional aim is to sew the borders on whilst the batting is attached, to reduce any potential movement that the batting may do over time.

Once I’m happy with the borders and the batting, I’ll attach the back of the quilt and the trim/final border and it should then be finished!