This is the last post of the series and looking at the date (in Australia, it’s Sunday 29th December, 2019), the last post for this year!
We’ve come a fair way in this series. We’ve considered who our student is and what their learning styles and abilities are, and some of the tools of the trade that may help them with starting out in cross stitch and hopefully enjoying it! We’ve had a quick look at some of the different patterns that are out there, with the strong recommendation of starting your learner out on a kit before embarking on chart and kitting things up themselves. Let alone embarking on a project that has a fabric count size 20 or over!
With these things in mind, we now need to have a chat with our learner about how they want to finish their project and the potential for back-stitch, beads, French Knots and what should be done with it when we’re done.
Back-stitch – is it overrated or a necessary evil?
Over the years I have definitely complained about doing back-stitch on many of my projects. Sometimes it’s because there’s so much of it and it’s felt like I’ve been working on the project for a really long time. Other times it’s because I’m just really keen to get moving onto a different project and I’m procrastinating the inevitable. That said, I know that really, back-stitch isn’t really all that hard. Tedious at times yes, but not hard. It also makes the world of different to a project and makes things stand out in a way that other stitching wouldn’t be able to do – that I’m aware of. If anyone does know of another stitch similar to back-stitch that can be used in cross stitch, I challenge you to show me!
Reading the pattern however, for doing back-stitch on a project – that may be another reason why I grumble about it. Because the pattern will remind me where I’ve fudged things on the project and when I go to try and follow where the back-stitch needs to be, I get annoyed at myself all over again. To help you understand why this is, the two clips below by Peacock and Fig, explain how back-stitch works in cross stitch projects:
“Backstitch tutorial for embroidery and cross stitch” by Peacock and Fig – uploaded to YouTube on 14 November 2015
“Intermediate backstitch techniques: handling long runs of backstitch” by Peacock and Fig – uploaded to YouTube on 31 October 2017
For some of the projects I’ve worked on that have had long runs or long lines of back-stitch, I’ve carried my thread from point A to point B without any stops in-between. This could cover a number of centimetres and I’ve then gone back and put some small anchors along the line to secure the thread. I’ve found this to have a bit more of a cleaner view rather than stitching the individual stitches and it saves a bit of time. You may need to help your student with starting and finishing the back-stitch to ensure the stitches stay put.
French Knots or Beads
This is something you and your student will need to have a chat about, regarding whether or not your student wants to give them a go. Personally, it’s taken me a very long time to get the hang of doing French Knots and I have used beads instead of the knots. An example of how this can look is shown below:
“Angel Bear with Candle” – design by Joan Elliott (C)2006 – stitched by Kristen Gawronski (The XStitching Runner)
The additional tip I can provide you and your learner with if either of you choose to use beads, is the smaller the bead, the fiddlier they are going to be to use in the project and you’re going to need to use a thinner needle than what was used to stitch the project. The image below shows the needle I use for beading. Unfortunately I’ve lost the packaging that the needles came in, so I’m unable to let you know the details of the brand and needle size. What I do like about these needles is that they are a little longer and thinner than the regular embroidery needle and I’m able to get a little Mill Hill Seed Bead on the end of the needle. Which helps a lot when I’m trying to pick a bead out from the packaging and adding it to the project, like the ‘Angel Bear with Candle’. I like to grow my fingernails a bit and I find it difficult to pick out just one of the little beads out of the packaging because of my nails!
Needles I use for beading. Brand and needle size unknown.
Additionally, I use one strand of cotton that’s the same colour (or as close as possible) as the bead I’m attaching to the project. My logic for doing this is to make it as seamless as possible and the centre of the bead is sometimes so small that it can only handle one or two strands at the most.
Washing your final project
Have you ever taken a project out of a stand, hoop or frame and found that your hands weren’t as clean as you thought they were – even though you thought you were diligent about washing them before working on the project? Don’t worry. Accidents happen. Even with the best of intentions!
Washing a project after it’s been finished is a personal preference for many people. If I’ve been working on light coloured fabric, I prefer to wash my projects to be absolutely sure I’ve not left any grubby marks on it. My logic behind this is I want the project to last for as long as possible. By removing any contaminates from the fabric, it puts my mind at ease knowing that I’ve done what I could to remove anything that could increase the deterioration of the fabric or threads.
It’s important to note that whenever I’ve washed my projects, I’ve hand washed them in the basin with some warm water and hand soap. Nothing fancy. I’ve rinsed the project in cool to warm water and gently wrung the project out and laid it out flat on an old, clean tea towel. I’ve usually left it overnight and then used an iron to smooth it all out. I’ll usually iron the back side of the project to ensure the iron doesn’t catch on any of the back-stitch or cause any problems with the French Knots or beads.
However, this is a personal preference and you will need to have a chat with your student about what they want to do about washing their finished project. Aside from potential marks from dirty hands or accidental spillages, another deciding factor will be what your student wants to do with the finished project. Do they want to frame it? Make a card? Turn it into a pin cushion? No decisions have to be made straight away. There are a lot of options out there regarding the way a cross stitch project can be fully finished. In the related posts section at the end of this post, is a link to an earlier post I wrote on what finishing options there are, if you or your student choose not to frame.
End of a series, but not goodbye…
It’s been fun and interesting writing this series. I hadn’t anticipated parts of it being so difficult to write – mostly the parts about doing the actual stitching! I’ve likened it to teaching someone to drive. Whilst the two activities are very different, it’s the fact that both activities are so hands on, that at times it can be easier to just jump straight in and make adjustments as you go!
Thank you for bearing with me throughout this series. I hope that you have picked up on some different things that help you and your student. I’ve certainly learnt a bit about different learning styles and going through my stash has reminded me how much I have and how much I want to stitch!
We’re now getting to the fun part of teaching someone to cross stitch! Well, fun in my opinion anyways! In this part of the series we’re going to take a look at pattern choices, starting a cross stitch project and the different ways to do cross stitch.
I’ve always loved the prospect of starting something new and seeing something new come out of a blank canvas. I love the different options available to us regarding fabric, patterns and the tools of the trade. It may be part of why it takes me a while to fully finish a project, because there are so many options out there and I want to stitch them all! But I digress…
Choosing a pattern or a kit
By now, I hope that you and your student have gotten to know each other and you know what their interests abilities are, which will enable both of you to pick out a pattern that will suit them and keep them interested long enough to finish it.
For someone who is completely new to cross stitch, it would be best for them to start with a kit, because the majority of what they need will be in the kit – i.e. fabric, threads, a needle and most importantly, the pattern. The question is…which one when there’s so much to choose from?
Patterns and kits for kids
When kids are concerned, the simplest pattern design with a few different colours is probably the best one to go with. Because it has at best, 3 to 4 different symbols on a chart they need to worry about and the simple design means that the chart should be easy enough for them to read.
Examples of simple patterns and kits for kids include the following:
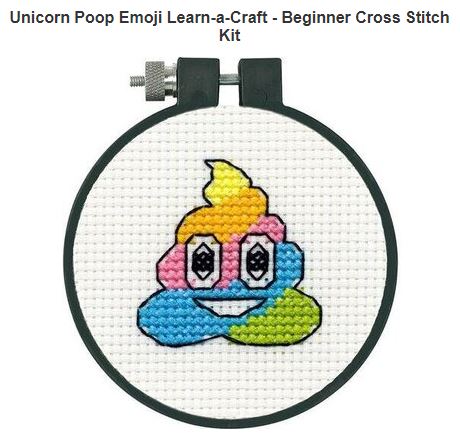
Image from the website 123Stitch.com – Designed by Dimensions
According to the 123Stitch.com website, this Unicorn Poop Emoji kit comes with everything, including 11 count Aida, the black hoop we see in the picture and all of the things needed to complete the project. This particular kit I think ticks alot of the boxes for kids these days because it’s poop! Also, in Australia at the moment, the unicorn theme has been strong and emojis seem to be here to stay, so why not embrace them?!
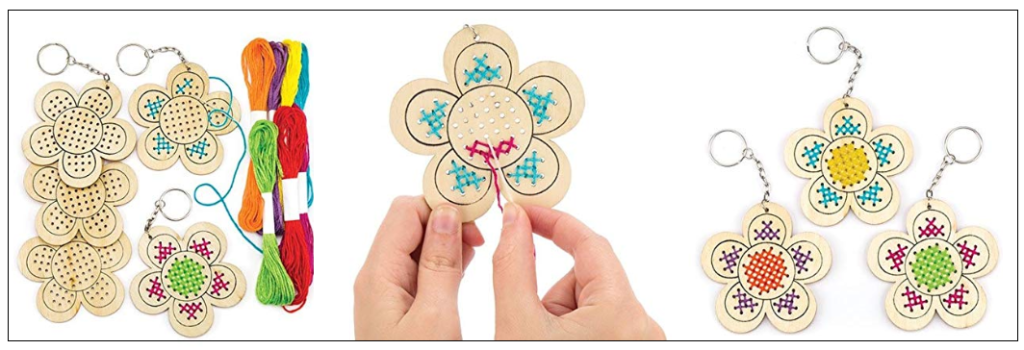
Baker Ross Wooden Flower Cross Stitch Keyring Kits for Beginners (Pack of 5) Embroidery For Kids – images from the Amazon UK site
These particular kits are from the UK Amazon site and they could be a fantastic way of introducing kids to cross stitch and embroidery. With these kits, there’s no pattern they have to follow. The holes are already drilled into the wood. All the kids need to do is decide what colours they want to use where because the kit comes with the threads and needle.
Scrolling through the Net…
Another idea is to jump onto the Net and have a scroll through some different websites that may spark some inspiration. The website OzStitch.com.au for example, has a couple of pages dedicated to kits that can be stitched by kids. Meanwhile, The Fox Collection has some pages on kids crafts and mini kits that could be of interest.
Patterns and kits for teenagers and adults
If your student is a bit older, then you have a bit more wriggle room for options in design. This is a lot to do with the complexity in the designs and your student’s potential ability to more patience and time to sit down and work on the project. It also means that your older student may be able to cope with a larger count size – e.g. 14, 16 or 18 count.
Personally, I’ve found the Country Threads patterns and kits by Fiona Jude to be absolutely awesome. The patterns are easy to read and they are comfortable size to work on. Meaning, it took me an average of three months to complete one of Country Threads patterns and that’s all the while working full time and in many circumstances, studying online part-time as well. The other thing that attracts me to the Country Threads designs is that there’s little to no backstitch and it’s a mix of full cross stitch and half stitch (aka tent stitch) and some patterns may require some French Knots.
Subversive cross stitch
This is something that may be of interest for teenagers and adults who may be more into quotes or words rather than images. The main challenges in this case, will be deciding on which font to use, how much swearing there is and which quote or word fits best with your student! Because the Internet and the stitching community has fully embraced subversive cross stitch and it doesn’t look like slowing down any time soon!
On a related note to the swearing, even if there isn’t any swearing in actual pattern, there may be a bit of swearing as the stitching commences because of the number of times that you or your student stabs themselves with the needle, the amount of un-picking that may happen and figuring out where you or they are on the pattern!
If you and you’re student still aren’t sure on what to stitch because nothing’s really jumped out at them, another idea is that your student could try designing their own pattern. All you and your student need is some graph paper and some colour pencils and some creativity and imagination to bring it to life!
A kit has been chosen…Now what?
Hemming the edges of the fabric*. Washing the fabric and threads*. Finding the middle of the fabric. Sorting or organising the threads*. Getting the rest of your supplies together. Understanding the pattern.
*These things are optional and may suit the preferences of you or your student. Personally, I’ve been really lucky with the threads I’ve used from kits and purchased individually either online or instore. When I have washed my project after completion, none of my threads have run and adversely affected the project. I have read in different forums that for some people, their threads have run and had a negative impact on their projects. Additionally, in some kits, the threads may not be as organised as you or your student need them to be.
Finding the centre of your fabric
The main times I bring out my iron and ironing board is to do something with cross stitch! When I’m finding the centre of my fabric, I prefer to iron out my fabric so that it’s as flat as possible because of the way it’s initially been folded and stored in my collection. By doing this, I know that I’ll be able to easily fold up my fabric in half and then half again, then run the iron over it while it’s folded up, so that I can cleanly see the centre.
The clip below by Stitcherista shows you what I mean…
‘Cross Stitch 101 – Finding the center of your fabric’ by Stitcherista – uploaded to Youtube on 9 October 2018
Additionally, if your student wants to use a hoop while stitching, the clip below by Spot Colours, will show them how to find the centre of their fabric and how to put it into the hoop…
‘Cross Stitch – How to Find the Center and Hoop’ by Spot Colours – Uploaded to YouTube on 22 June 2017
Hoops, Qsnaps and Frames
It’s important to note that depending on the size of the project your student is working on, that the size of the hoop, qsnap or frame will have a large impact on how well the fabric fits. For example, the smaller the size of the fabric, the smaller the tool you use to keep the tension. This may also depend on personal preference and what your student is able to use.
Personally, I have always used hoops of various sizes and I’ve recently started using a stand to hold the hoop.
Understanding the pattern
The first time your student sees the cross stitch pattern, it may look really confusing to them. Thankfully, some patterns have colours on them to make it easier to see the different areas they need to stitch with the different threads. However, if it’s a black and white pattern with a series of symbols, helping your student understand that each symbol represents a different colour in the key will be crucial. The YouTube clip below by Love Crafts shows people in a really easy and simple way how to understand and read a pattern, to enable them to start stitching:
‘How to read a cross stitch pattern for beginners’ by Love Crafts – uploaded to YouTube on 14 October 2019
Tip – Drawing the symbols from the pattern on the thread sorter
One of the things that may help – regardless of your student’s age – is to go through the key and draw the symbols on the thread sorter (if the kit came with one). I’ve found this to be really useful for some of the Dimensions kits I’ve worked on due to the way the chart and key have been written up.
Symbols I have hand drawn on the card sorter that came with a kit
Starting to stitch…
The earlier clip by Love Crafts shows people one of the ways that they can start stitching a pattern. What you will need to show your student is what they will need to do with their thread so that it doesn’t accidentally come straight through the hole of the fabric.
Floss, cotton and strands
You and your student will find that the majority of patterns and projects will require it to be stitched with two strands of cotton (aka floss). To help put things into perspective, the image below shows that the floss can be split into 6 individual threads or grouped into 3 lots of 2.
Image shows that floss can be grouped into three lots of 2 strands.
The Loop Start Method
This relates to the way the amount of strands you or your student has pulled out of the cotton and the way it has been threaded into the needle. For the loop method to be most effective, you or your student will need to pull out just one strand and then fold it in half, so that ends meet up evenly. The clip below by Mr X Stitch explains the loop method really well:
‘Start your cross stitch with the Loop Technique’ by Mr X Stitch – uploaded to YouTube on 18 July 2018
Personally, I love the loop method if I’m using two strands on a project. It makes the back of the project a lot neater and I find it to be a fantastic anchor for the first few stitches. The caveat with using this method though is that it’s only useful if I need to use two strands of floss.
Finishing off your crosses and changing colours
You may need to help your student with the first time they go to finish off their crosses in accordance with the pattern or because they’ve run out of enough thread on their needle. The aim is to fully finish the cross and then flip the project over so that you’re looking at the back of the project. Then have the needle move between the fabric and some of the crosses that have just been stitched. I’ve found this to be a very neat way of finishing the crosses and it helps to secure them. To put this into perspective, the clip below by Rainbowlune, shows us how to just this:
“How to Finish a Thread – Cross Stitch” by Rainbowlune – uploaded to YouTube on 23 February 2013
Meanwhile, changing colours is reasonably easy in cross stitch. The difficulty sometimes is deciding which colour to do next or threading the needle – depending on the size of the eye of the needle! The way that your student would start off and finish on a new colour is very much the same as they would with any other colour.
Which way to stitch – left to right, up and down, right to left, cross country or parking
If you’ve been stitching for a while, you’ll hopefully know what I mean by this heading! When you’re chatting with your student, you will be able to work with them to find out what is most comfortable for them and what the pattern allows you to do too.
Stitching left to right and right to left (aka horizontal cross stitch)
This predomenantly means that the first half of the stitches will be done left to right – just like when we’re writing something. Once we’ve reached the designated number of stitches, we then complete the crosses by stitching right to left.
Meanwhile, the stitching right to left is when you start the first half of the crosses by moving right to left and then completing the crosses by moving left to right.
To help put this into perspective, the clip below by Peacock and Fig help to put these words into motion by showing you the English and Danish methods of cross stitch (aka left to right/right to left or one cross at a time):
“Cross Stitch Techniques: English method and Danish method of cross stitch” by Peacock and Fig – posted to YouTube on 4 April 2017
Stitching up and down (aka vertical cross stitch)
This way of stitching may depend a little bit on the pattern your student may be working on. Personally, I’ve found it easiest to stitch the full cross before I move above or below the first cross. To help explain what I’m talking about, check out the clip below:
“Full Cross Stitch Vertical” by MonkeySee.com – posted on YouTube on 8 August 2008
Cross Country and Parking
The good thing with cross country cross stitch is that we don’t need to leave our chairs to do this. The main exertion with this method is keeping track of where you are on the pattern!
The aim of cross country cross stitch is to stitch as much as possible of the pattern with the one colour and where possible, using the same strand without the stopping and starting. This can make the picture look a bit pixelated or scattered. Below is an image on how cross country stitching looks on a project:
Example of cross country stitching
Meanwhile, the parking method means that your student may prefer to read the pattern line by line, like they are reading a book, and stitch each symbol on that line. This will mean a lot of threading the needle with different colours as the pattern requires it. The benefit of using the parking method is that the thread will be ready when your student next reaches the corresponding symbol on the pattern.
To help put this into perspective, the clip below will show you and your student what cross country stitching and parking looks like on a project and which methods may be most effective on which projects.
“Cross Country vs Blocks with Parking” by Pam’s Crafty Corner – uploaded to YouTube on 18 January 2017
Deep breath… you’ve finished your project, now what?
This post was surprisingly challenging to put together, which is something I had never expected! I think a lot of it has to do with cross stitch being so much of a hands-on activity, that to just write about how to do cross stitch doesn’t do the activity justice! Which is why I think that there are so many more videos out there on how to cross stitch than there are written posts.
My next post in this series will hopefully be a little shorter. In the next post of this series we’ll be looking at the finishing touches of your student’s project, which may include back-stitching, the inclusion of some beads or special stitches. There may also be questions about whether it’s worth washing the project before your student then completely finishes it.
Thank you for sticking with me during this post and the series so far!
Cross Stitch Tips – Choosing a Pattern – blog post by Julie – posted on the website Julie’s X Stitch Cross Stitch and Supplies – Date released online not known
Following last week’s post on learning styles and learning disabilities, this week we’ll be taking a closer look at some of the different tools of the trade that may assist people with different abilities.
While you’re getting to know your student and you’re both trying to figure out what works and what doesn’t, it’s really important to check with your student regarding any health ailments they may have or restrictions they have on their movement or if they are left handed or right handed. This is regardless of whether your student has any obvious or hidden disabilities, because you don’t want to aggravate any existing injuries or ailments such as Carpal Tunnel Syndrome, arthritis or any skeletal or muscular injuries or defects. Alternatively, you or your student may have experienced or suffered from a medical trauma such as a stroke, diabetes or epilepsy. This conversation may be awkward or uncomfortable to have with your student, but it’s an important one to have because it will help you and your student set achievable goals during the sessions you have, such as the length of time spent stitching. It will also help both of you to figure out what tools of the trade will help .
Tools of the trade
Scissors, needles, fabric, threads, really good light and a pattern are the basics of what we all need. Personal preferences and our comfort and abilities kick in when we start looking at:
Hoops
Q-snaps
Stands
No hoops or Q-snaps
Fabric colour and count size
Needle size
Needle Minders
Brand of thread (e.g. DMC, Anchor, silks)
Where our lighting comes from (e.g. natural sunlight, LED over-the-top lighting, regular light bulbs)
Needle threaders
Type of scissors
Magnifiers or glasses with lights attached to them
Unpickers
Thimbles
Janet M Perry for example, wrote a post titled ‘Stitching Aids for Stitchers with Strokes‘ on 16 April 2016. Janet writes from experience because in her post, she states that she has MS (Multiple Sclerosis) and for 5 years she had been misdiagnosed as having had a stroke, until she had her second attack. She also acknowledges that in one of her classes, she had been asked about some of the aids available for people who have had a stroke which formed the basis of her post.
Automatic Needle Threaders
One of the things Janet talked about in her post, was an automatic needle threader that is made by a company called Clover. I never realised or thought of such a tool existing! But it makes sense and I’m really happy that this tool is out on the market because there’s a pretty strong chance that I might need it one day or someone I teach may need it.
Automatic Needle Threader made by the company Clover – image and description found on the Amazon website as of 2 December 2019
Scissors
When we’re talking about craft related scissors we have a really nice variety to choose from to cater for people who may left handed or right handed and various strength levels and mobility in either hand. Many of the smaller craft scissors on the market now (we can use for cutting our threads) have been designed for left or right handed people.
One of the things that Janet suggests in her post, is the use of shears for people who may have difficulties with using regular scissors.
Hoops, Q-Snaps and Stands
As crafters, I feel like we can be spoilt for choice. We can choose to use hoops, q-snaps, stands or nothing at all to help keep the tension in our fabric. Additionally, if we choose to use a stand or frame, it can take the weight off our hands while stitching.
Images of various hoops and stands from a Google Image search – as of 8 December 2019
Depending on the ability of your student and their preferences, a frame or hoop may make it easier for them to learn how to cross stitch and potentially for longer periods of time.
Personally, I use the Stitch Smart Stand that you can see in the top left corner of the above image. My stand doesn’t have the magnifier or pattern holder attached to it, but I have the option to add them if I want and can use a variety of sized hoops with it. To access the back of the project to finish off a thread or commence stitching with a new thread, all I need to do is turn the hoop to the left or right and I can see what’s happening. Using this stand takes the weight off my left hand (that I use to hold the project) and I can just use my right hand for the needle and thread. I still use my left hand to lightly hold the project and give the project the extra bit of support.
Additionally, regardless of whether I’m using the stand or not, I definitely use a hoop for all of my projects. I find that the tension for the project is a lot better than when I’m stitching without one. I have stitched one project without a hoop and I felt naked without it!
Magnifiers, lights or glasses
When you can clearly see what you’re doing, it can make the task you’re doing so much easier and hopefully a lot more enjoyable! When it comes to embroidery glasses and magnifiers, there are a number of options on the market which include:
the 5 Lens Loupe LED Light Headband Magnifier Glass LED Magnifying Glasses that can be worn like regular glasses and they have a light embedded in the bridge of the glasses and enables you to light up your work. The 5 lenses means that you’re able to adjust the strength of the lenses to suit your eye sight.
Giant Large Hands Free Magnifying Glass with light LED which is a rectangle magnifier on a stand that you can use if you’re sitting at a table or on the couch and your work can go under the magnifier. Alternatively, (based upon the images on the internet) the magnifier can hang from your neck.
If you choose to use a stand to hold your work, some models enable you to have magnifiers and lights attached to them.
Magnifiers that lay over the top of the paper pattern (if you choose to have a paper version or copy) to help you clearly see the symbols and see where you’re up to.
Gloves or wrist supports
Cross stitching for extended periods of time (e.g. hours at a time) and over the course of many years, many of us may become susceptible to ailments such as RSI (repetitive strain /stress injury) and arthritis. Internet searches have shown that there are numerous types of compression finger-less gloves available to provide support to provide support to hands and wrists.
Project Bags
Your student is going to need to put their project somewhere when there not working on it, and be able to easily pick it up and go if you’re meeting somewhere to do a stitch ‘n’ bitch session! The bag can be anything that makes it easy for them to store their stash, ranging from a backpack with many pockets through to a calico bag that may have been used to purchase their new crafty items.
However, if they want something really special, an internet search on project bags for cross stitch will bring up an enormous amount of options such as:
A very tiny sample of cross stitch project bags available on Etsy by various talented people – image taken on 8 December 2019
Alternatively, you and your student may want to try your hand at making a project bag yourself and thankfully, there are many videos on YouTube that can help you with that!
Make your won project bag by Making Life Count – Posted on 2 January 2017
Storage Options
Thankfully there are a lot of different options when it comes to the way we can store our collections – especially depending on whether the projects are actively being worked on or not. The way in which your student chooses to store and manage their floss (aka, cotton, silks or skeins) can make it easier or harder for them to know which colours they need for different parts of the pattern. Additionally, depending on their preference, it may make it easier for them to ensure their strands don’t get tangled. For example, will it be easier for them to be put onto bobbins, remain as they are, be stored in boxes and tins or hanging from hoops?
How to organise embroidery floss and wind on floss to bobbins – YouTube clip by Peacock and Fig – uploaded on 25 October 2015
Technology or paper
Similar to the lighting and magnifying of patterns and projects, your student may have a preference for seeing the pattern on an IT device or on paper and how they mark off the areas they’ve stitched will be impacted by the IT device or paper.
There are a number of apps available to enable people to view and use patterns on their IT devices. I’ve not used any of them before, so the information listed below is based upon searches from the internet:
GoodReader – available on Apple only
ezPDF reader – available for Android and Apple
How to use the GoodReader app for cross stitch (on ipad) – by Carolyn Mazzeo – uploaded to YouTube on 3 January 2015
EzPDF Cross Stitch how to highlight and remove highlight by Leeleered – uploaded to Youtube on 16 September 2018
My Favourite Cross Stitch and Diamond Painting Apps and why they’re useful by Crafty Lisa – uploaded to Youtube on 21 September 2018
Alternatively, your student may prefer the feel of pencil and paper, photocopying and enlarging the pattern can make life a lot easier if the symbols are quite small or there are a lot of them on the one page.
It’s important to note that there will be limitations around the number of copies you can make – especially for paper based patterns. Additionally, not all patterns are available digitally. Which means that some extra steps will need to be taken to digitise the patterns to enable them to work with whichever app you or your student chooses to use (if using an IT device).
Parting note…
If you’re teaching someone who has never done any form of sewing or embroidery, it may be worth taking a trip to your local craft store so that your student can get a feel for what is right for them.
Meanwhile, next time in Part 4 of this series, we’ll take a look at pattern choices, starting a cross stitch project and the different ways to do cross stitch.
Until next time, happy stitching!
Related Links
Easy Grip Scissors by Educational Experience – website viewed on 2 December 2019